I was a new bride, standing in our ample, hallway entry, scrutinizing ingredient labels. The church had generously blessed us with an overload of groceries. The hallway served for storage, until I could find homes for everything in the tiny kitchen. The new wife I was, I still remember crying about the overwhelm of realizing I was now soley responsible for cooking, figuring out meals and getting groceries. New responsibility typically brings with it a measure of fear for me. The realization hit me full force that it was up to me what our diets would look like. The health of my husband and later on, our children, depended alot on me and what style of cooking I chose.
We were given The Derstines Favorite Recipes cookbook as a wedding gift. In the back, it has a section on health, detox, and herbal recipes. They also shared of losing a neice to breast cancer, and the importance of detoxing, lymph flow, removing perfumes and parabens from our body products. This ignited the flame in me. With having cancer in my history, combined with new responsibilities, this is where my desire for healthy living was born. I scrutinized that honeymoon bodywash with the lavender color- this had parabens? The Shania Twain lotion in the hot pink tube that my friend and I raved over, this had harmful things that could cause cancer?! And what were all these unpronouncable, extensive words on food labels? I didn’t know much but quickly learned to scan ingredient labels and what words meant “bad stuff.”
Before I was married I drank Dr. pepper, ate raspberry zingers and gave no thought to the hideous amount of red dye and HFCS. Nourishing to flourish is a process, not an overnight change. Now days, I have zero desire for greasy burgers and fries. If you feed your body junk it will crave junk. If you feed your body whole foods, you will eventually gravitate towards that above processed foods.
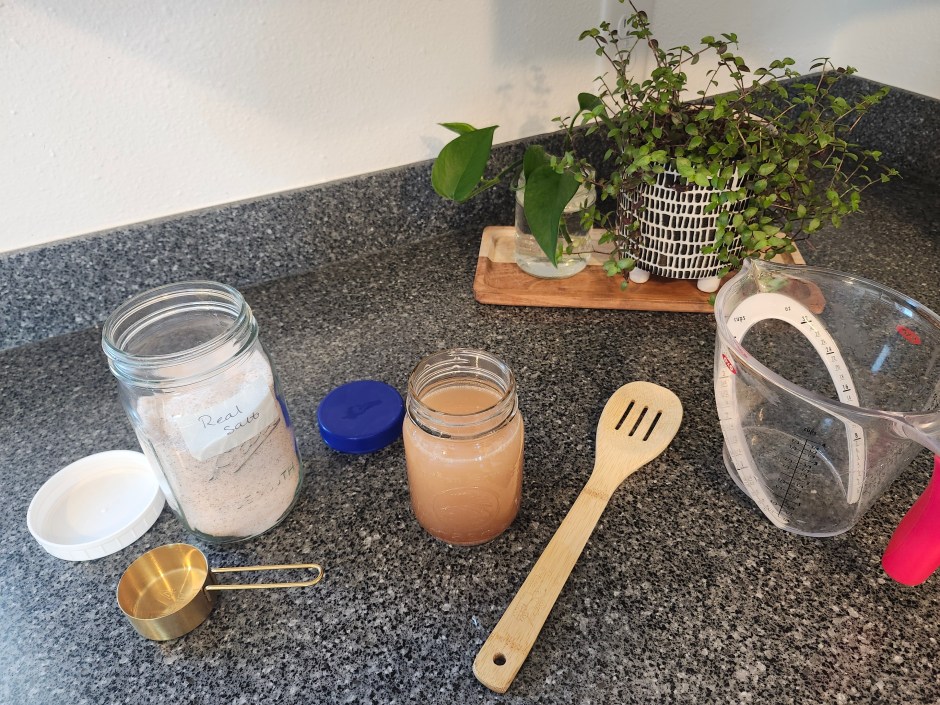
The first swaps in food choices I made was, sea salt instead of Morton table salt. Also swapping baking soda from the orange box stuff to Bob’s Red Mill brand which was aluminum free. I also used that brand baking powder. I poured these in pint jars with labels. Tiny steps but changes nonetheless.
Although cooking is not my first love, fifteen years later, menu planning, groceries and cooking has become second nature. I love sitting down Monday morning to plan the week’s menus, utilizing what foods need used up and jotting down any needed groceries. I’ve also learned the joy of keeping my freezer stocked with prepared foods for hectic days or unexpected hosting.
It’s much harder to eat healthy when your away from home or traveling. A good guide to keep in mind is the 80/20 rule. If you eat real, whole foods/good proteins 80% of the time, the other 20% of eating less than ideal, won’t take your health down as rapidly. Do your best, take small steps at a time, but don’t stress perfection. On the other side, don’t take the, I can never get it right, so who cares, approach either. Small steps are better than none!
And please don’t think we’re perfection at this house. We are far from it! I feel I’ve slacked over the years, with the children getting older and enjoying their liberties, splurging at parties or away from home. Honest confession. I’ve even gone so far as to buy treats like hot dogs and egg rolls when Dad was gone, to make it special. Now you know I’m not completely crunchy!
A great way to start eating cleaner is to eat very basic. Use fresh, whole foods instead of processed. Peel carrots and bake those along with potatoes and a simple meat, instead of casseroles full of creamed soups and velveeta cheese. Grill chicken, bake rice and dice up a fresh salad instead of mac and cheese, boughten pizza, or processed meats like chicken nuggets and hot dogs.
I’m thrilled to see the changes in cleaner options available these days than there was twenty years ago. America is slow to learn. I’m going to share the healthier swaps I’ve made in our food department. It’s not in any order of importance neither is it all inclusive. Many of you are making healthier choices and I applaud you for that! In that regard, this may be old news for you. I’ve had this post in mind for awhile, and if it appears I’m behind times, you’re probably right.
HEALTHIER SWAPS:
White refined sugar: organic raw cane sugar. You can also use much less than a recipe calls for, often half the amount is enough.
Brown sugar: sucunat or coconut sugar
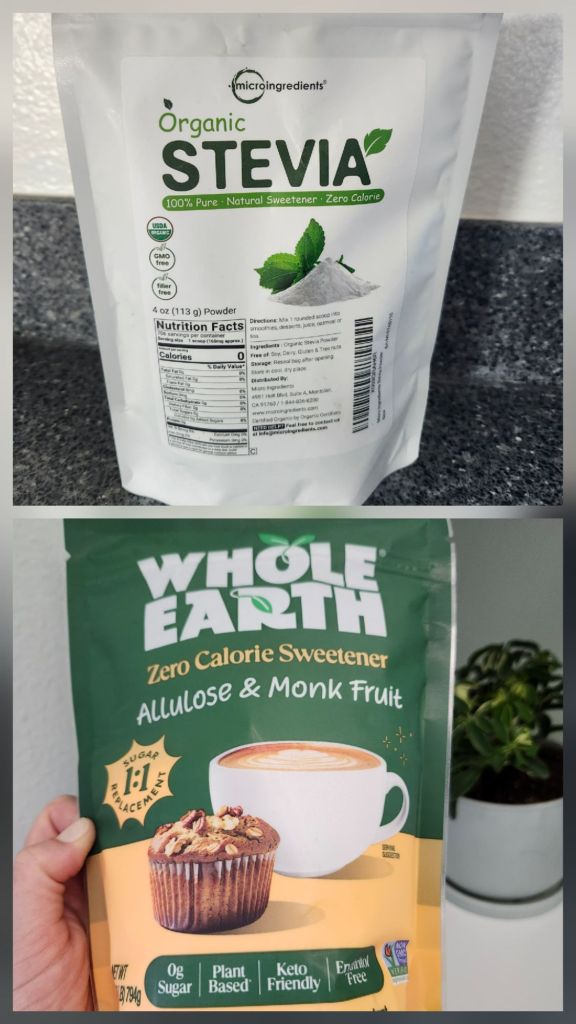
Raw local honey and maple syrup are good options. Store bought honey often has HFCS as filler. I’m learning about Allulose and monk fruit which I believe are both good, but don’t have much experience yet. This package below I found at Costco. Sugar alcohols are debatable. I rarely use them anymore. I still use liquid stevia glycerite and stevia powder for certain foods and drinks. Currently I’m using this organic microingredients stevia powder.
Flour: Organic flour is better but grinding your own and using freshly milled flour is much better. Crushed wheat is also a healthier option but here again, I don’t have experience with it. We use organic fresh milled or a gluten free flour mix. You can make your own with the recipe in this post.

Instead of Seed Oils such as canola, corn and soybean: use avocado, olive and coconut oil. I use refined coconut oil as a replacement for crisco/shortening. Butter and lard are good options as well. I use Chosen avocodo oil and Terra Delyssa olive oil.

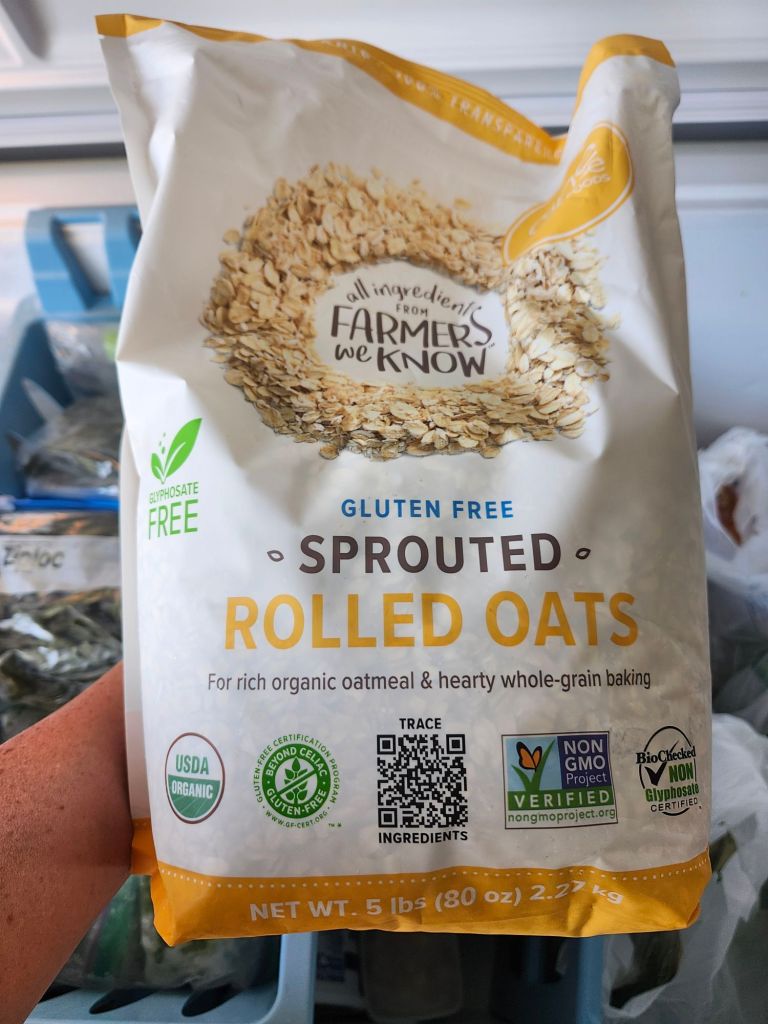
Oats: Oats are high in glyphosate, so buying organic ensures against that. I was pleased to find these sprouted oats at Costco.
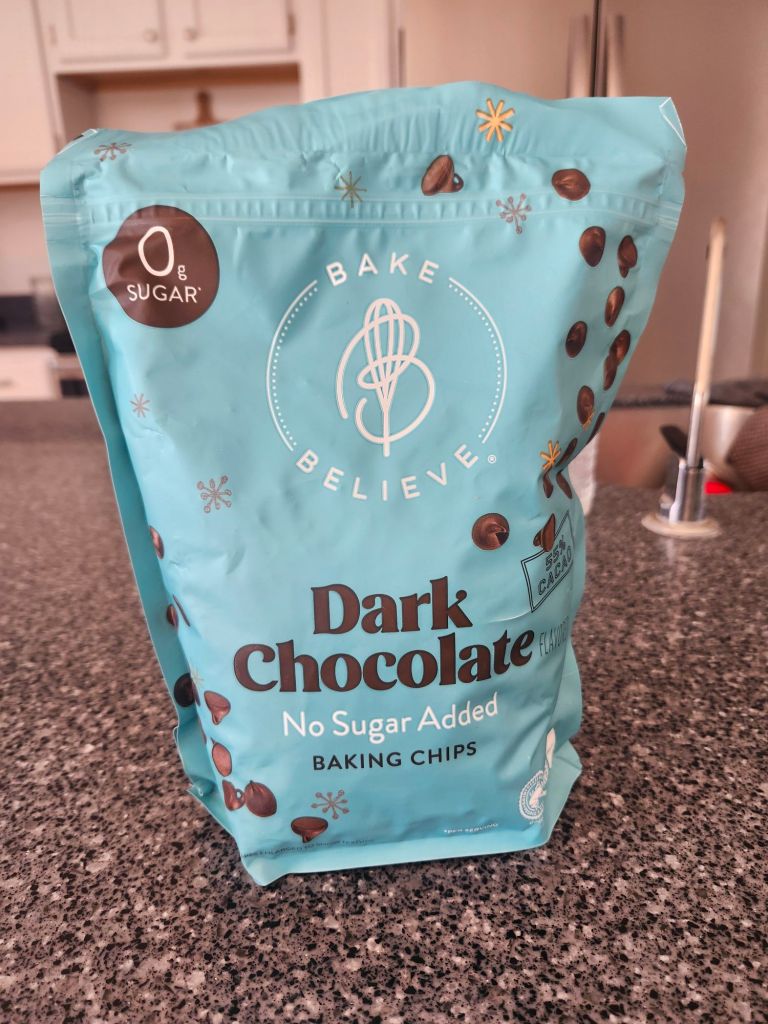
Chocolate chips: Enjoy Life is a good brand with only a couple ingredients. Lily’s is a sugar free option but I personally don’t use, partially because of the price. Walmart carries this Bake Believe brand, but I was pleased to find this large bag at Costco.
Cereal: I keep homemade granola on hand but otherwise, not too much. Most cereal is full of sugar with little nutrients. I like to keep rice krispies on hand for use in baking and cheerios for toddler snacks. Here’s better options that I started using. Organic Morning O’s, Nature’s Path Crispy Rice and Three Wishes. Seven Sundays is a good brand too. Three Wishes cereal is made with chickpeas and very few ingredients.

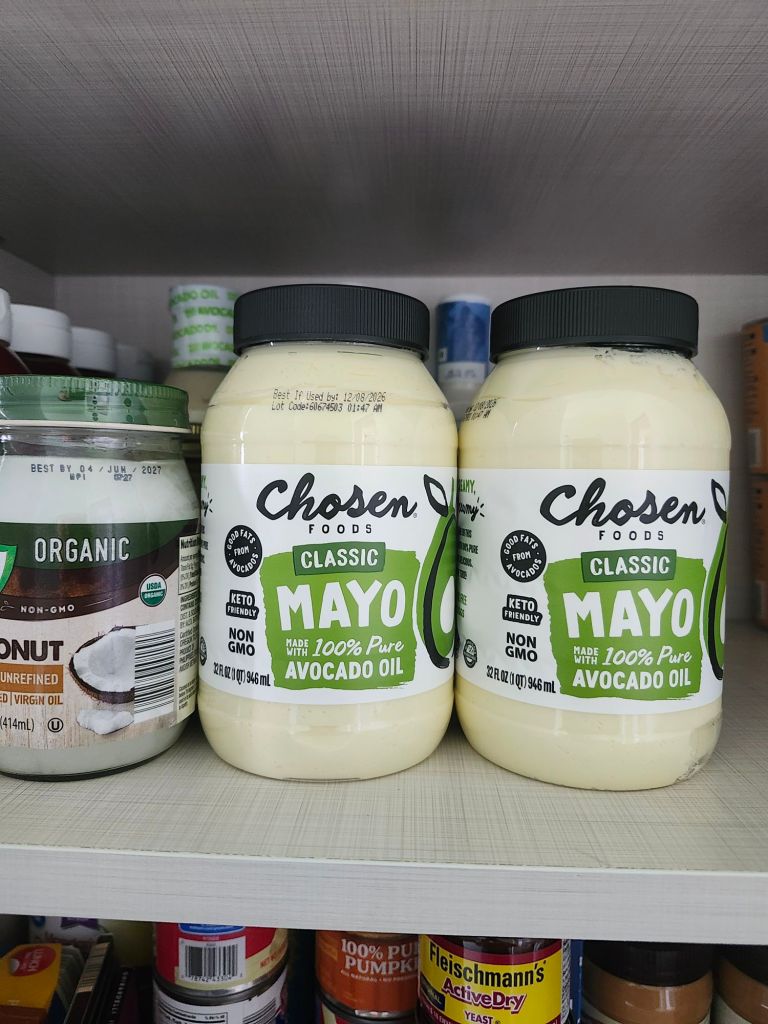
Mayonnaise: Most mayonnaise is full of soybean oil! It might boast ‘made with cage free eggs’ or ‘made with olive oil’. But look closely. Even if its made with olive oil, its usually only partly! And what’s great about cage free eggs if it’s full of seed oil?! I love the Chosen avocodo oil mayonnaise or you can make your own. At times I have trouble with it not wanting to emulsify properly. I could never figure out why. Now I try to drizzle the oil in very slowly instead of having everything in the jar and then blending. But I’ve given in to the convenience of having mayonnaise in my pantry. I’ve found Costco carries it for the best price.
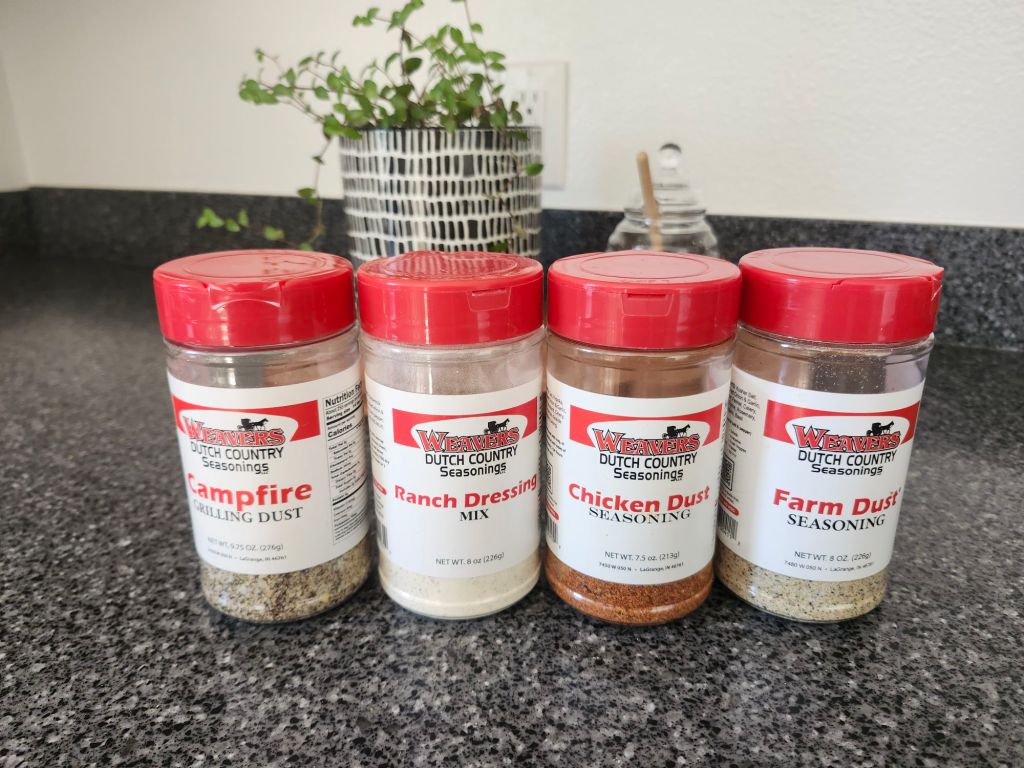
Ranch and other salad dressings: make your own, because they’re best friends with soybean/canola oil. Their next besties are MSG and preservatives. We buy Weaver’s Dutch Country Ranch dressing powder instead of Hidden Valley Ranch powder. Mix it with sourcream, nutritional yeast, garlic powder and salt for your own dip or add milk and mayo to make your own Ranch dressing. We use alot of Weaver’s Seasonings! We’ve switched from using Italian dressing to marinate meat, to simply using Weavers Grilling Dust for marinating. It’s delicious! When you buy store bought seasonings, it usually won’t have the good kind of salt in it, so keep that in mind. Weaver’s uses mostly Himalayan or sea salt.
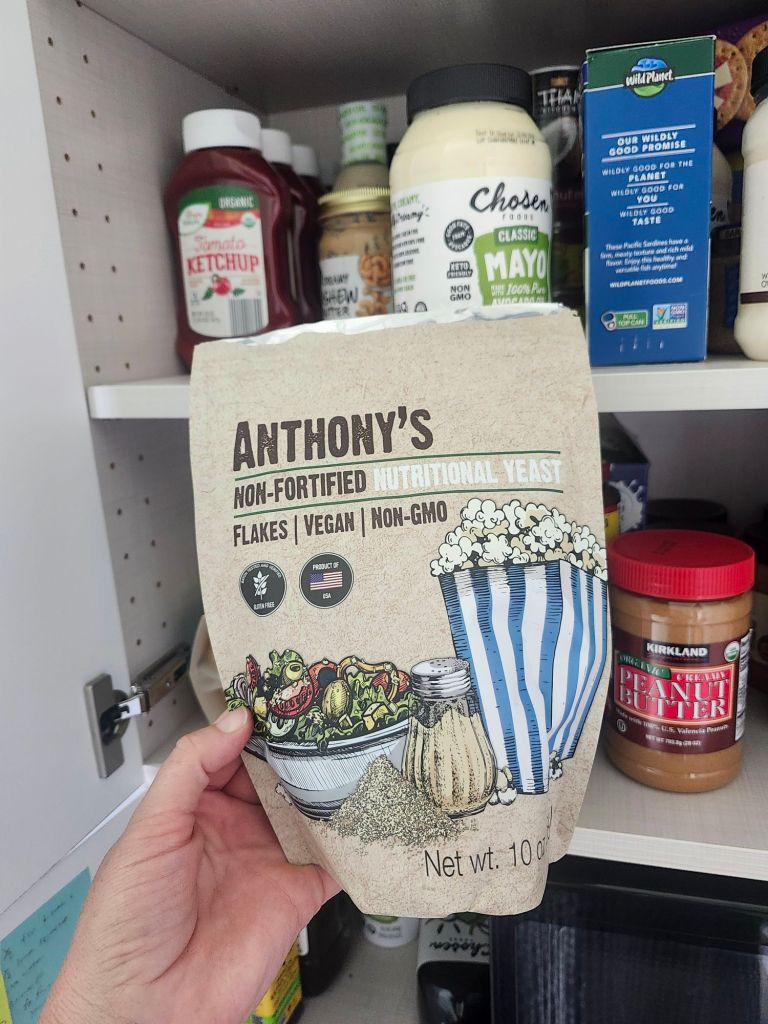
Along with seasonings, I’ve used Nutritional yeast for years. We love it on popcorn and avocado toast. I also like it on eggs. But recently learned of nonfortified brands which are a better option. Besides Anthony’s pictured here, a couple more good options are Sari, Foods Alive and THM.
I’ve made my own taco seasoning for years now. You can find the recipe here. McCormick is a clean option if you prefer buying yours.
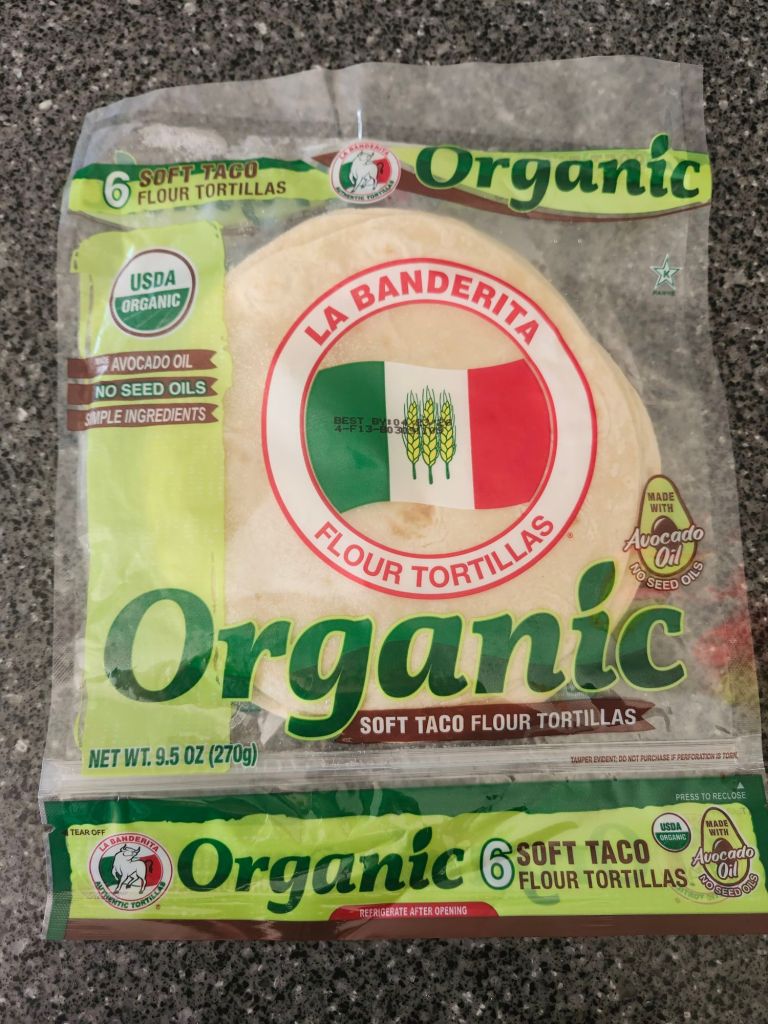
Tortillas: Making your own is great! I never feel I have time for the effort involved, plus have no tortilla press. I was beyond thrilled to find these organic ones at Walmart a couple months ago!
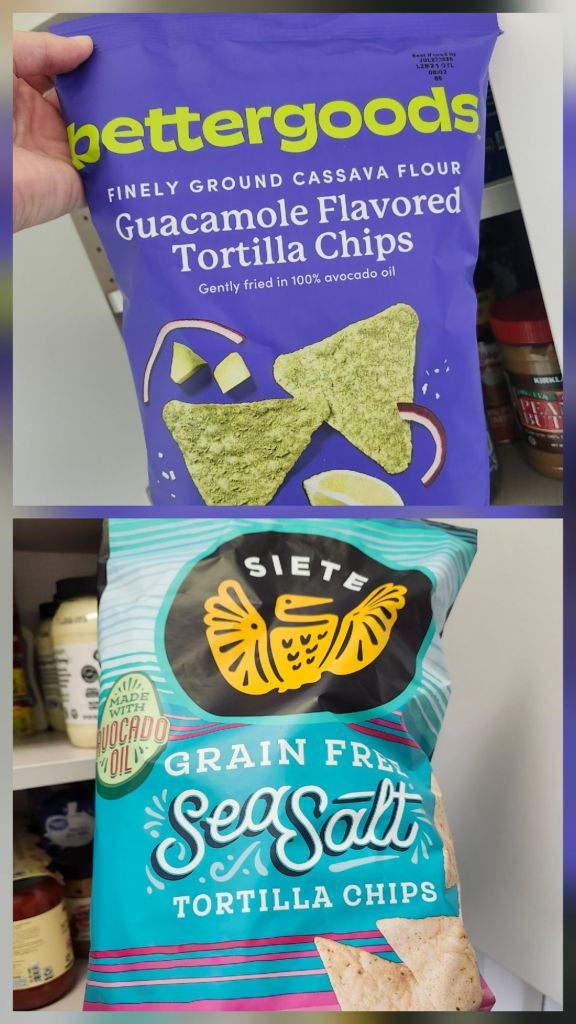
Chips: We try to eat chips sparingly and find healthier options. This is a harder one to find without seed oils. We like Bettergoods brand guacamole flavored chips fried with avocado oil. The grain free tortilla chips are made with very clean ingredients. Costco carries a variety of chips made with avocado oil as well as Thrive Market. Learn to read labels. Just because it looks healthy or says all natural doesn’t mean it always is. Simply Nature has organic chips that are made with sunflower oil, which is still a seed oil.
Yogurt: Oikos triple zero is a great brand with zero sugar, zero artificial favors, zero fat and great protein. Chobani and Better Goods are better quality, though still have sugar. Homemade of course is great, especially when made with raw milk.
Milk: of course raw milk is best if you have access to it. But if you buy it like we do currently, we buy organic or A2A2. Costco carries both options.
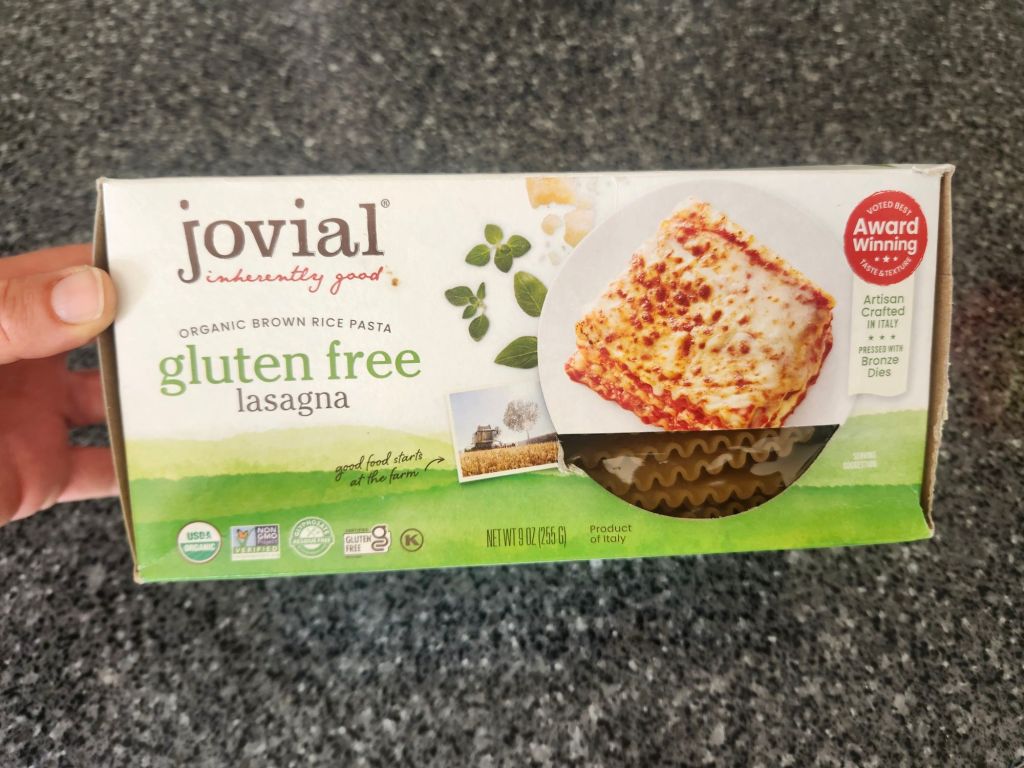
Pastas, jellos and instant puddings: these are things I rarely make. But I’ve learned of better brands for when I do use them. Jovial is a gluten free brand of pasta that’s made from brown rice. (I don’t cook brown rice anymore, but for an occasional use like pasta I’ll use it). Banza is also gluten free and made with chick peas. I prefer using gluten free products other than those made with corn.
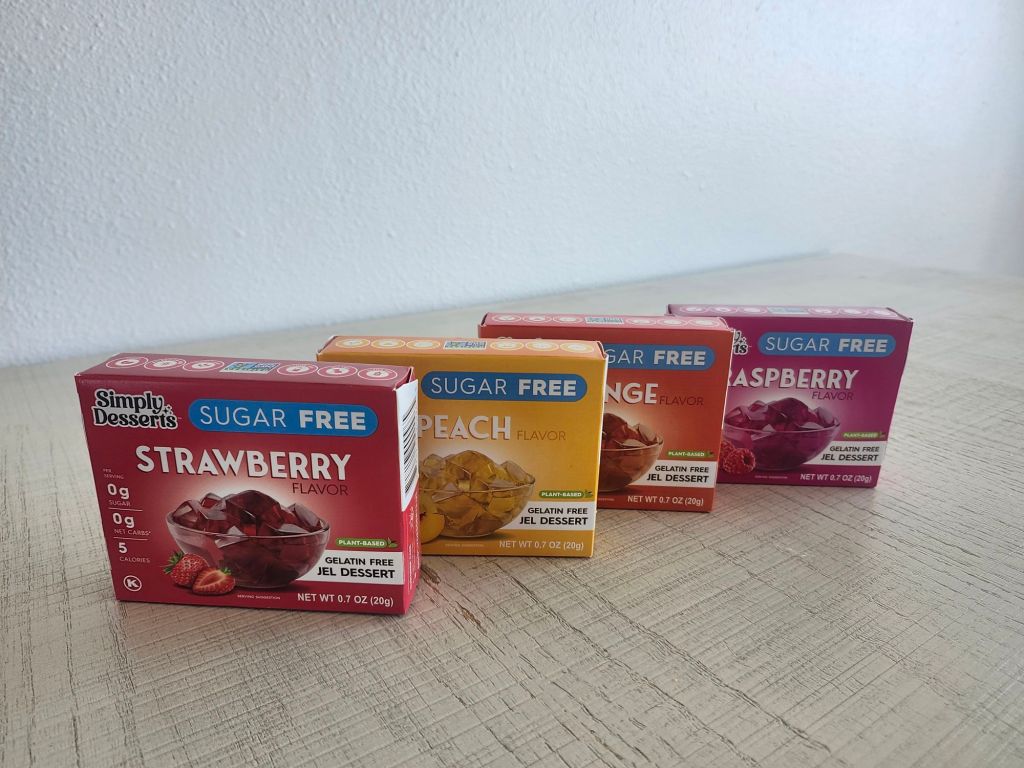
Simply Desserts is a brand of jello and pudding that is sweetened with eyrthrityol and has no food dyes. We so rarely have jellos/pie fillings that I don’t mind using this brand, even though it has eyrthrityol. It’s still better than the typical brands with loads of sugar and food coloring! And in all honesty, occasionally I use ordinary jello for a special dessert or something like Christmas cranberry salad.
Rice: The way basmati and jasmine rice are raised, doesn’t expose them to as much cadmium and toxins as regular rice. I buy either of those, organic in the Simply Nature brand. I don’t use brown rice anymore, because of the higher arsenic content, which is a carcinogen. I rinse my rice well, soak it a couple hours, then rinse again before cooking. This helps remove excess starch. Cooking your rice with broth instead of water amps up the nutritional value as well as the taste! I have plenty of broth on hand since we raise our own chickens and almost never cook rice with plain water anymore.
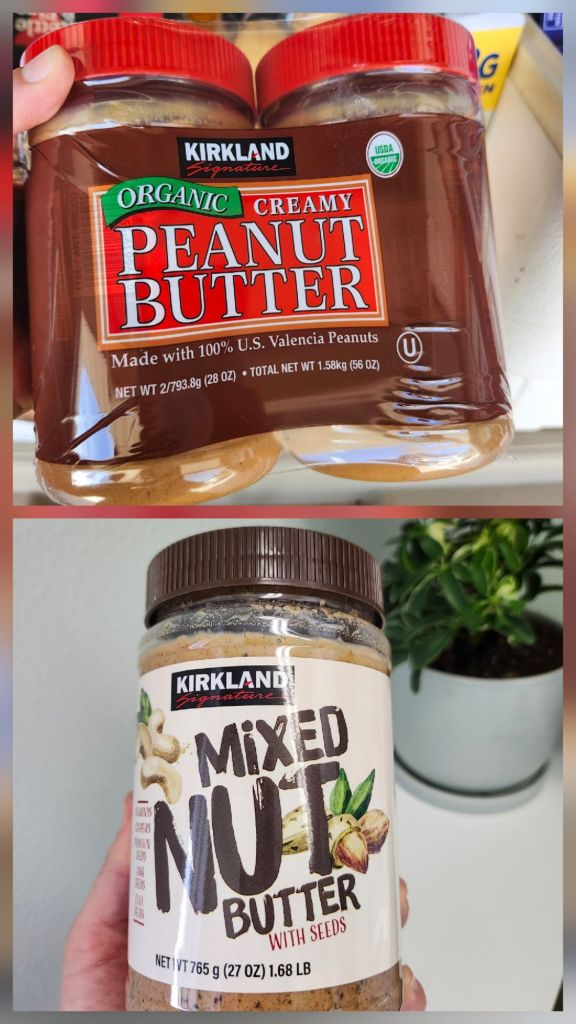
Peanut Butter: Peanuts and salt should be the only ingredients in your peanut butter jar. Peanuts are high in aflatoxins (a particular mold that’s been linked to cancer and other damaging health issues). There’s other foods with aflatoxins too, but peanuts are highest.) Any wonder many people have peanut allergies?! Peanut butter can go rancid quickly, even when stored in the refrigerator. Some years ago I learned Valencia peanuts are a better option, because they’re grown in a dryer climate, thus less susceptible to mold/ aflatoxins. Recently I discovered Costco carries organic Valencia peanut butter. You better believe it I was thrilled! A two pack like this was $9.99. Can’t complain on the price either. I still don’t use loads of peanut butter for myself personally. There’s heaps better protein options available without aflatoxins. The mixed nut butter is a good option if you want to avoid peanut butter.
Coffee: I’m no coffee drinker so I’m not telling you what to buy on that, but you could drink bone broth for a healthier alternative! Hah, as though I’d change anyone. (I’m quite aware coffee lovers are opinionated about their coffee and I won’t change them!) At the very least, drink your coffee with a protein filled breakfast instead of on an empty stomach. Or then stir collagen or protein powder into your coffee to give a bit of protein. Straight coffee on an empty stomach isn’t good for women’s hormones in particular. Don’t pounce on me. I didn’t come up with that tidbit.
Nonetheless, a few good brands of bone broth protein powders are: Ancient Nutrition, Designs for Health and Paleovalley. I love using these for a quick, protein breakfast. Plus they’re beneficial for your gut! I use Designs for Health unflavored version as well as Ancient Nutrition chocolate. With the unflavored, it’s handy to add in any flavors of choice. You can also add it to granola bars or protein balls.
I don’t recommend whey protein because of the liklihood of MSG and other junk in alot of powders. However, Just Ingredients is a very clean brand with whey protein from a good source.
Pop: We very rarely buy pop. Ollipop is something we enjoy occasionally. It has low sugar, clean ingredients with prebiotics, yet carbonated and tasty.
Where to shop:
For years, our grocery shopping was done between Walmart and Aldi. But we’ve gotten started with Costco in the last month and have decided to switch over to that. They have oodles of great options for cleaner foods, plus good prices. The perk of buying in bulk is super nice for staying stocked! They have a yearly membership fee but its quite minimal for the benefits they have. Azurea Standard has tons of good options as well. I never got onto it much because of the hassle of pick-up. I used Thrive Market for a few years. Shipping to your door is awesome, but it comes with a yearly membership fee, that felt a bit much for not more than we used it. It might be a great fit for you though. They have good options. If your looking for an in-store option, Whole Foods will likely carry many of these items.
We don’t have any bent & dent or health food stores nearby, so its easiest to order some things from Amazon. Like the jello I mentioned, nutritional yeast, stevia, certain cereals, bone broth protein and more.
In case it feels overwhelming to make changes, start with one change at a time. I would recommend avoiding seed oils. When you have better options figured out on that, remove high fructose corn syrup. Next be vigilant about removing food dyes and so on. As you learn to read ingredient labels, you will learn better options available. It will become easier, I promise. And kudos to you if you’ve gotten your health food department all figured out! ❤️ I’m still learning too.