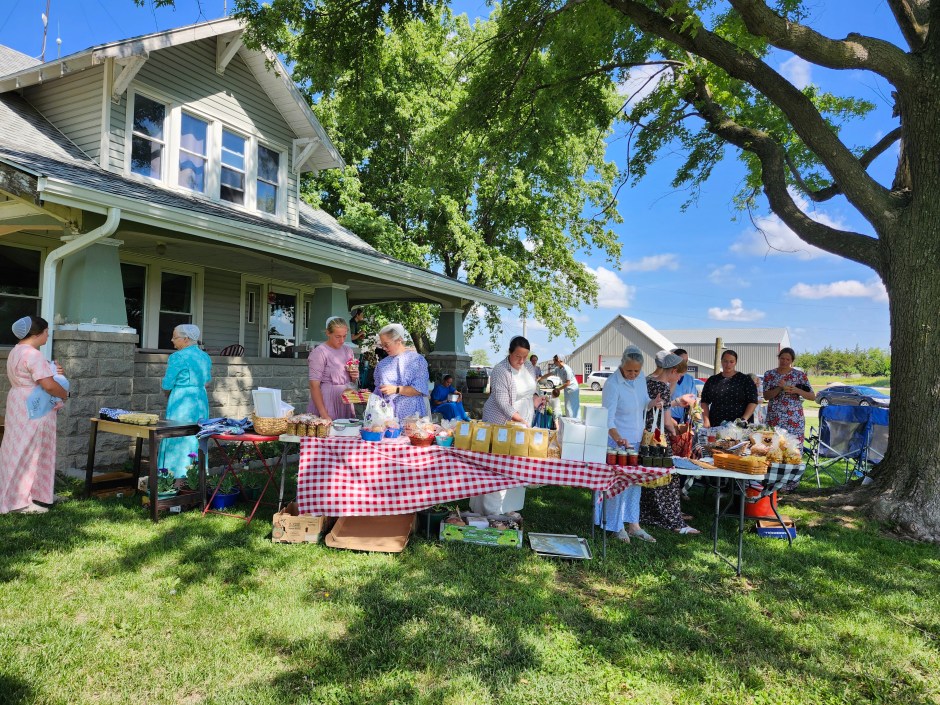
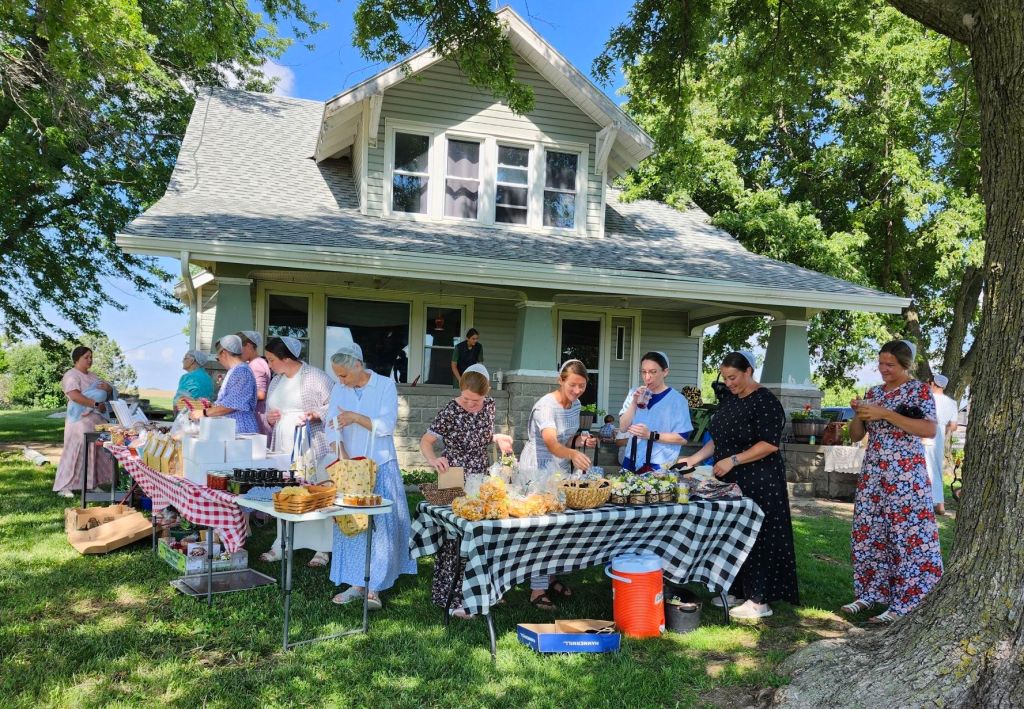
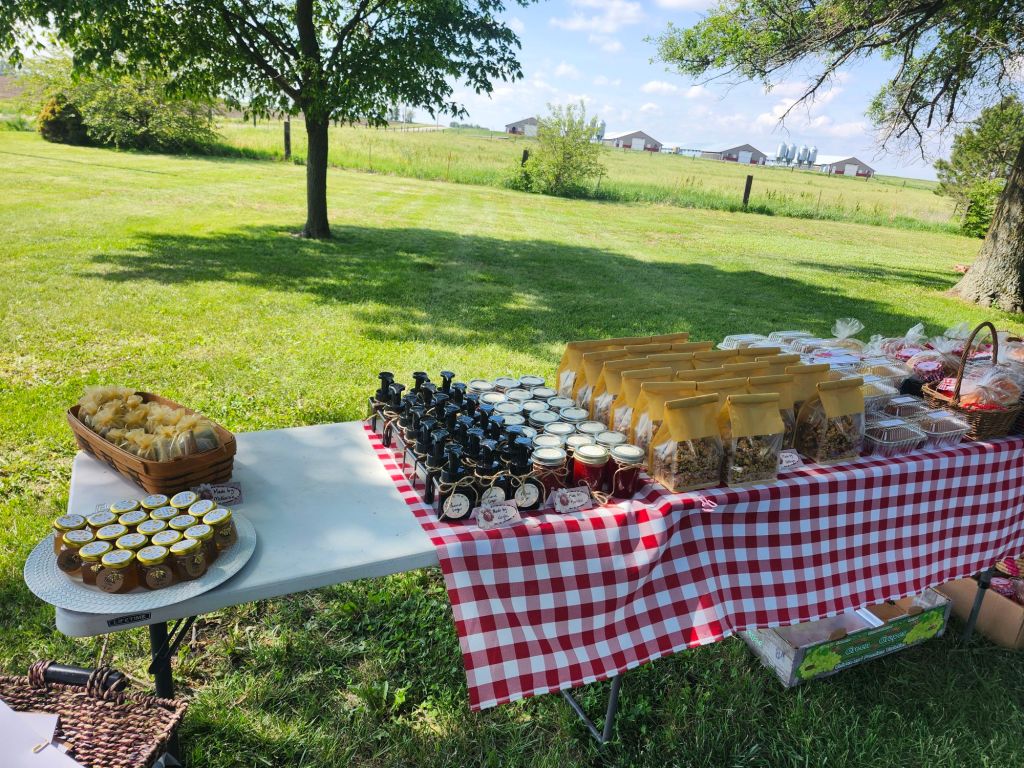
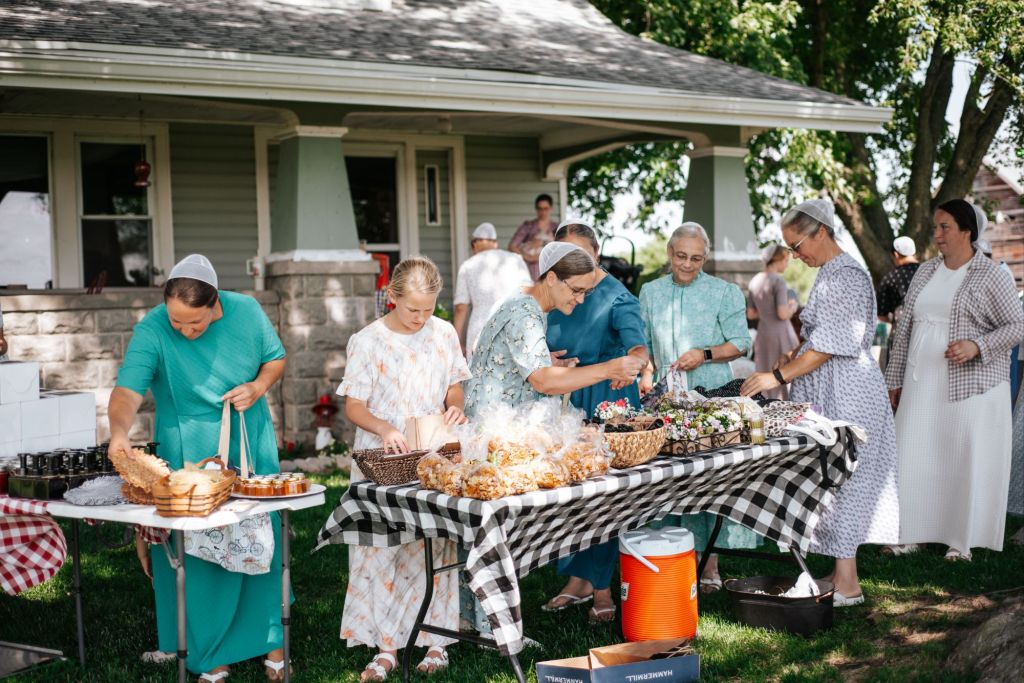
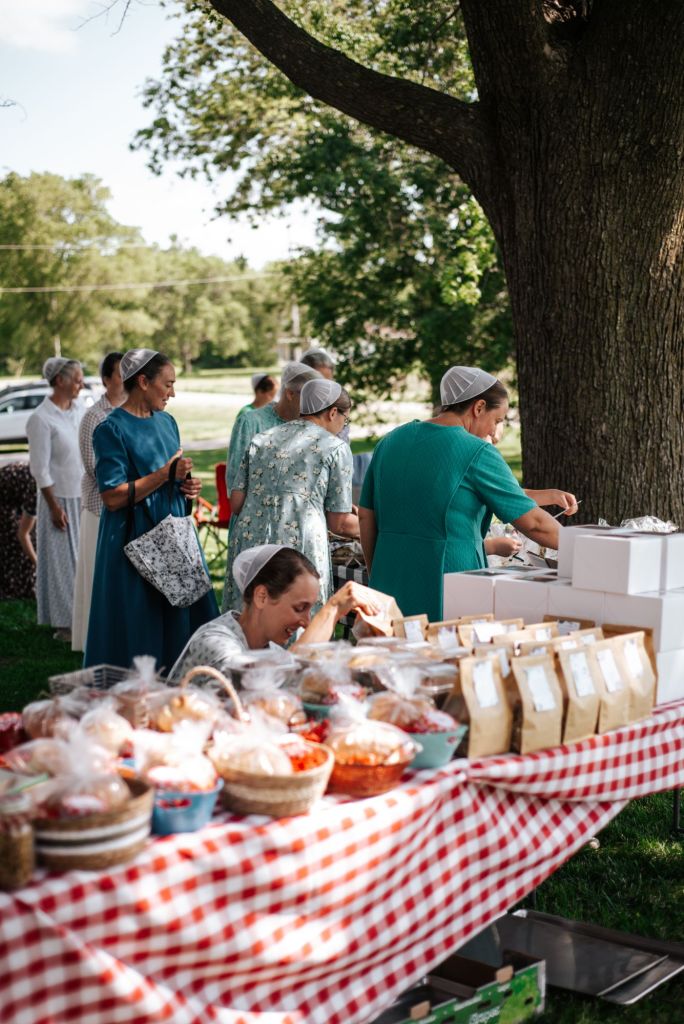
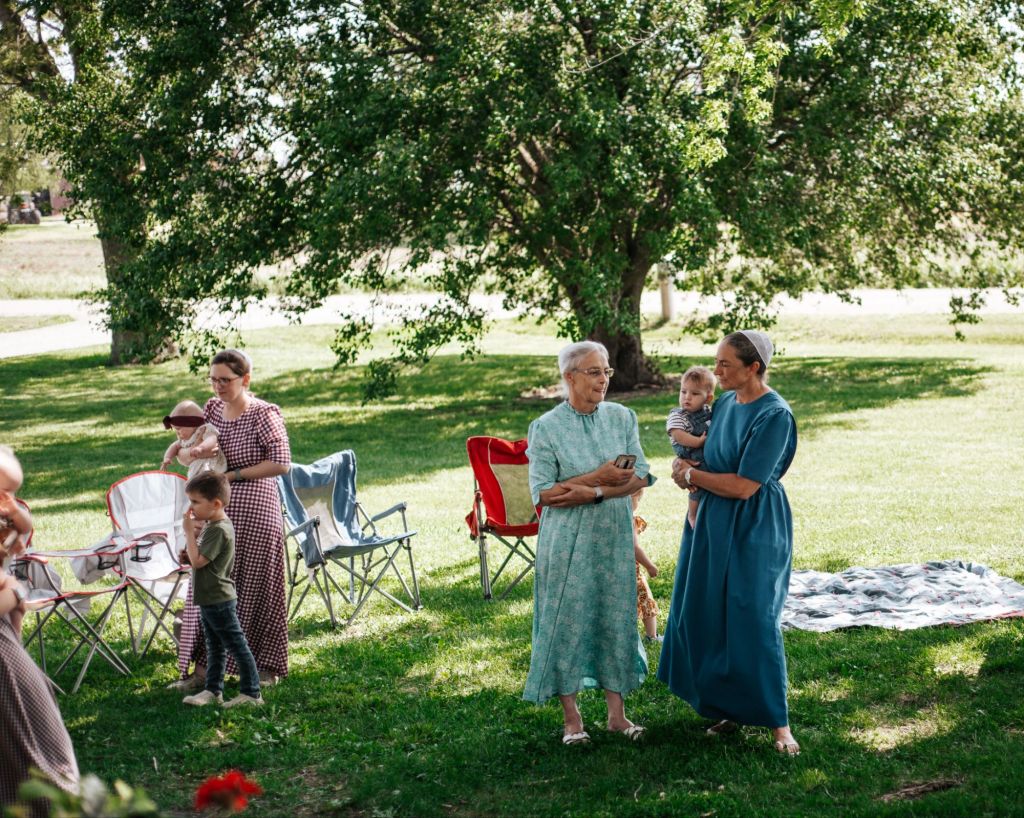
It was a balmy summer day. The kind with puffy white clouds and cheerful, dappling sunshine. Toting our babies and baskets of goods, we gathered beneath the stately maples in Karla’s front yard. The weather was epic! Not hot or windy- definite blessings for the Nebraska plains.
We placed our wares on gingham covered tables, browsing, and delighting over the creative options.
The invitation came from Karla several weeks ago, who graciously offered to host us church ladies for a friends farmer’s market. The old fashioned sort where vendors swapped their goods. And so it was, twenty some ladies found themselves in her front yard on that summery Wednesday morning, bringing their handcrafted items.
Our host had sewn colorful cloth bags, placed at the beginning of the line, ready for us to fill. After the goods were arranged, we filed past the tables collecting our treasures. Many of the crafts and foods were embellished or labeled. It was just good, old fashioned fun!
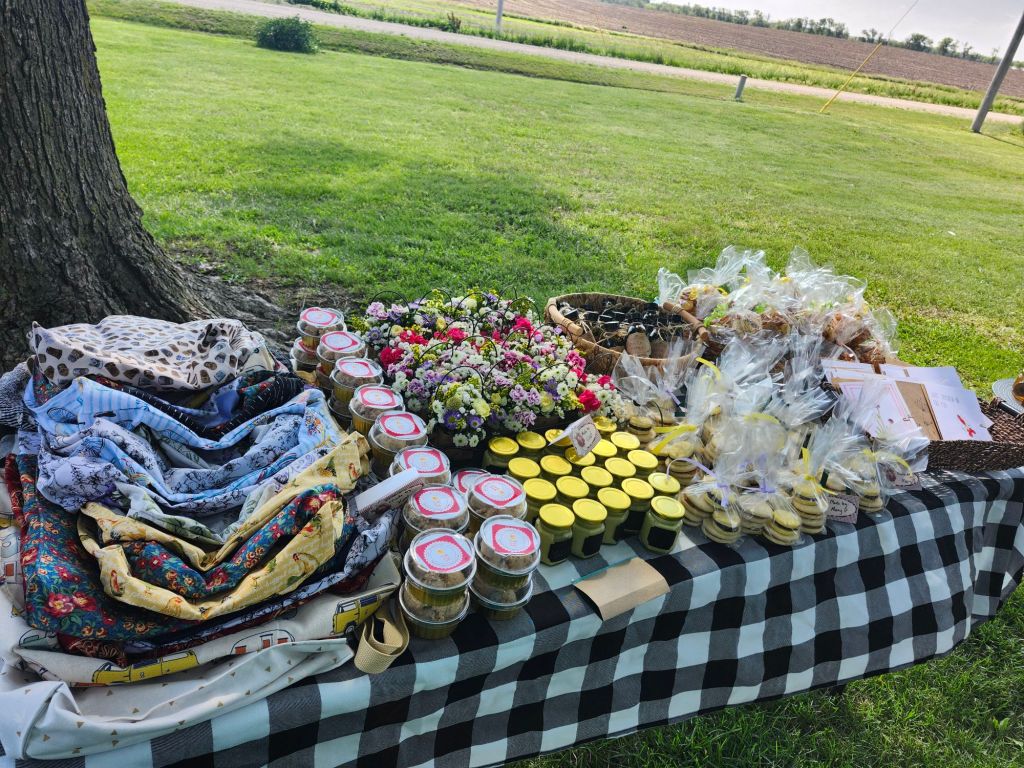
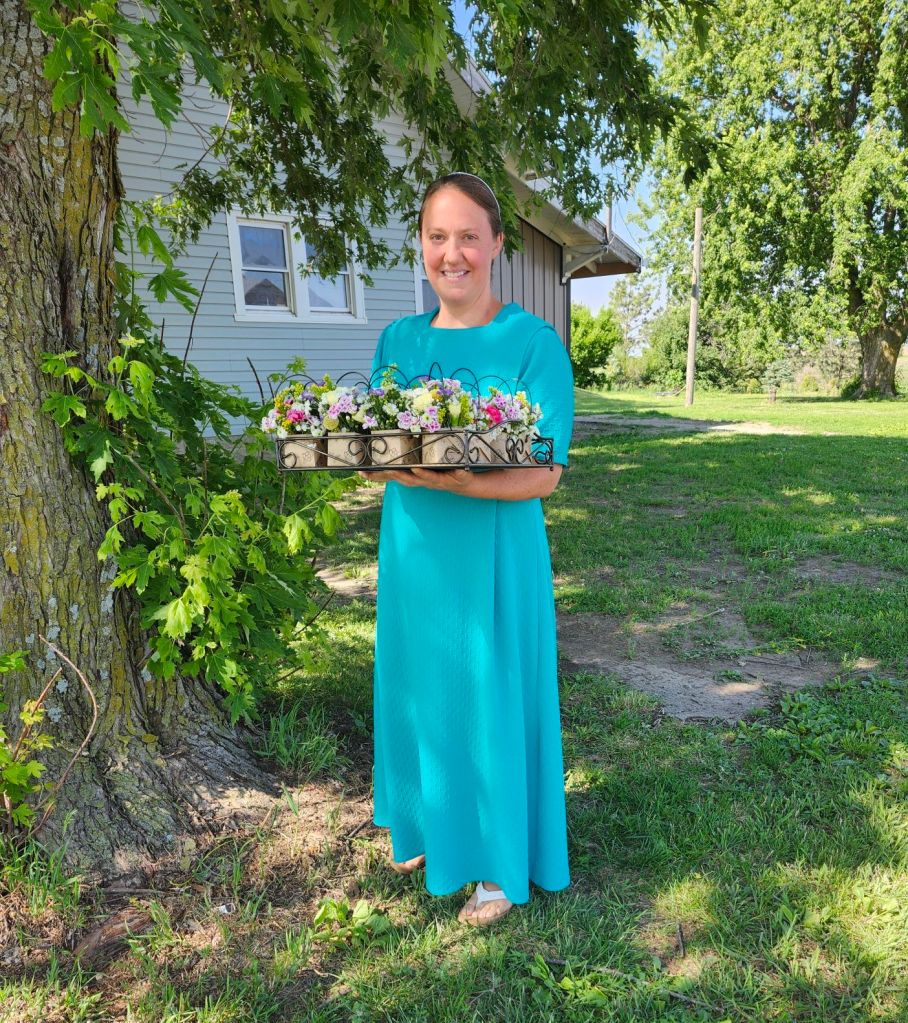
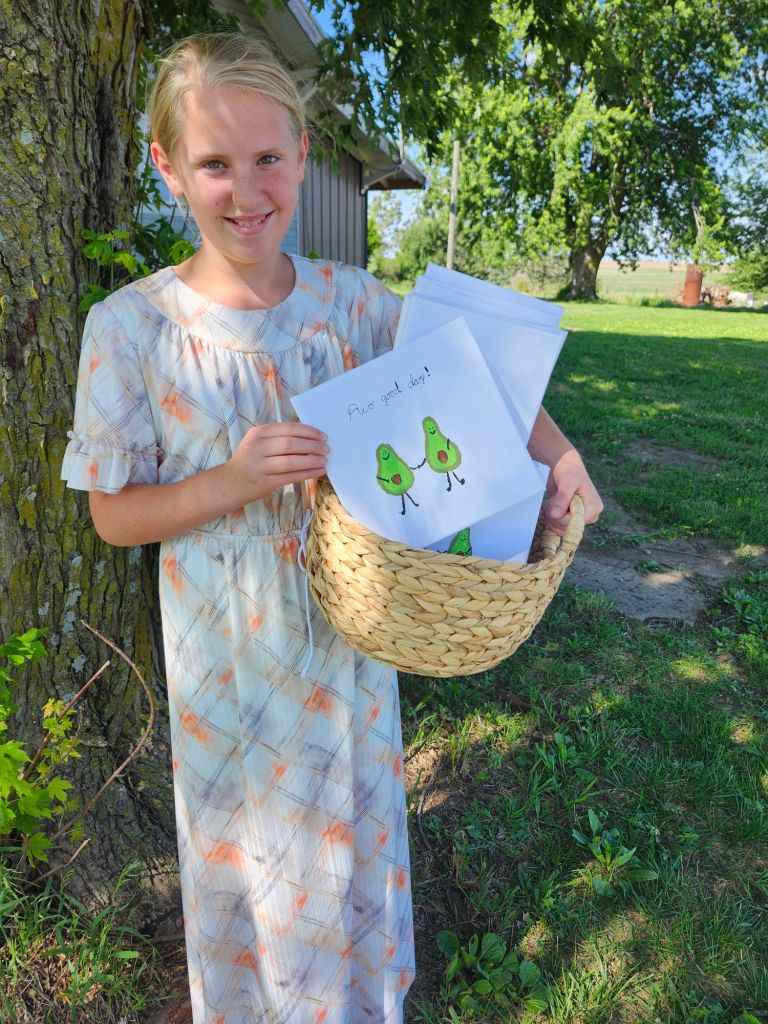
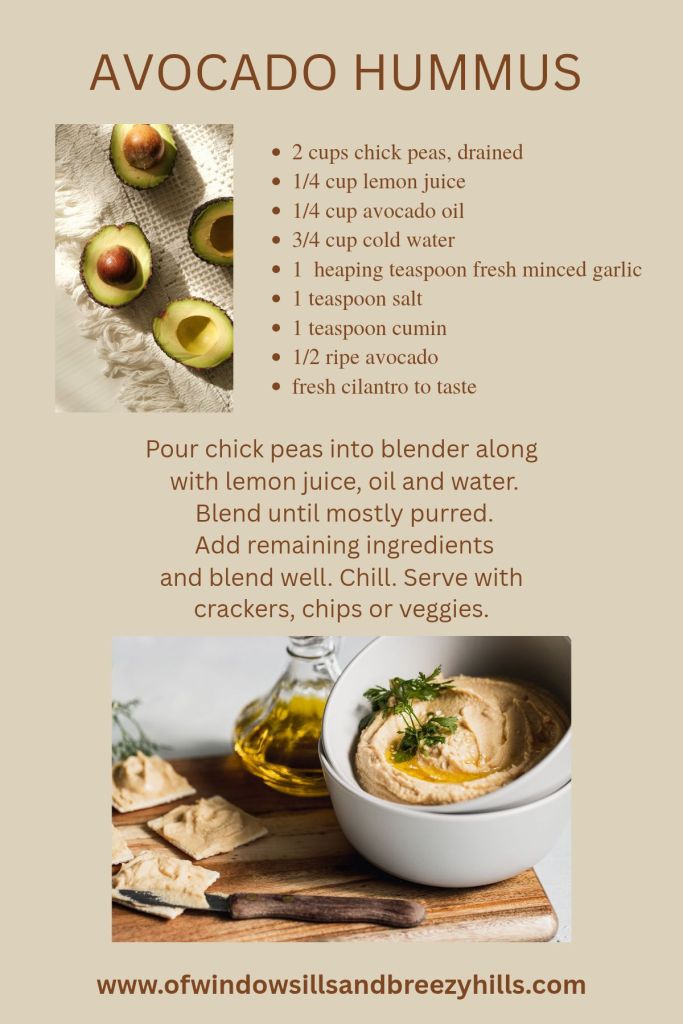
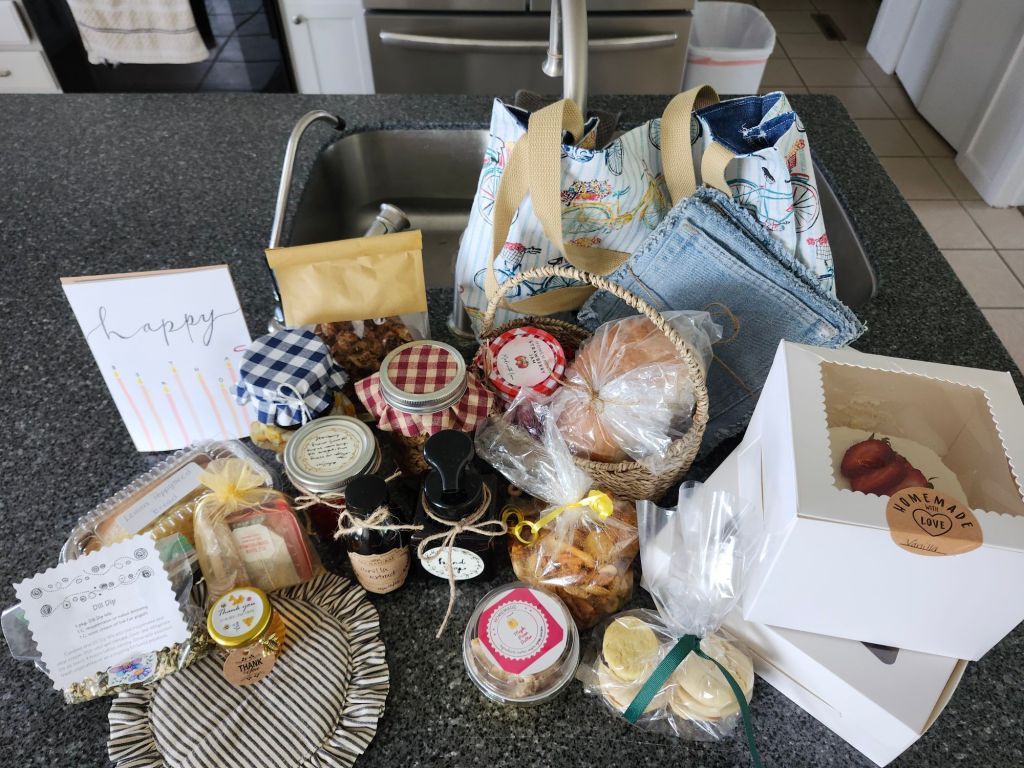
📷 Mary Steria📷 Mary Steria 📷 Mary Steria 📷 Mary Steria These mini bouquets were my contribution along with mini jars of hummus. Indecisive me couldn’t decide which, so I did both.Josie’s contribution was these avocodo paintings. She decided this last minute, putting in some long hours the night before. The paintings said ”Avo good day”Here is the recipe for the hummus I made. This is the stash I brought home.
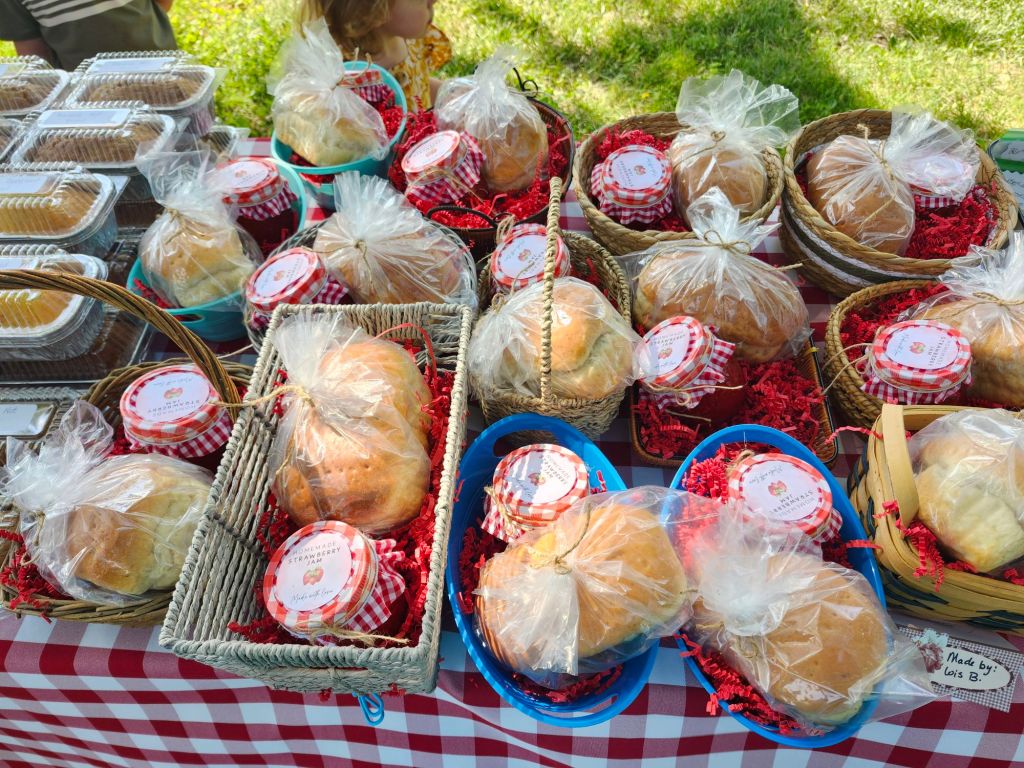
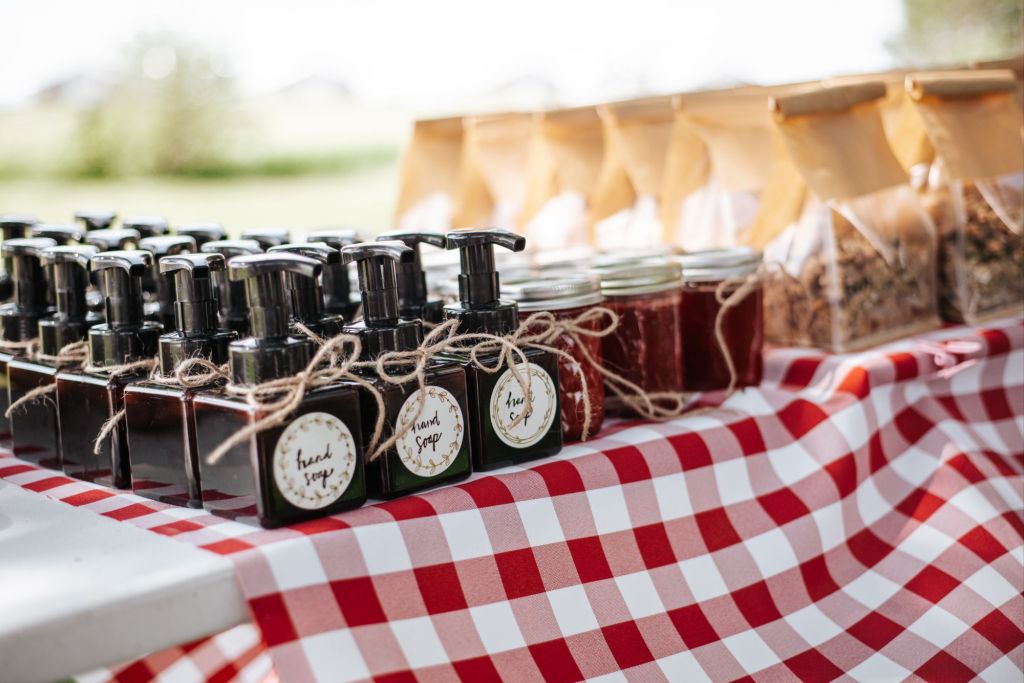
Here’s a list of the items that were brought. We had around 20 vendors, so each one brought that many items. Everything was handcrafted or homemade.
Maple pecan butter
Honey butter
Mini banana and lemon poppyseed bread
Strawberry and blueberry preserves
Mini bread loaves
Protein balls
Mini layer cakes
Alfajor cookies
Hummus
Granola
Party mix
Vanilla extract
Tea bags and mini jars of honey
Dill dip mix
Cloth bags
Mini bouquets
Handmade cards
Hand soap
Potholders
Clothespin bags
Lisianthus flowers
📷 Mary Steria
Karla served us a tasty charcuterie style salad bar- a feast for the eyes and mouth both.
📷 Mary Steria
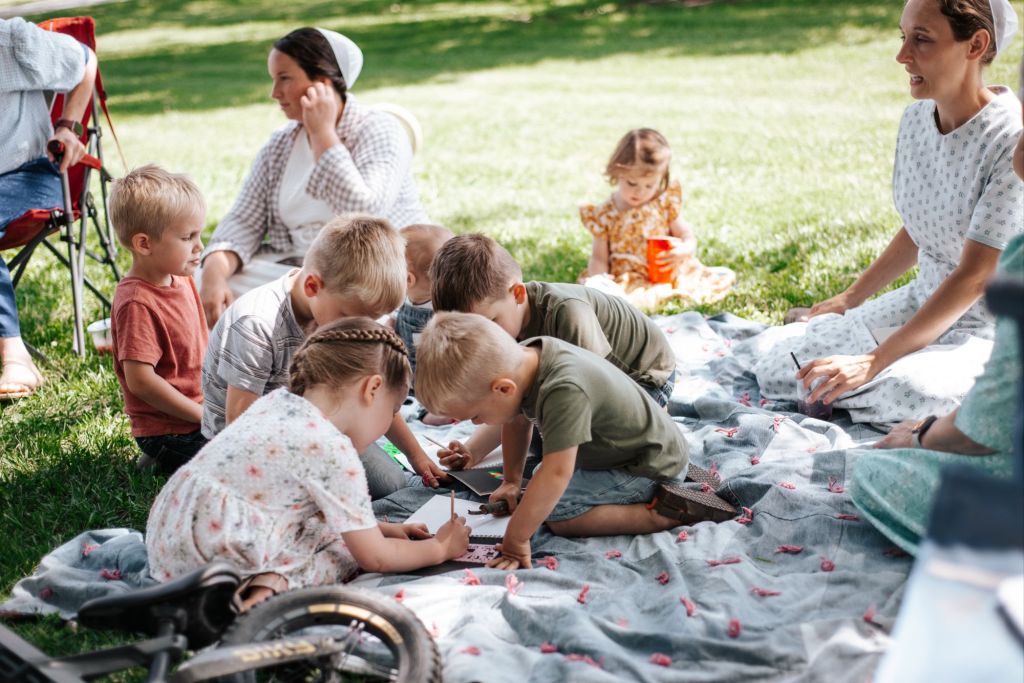
The towering maples spread their shady limbs over our gathering. We chatted with friends and held tiny, slumbering humans. A quilt for toddlers to play on and soft grass for mini bare feet. The day reminded me of the sort you read in books of yore. When life was slow and a social like this would be discussed and remembered for days to come. And so we will! One day we’ll look back at our babies and brim with tears for those sweet young tots. We’ll exclaim over our youthful faces and oh, the way our dresses were made back then! When we look on bygone days, we tend to remember the good and forget the hard. But in our day to day living, it’s easy to forget the good and see the hard.
📷 Mary Steria
Don’t overlook the gold in today’s moments. Of course there are things we wish were different. But remember, each moment is an opportunity to create good old days.
Find yourself a bevy of friends, craft your items and gather for a taste of nostalgia.
I was a new bride, standing in our ample, hallway entry, scrutinizing ingredient labels. The church had generously blessed us with an overload of groceries. The hallway served for storage, until I could find homes for everything in the tiny kitchen. The new wife I was, I still remember crying about the overwhelm of realizing I was now soley responsible for cooking, figuring out meals and getting groceries. New responsibility typically brings with it a measure of fear for me. The realization hit me full force that it was up to me what our diets would look like. The health of my husband and later on, our children, depended alot on me and what style of cooking I chose.
We were given The Derstines Favorite Recipes cookbook as a wedding gift. In the back, it has a section on health, detox, and herbal recipes. They also shared of losing a neice to breast cancer, and the importance of detoxing, lymph flow, removing perfumes and parabens from our body products. This ignited the flame in me. With having cancer in my history, combined with new responsibilities, this is where my desire for healthy living was born. I scrutinized that honeymoon bodywash with the lavender color- this had parabens? The Shania Twain lotion in the hot pink tube that my friend and I raved over, this had harmful things that could cause cancer?! And what were all these unpronouncable, extensive words on food labels? I didn’t know much but quickly learned to scan ingredient labels and what words meant “bad stuff.”
Before I was married I drank Dr. pepper, ate raspberry zingers and gave no thought to the hideous amount of red dye and HFCS. Nourishing to flourish is a process, not an overnight change. Now days, I have zero desire for greasy burgers and fries. If you feed your body junk it will crave junk. If you feed your body whole foods, you will eventually gravitate towards that above processed foods.
The first swaps in food choices I made was, sea salt instead of Morton table salt. Also swapping baking soda from the orange box stuff to Bob’s Red Mill brand which was aluminum free. I also used that brand baking powder. I poured these in pint jars with labels. Tiny steps but changes nonetheless.
Although cooking is not my first love, fifteen years later, menu planning, groceries and cooking has become second nature. I love sitting down Monday morning to plan the week’s menus, utilizing what foods need used up and jotting down any needed groceries. I’ve also learned the joy of keeping my freezer stocked with prepared foods for hectic days or unexpected hosting.
It’s much harder to eat healthy when your away from home or traveling. A good guide to keep in mind is the 80/20 rule. If you eat real, whole foods/good proteins 80% of the time, the other 20% of eating less than ideal, won’t take your health down as rapidly. Do your best, take small steps at a time, but don’t stress perfection. On the other side, don’t take the, I can never get it right, so who cares, approach either. Small steps are better than none!
And please don’t think we’re perfection at this house. We are far from it! I feel I’ve slacked over the years, with the children getting older and enjoying their liberties, splurging at parties or away from home. Honest confession. I’ve even gone so far as to buy treats like hot dogs and egg rolls when Dad was gone, to make it special. Now you know I’m not completely crunchy!
A great way to start eating cleaner is to eat very basic. Use fresh, whole foods instead of processed. Peel carrots and bake those along with potatoes and a simple meat, instead of casseroles full of creamed soups and velveeta cheese. Grill chicken, bake rice and dice up a fresh salad instead of mac and cheese, boughten pizza, or processed meats like chicken nuggets and hot dogs.
I’m thrilled to see the changes in cleaner options available these days than there was twenty years ago. America is slow to learn. I’m going to share the healthier swaps I’ve made in our food department. It’s not in any order of importance neither is it all inclusive. Many of you are making healthier choices and I applaud you for that! In that regard, this may be old news for you. I’ve had this post in mind for awhile, and if it appears I’m behind times, you’re probably right.
HEALTHIER SWAPS:
White refined sugar: organic raw cane sugar. You can also use much less than a recipe calls for, often half the amount is enough.
Brown sugar: sucunat or coconut sugar
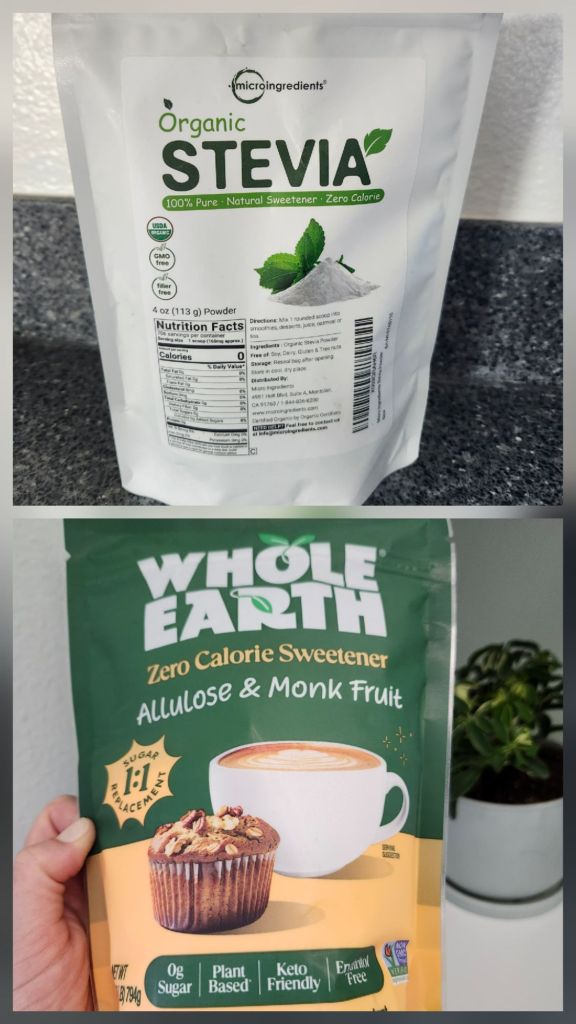
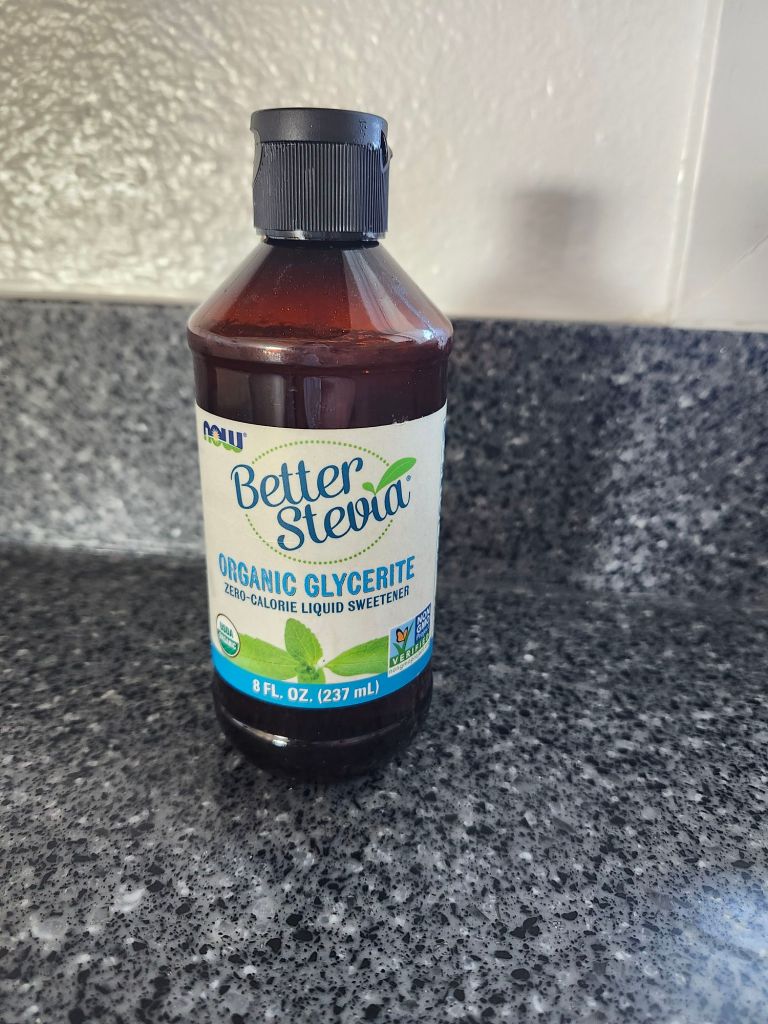
Raw local honey and maple syrup are good options. Store bought honey often has HFCS as filler. I’m learning about Allulose and monk fruit which I believe are both good, but don’t have much experience yet. This package below I found at Costco. Sugar alcohols are debatable. I rarely use them anymore. I still use liquid stevia glycerite and stevia powder for certain foods and drinks. Currently I’m using this organic microingredients stevia powder.
Flour: Organic flour is better but grinding your own and using freshly milled flour is much better. Crushed wheat is also a healthier option but here again, I don’t have experience with it. We use organic fresh milled or a gluten free flour mix. You can make your own with the recipe in this post.
Walmart carries a gluten free flour blend but I personally prefer this blend from Costco.
Instead of Seed Oils such as canola, corn and soybean: use avocado, olive and coconut oil. I use refined coconut oil as a replacement for crisco/shortening. Butter and lard are good options as well. I use Chosen avocodo oil and Terra Delyssa olive oil.
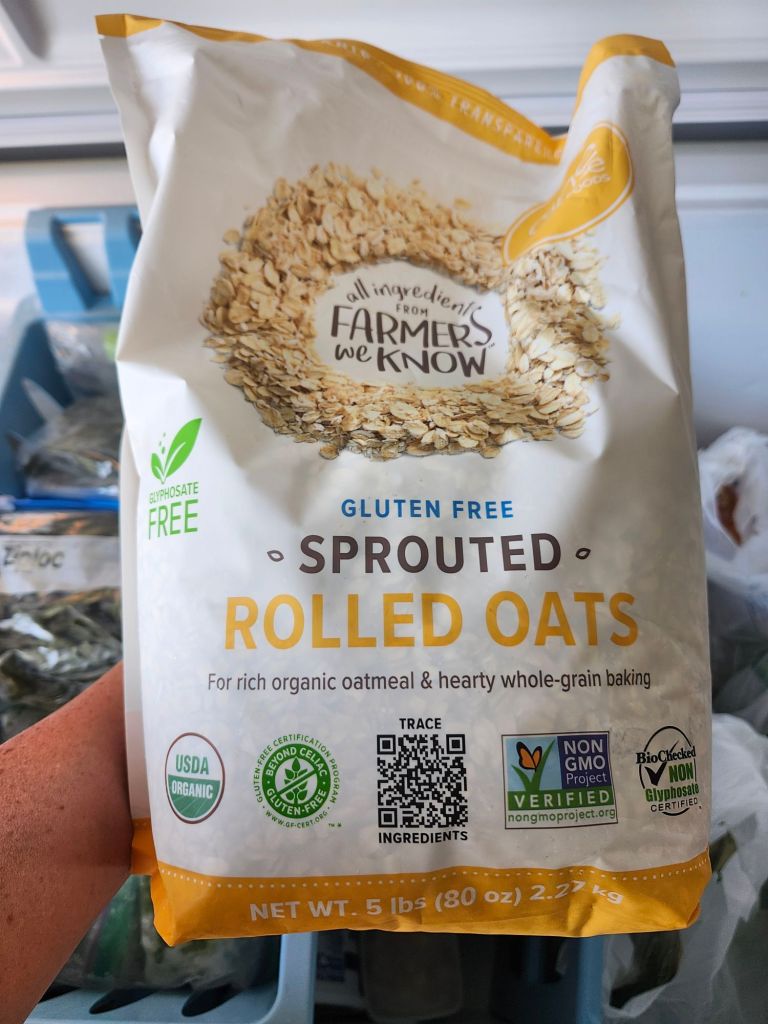
Oats: Oats are high in glyphosate, so buying organic ensures against that. I was pleased to find these sprouted oats at Costco.
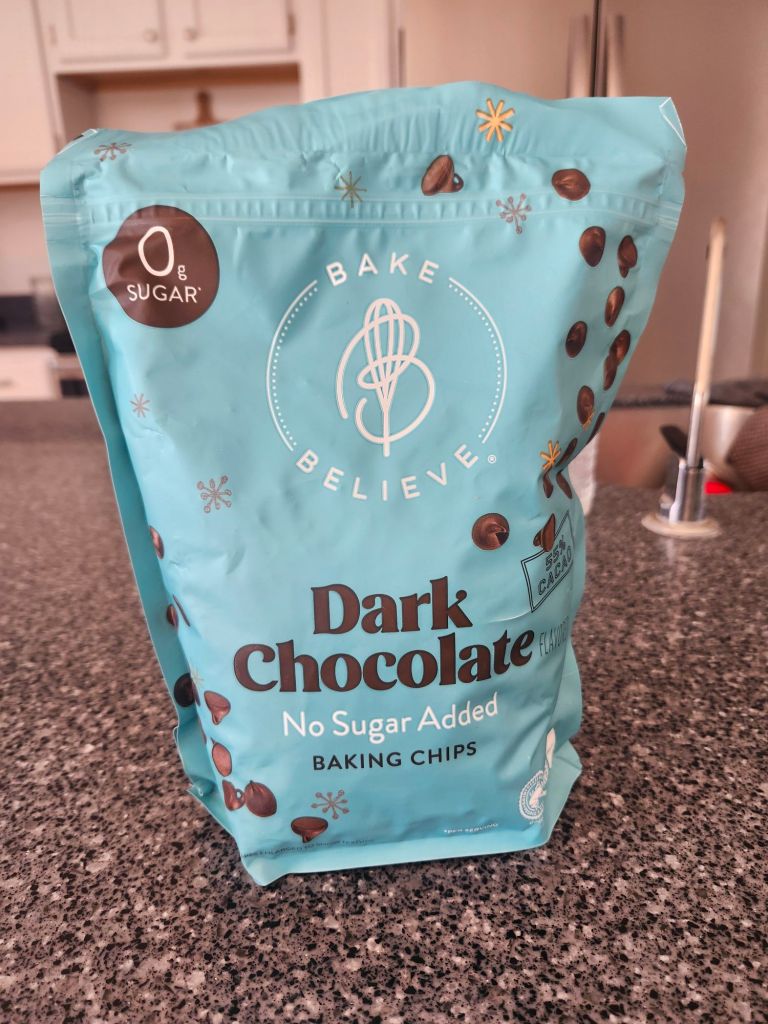
Chocolate chips: Enjoy Life is a good brand with only a couple ingredients. Lily’s is a sugar free option but I personally don’t use, partially because of the price. Walmart carries this Bake Believe brand, but I was pleased to find this large bag at Costco.
Cereal: I keep homemade granola on hand but otherwise, not too much. Most cereal is full of sugar with little nutrients. I like to keep rice krispies on hand for use in baking and cheerios for toddler snacks. Here’s better options that I started using. Organic Morning O’s, Nature’s Path Crispy Rice and Three Wishes. Seven Sundays is a good brand too. Three Wishes cereal is made with chickpeas and very few ingredients.
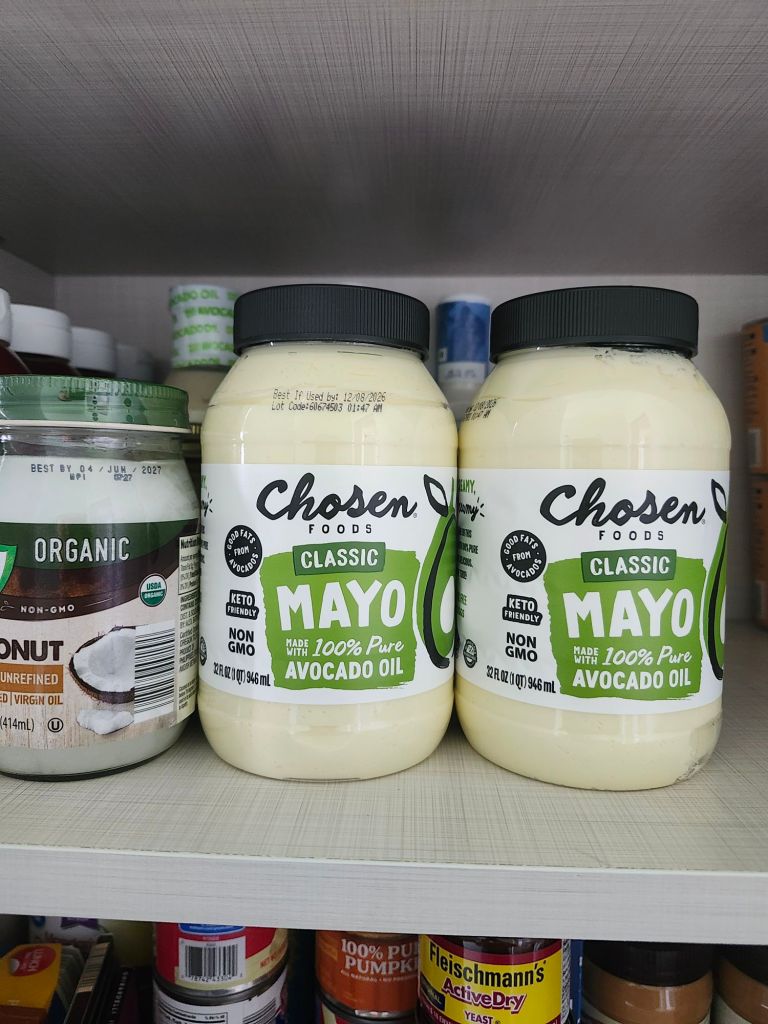
Mayonnaise: Most mayonnaise is full of soybean oil! It might boast ‘made with cage free eggs’ or ‘made with olive oil’. But look closely. Even if its made with olive oil, its usually only partly! And what’s great about cage free eggs if it’s full of seed oil?! I love the Chosen avocodo oil mayonnaise or you can make your own. At times I have trouble with it not wanting to emulsify properly. I could never figure out why. Now I try to drizzle the oil in very slowly instead of having everything in the jar and then blending. But I’ve given in to the convenience of having mayonnaise in my pantry. I’ve found Costco carries it for the best price.
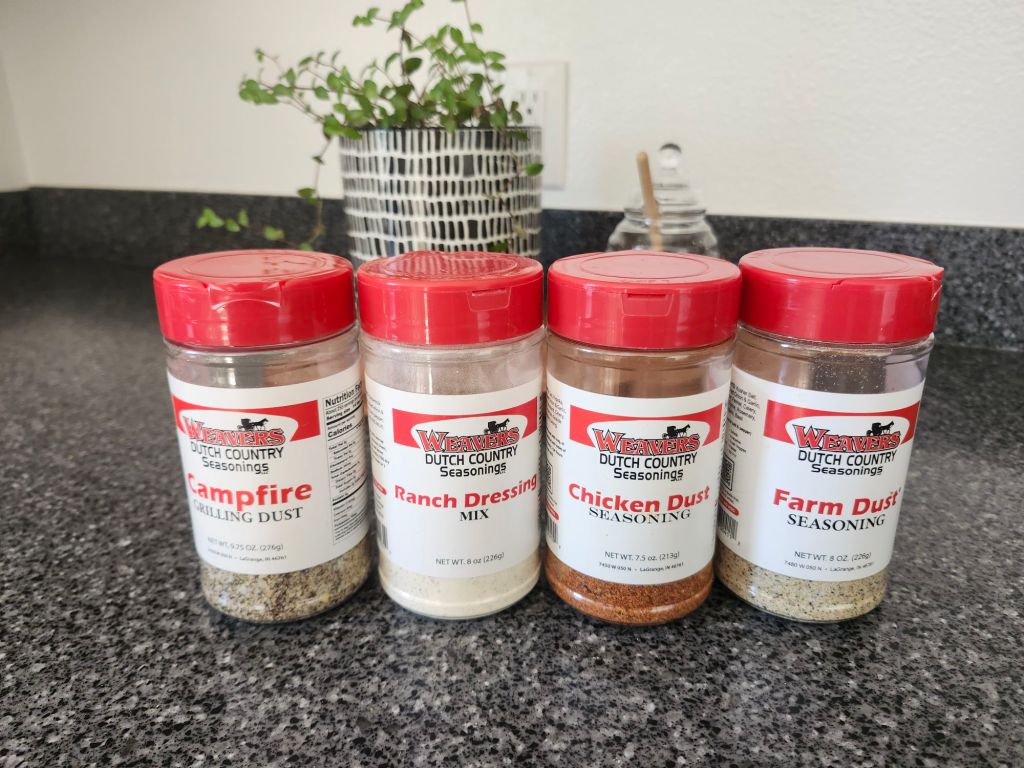
Ranch and other salad dressings: make your own, because they’re best friends with soybean/canola oil. Their next besties are MSG and preservatives. We buy Weaver’s Dutch Country Ranch dressing powder instead of Hidden Valley Ranch powder. Mix it with sourcream, nutritional yeast, garlic powder and salt for your own dip or add milk and mayo to make your own Ranch dressing. We use alot of Weaver’s Seasonings! We’ve switched from using Italian dressing to marinate meat, to simply using Weavers Grilling Dust for marinating. It’s delicious! When you buy store bought seasonings, it usually won’t have the good kind of salt in it, so keep that in mind. Weaver’s uses mostly Himalayan or sea salt.
Favorites of ours. I use chicken dust as a replacement for seasoned salt.
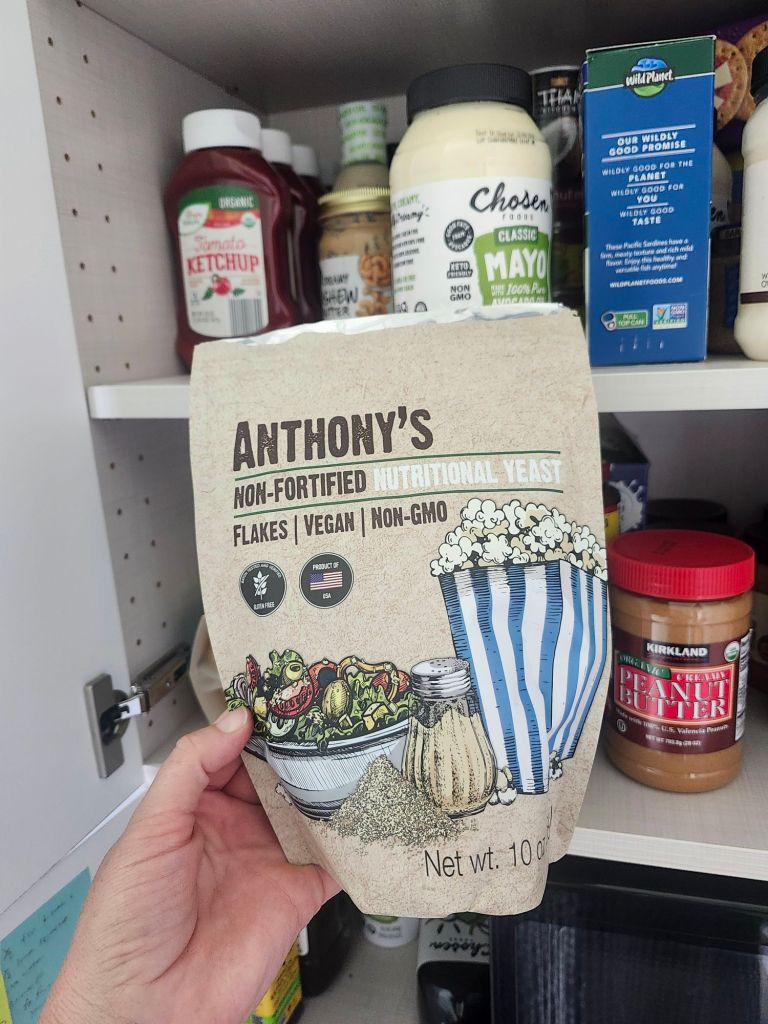
Along with seasonings, I’ve used Nutritional yeast for years. We love it on popcorn and avocado toast. I also like it on eggs. But recently learned of nonfortified brands which are a better option. Besides Anthony’s pictured here, a couple more good options are Sari, Foods Alive and THM.
I’ve made my own taco seasoning for years now. You can find the recipe here. McCormick is a clean option if you prefer buying yours.
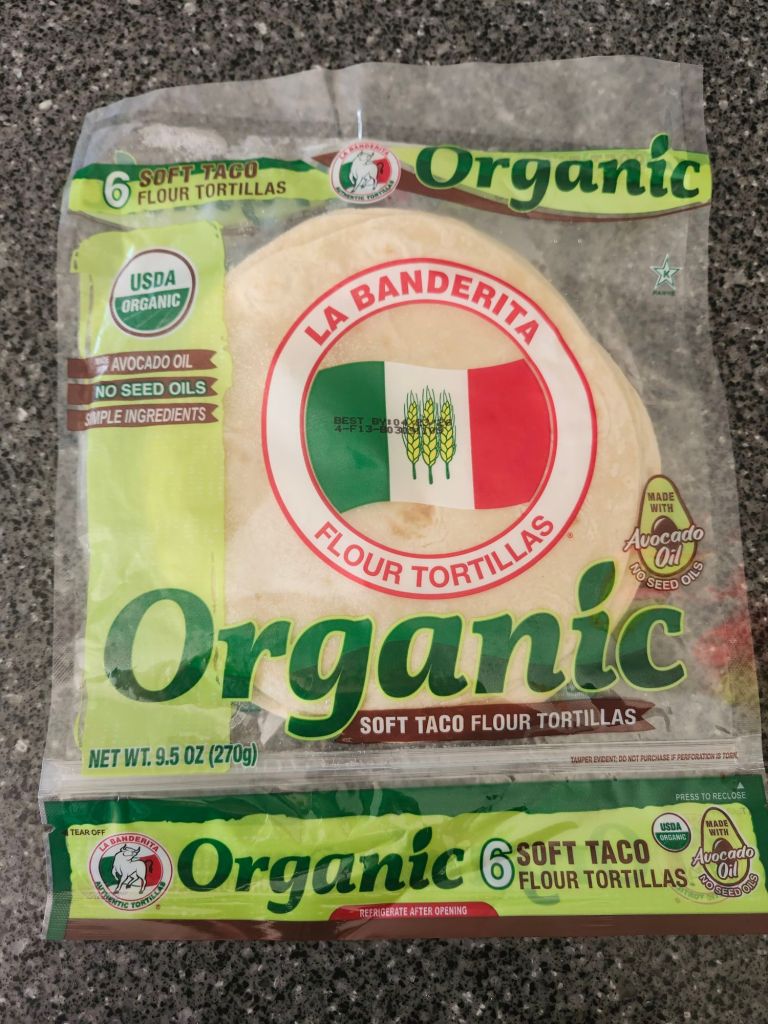
Tortillas: Making your own is great! I never feel I have time for the effort involved, plus have no tortilla press. I was beyond thrilled to find these organic ones at Walmart a couple months ago!
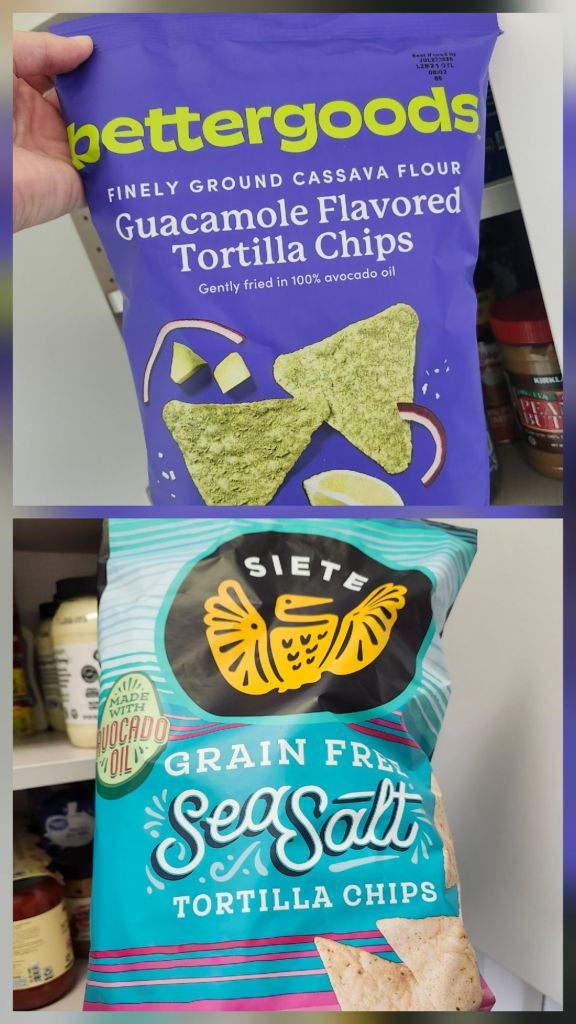
Chips: We try to eat chips sparingly and find healthier options. This is a harder one to find without seed oils. We like Bettergoods brand guacamole flavored chips fried with avocado oil. The grain free tortilla chips are made with very clean ingredients. Costco carries a variety of chips made with avocado oil as well as Thrive Market. Learn to read labels. Just because it looks healthy or says all natural doesn’t mean it always is. Simply Nature has organic chips that are made with sunflower oil, which is still a seed oil.
Yogurt: Oikos triple zero is a great brand with zero sugar, zero artificial favors, zero fat and great protein. Chobani and Better Goods are better quality, though still have sugar. Homemade of course is great, especially when made with raw milk.
Milk: of course raw milk is best if you have access to it. But if you buy it like we do currently, we buy organic or A2A2. Costco carries both options.
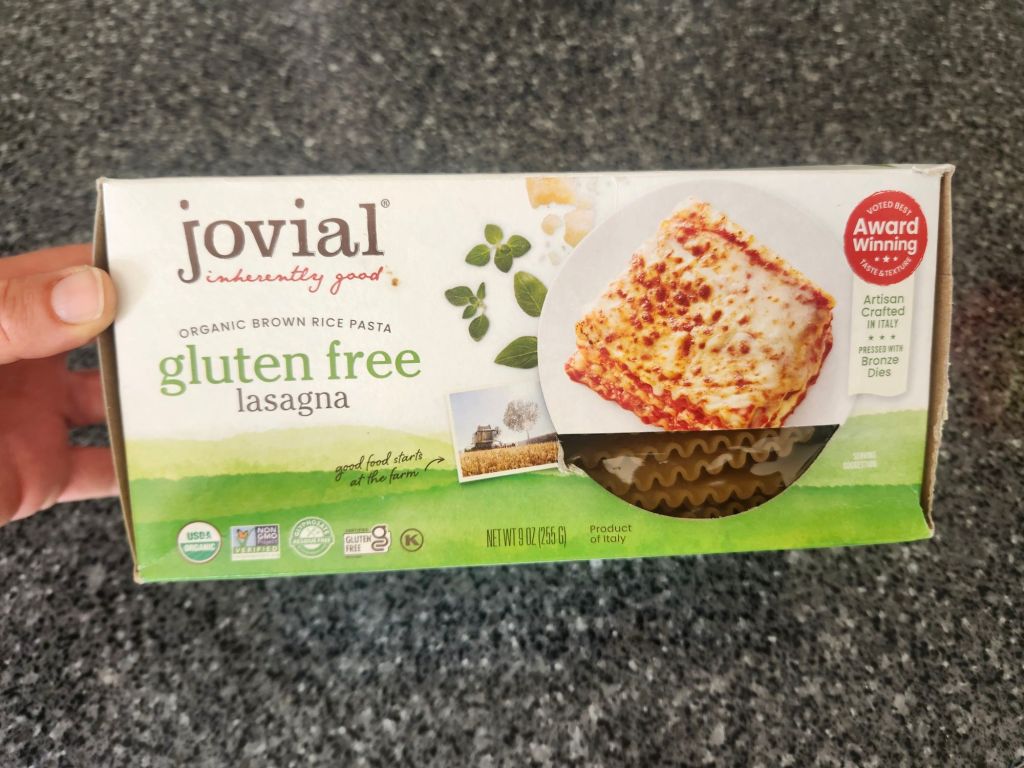
Pastas, jellos and instant puddings: these are things I rarely make. But I’ve learned of better brands for when I do use them. Jovial is a gluten free brand of pasta that’s made from brown rice. (I don’t cook brown rice anymore, but for an occasional use like pasta I’ll use it). Banza is also gluten free and made with chick peas. I prefer using gluten free products other than those made with corn.
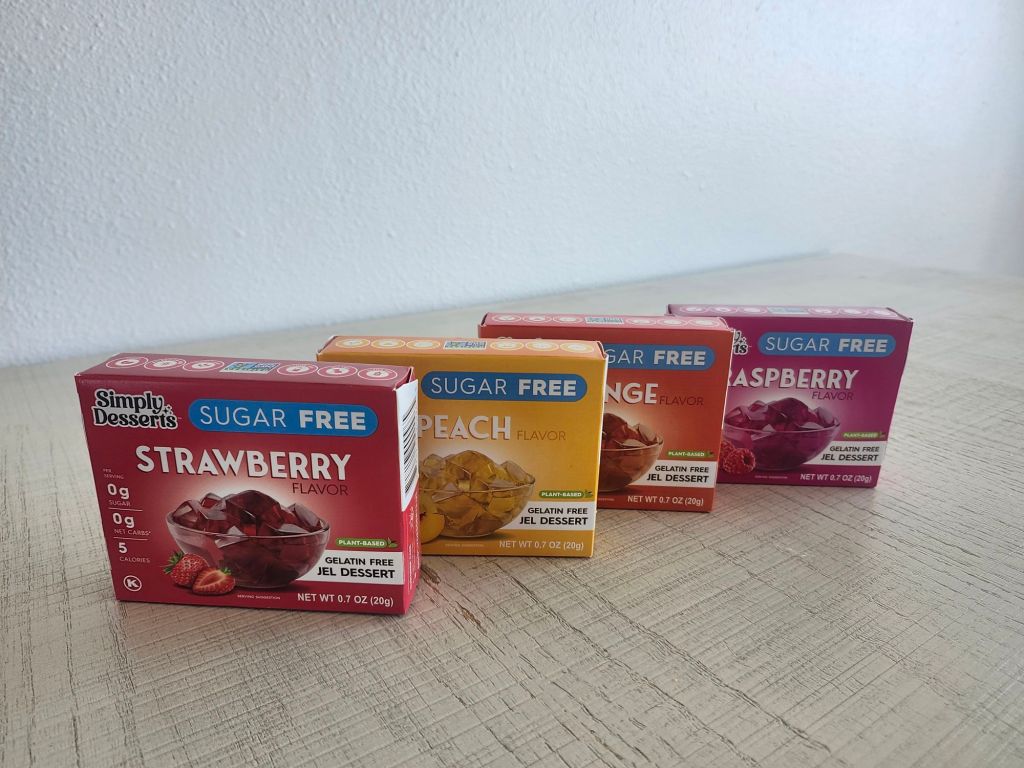
Simply Desserts is a brand of jello and pudding that is sweetened with eyrthrityol and has no food dyes. We so rarely have jellos/pie fillings that I don’t mind using this brand, even though it has eyrthrityol. It’s still better than the typical brands with loads of sugar and food coloring! And in all honesty, occasionally I use ordinary jello for a special dessert or something like Christmas cranberry salad.
Rice: The way basmati and jasmine rice are raised, doesn’t expose them to as much cadmium and toxins as regular rice. I buy either of those, organic in the Simply Nature brand. I don’t use brown rice anymore, because of the higher arsenic content, which is a carcinogen. I rinse my rice well, soak it a couple hours, then rinse again before cooking. This helps remove excess starch. Cooking your rice with broth instead of water amps up the nutritional value as well as the taste! I have plenty of broth on hand since we raise our own chickens and almost never cook rice with plain water anymore.
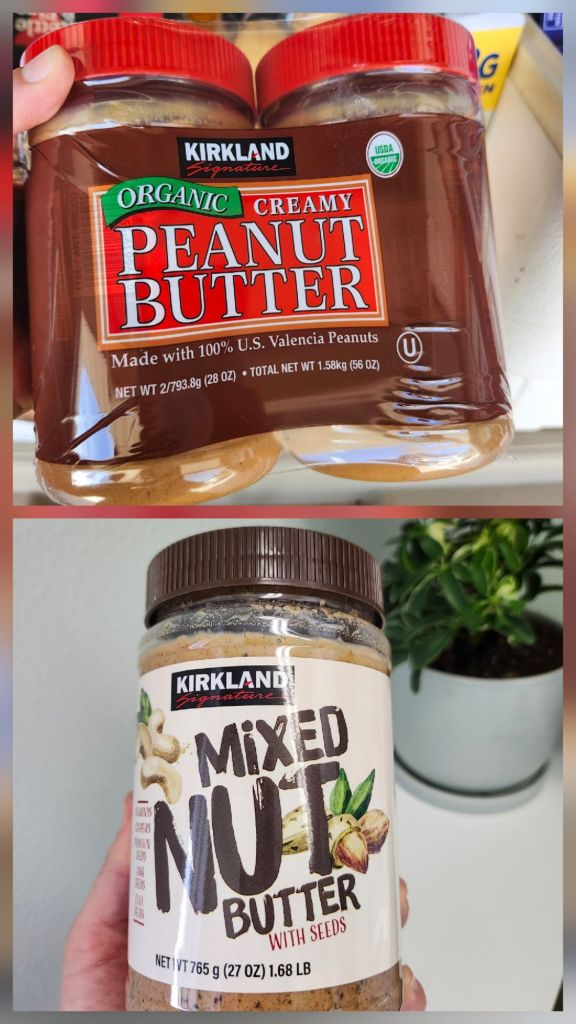
Peanut Butter: Peanuts and salt should be the only ingredients in your peanut butter jar. Peanuts are high in aflatoxins (a particular mold that’s been linked to cancer and other damaging health issues). There’s other foods with aflatoxins too, but peanuts are highest.) Any wonder many people have peanut allergies?! Peanut butter can go rancid quickly, even when stored in the refrigerator. Some years ago I learned Valencia peanuts are a better option, because they’re grown in a dryer climate, thus less susceptible to mold/ aflatoxins. Recently I discovered Costco carries organic Valencia peanut butter. You better believe it I was thrilled! A two pack like this was $9.99. Can’t complain on the price either. I still don’t use loads of peanut butter for myself personally. There’s heaps better protein options available without aflatoxins. The mixed nut butter is a good option if you want to avoid peanut butter.
Coffee: I’m no coffee drinker so I’m not telling you what to buy on that, but you could drink bone broth for a healthier alternative! Hah, as though I’d change anyone. (I’m quite aware coffee lovers are opinionated about their coffee and I won’t change them!) At the very least, drink your coffee with a protein filled breakfast instead of on an empty stomach. Or then stir collagen or protein powder into your coffee to give a bit of protein. Straight coffee on an empty stomach isn’t good for women’s hormones in particular. Don’t pounce on me. I didn’t come up with that tidbit.
Nonetheless, a few good brands of bone broth protein powders are: Ancient Nutrition, Designs for Health and Paleovalley. I love using these for a quick, protein breakfast. Plus they’re beneficial for your gut! I use Designs for Health unflavored version as well as Ancient Nutrition chocolate. With the unflavored, it’s handy to add in any flavors of choice. You can also add it to granola bars or protein balls.
I don’t recommend whey protein because of the liklihood of MSG and other junk in alot of powders. However, Just Ingredients is a very clean brand with whey protein from a good source.
Pop: We very rarely buy pop. Ollipop is something we enjoy occasionally. It has low sugar, clean ingredients with prebiotics, yet carbonated and tasty.
Where to shop:
For years, our grocery shopping was done between Walmart and Aldi. But we’ve gotten started with Costco in the last month and have decided to switch over to that. They have oodles of great options for cleaner foods, plus good prices. The perk of buying in bulk is super nice for staying stocked! They have a yearly membership fee but its quite minimal for the benefits they have. Azurea Standard has tons of good options as well. I never got onto it much because of the hassle of pick-up. I used Thrive Market for a few years. Shipping to your door is awesome, but it comes with a yearly membership fee, that felt a bit much for not more than we used it. It might be a great fit for you though. They have good options. If your looking for an in-store option, Whole Foods will likely carry many of these items.
We don’t have any bent & dent or health food stores nearby, so its easiest to order some things from Amazon. Like the jello I mentioned, nutritional yeast, stevia, certain cereals, bone broth protein and more.
In case it feels overwhelming to make changes, start with one change at a time. I would recommend avoiding seed oils. When you have better options figured out on that, remove high fructose corn syrup. Next be vigilant about removing food dyes and so on. As you learn to read ingredient labels, you will learn better options available. It will become easier, I promise. And kudos to you if you’ve gotten your health food department all figured out! ❤️ I’m still learning too.
What better time to celebrate new life than Easter? The power in Jesus’ resurrection is proof He’s living and real! No other religion could do the miracle of raising the dead to life and then living forever! Every spring, new life unfolds all around us, little reminders of His resurrection!
I had quite a number of new subscribers since my last post. In regards to that, I belatedly updated a couple things on my About page. One of which was a new link to the book of my cancer story. My apologies to those who may have clicked and saw it was outdated. Welcome, and thank you for being here! It’s my prayer that you will find content that encourages and blesses your life.
Ahhh Springtime! It thrills my heart how the sun waits to say goodnight for a couple hours longer, begging us to stay outside. Chirpy birds, greening grass and budding trees, who could say there is no God?!
Let’s chat about our kitchen tables. Obviously it’s a place for nourishing meals and interaction with families and friends. But aside from meals, what does our table look like? A flat, central surface will attract clutter sure as pies attract flies. And it’s ok. We need a place to put things. But who enjoys a constant disarray, where it needs cleared before every meal? If you don’t know where to start cleaning up, just clear the table. A clean kitchen table with a pretty centerpiece can give you courage when the rest of your house is crumbling. Daily resetting/clearing this surface will help combat the piles that (almost) magically appear.
I had fun playing around with a variety of centerpieces and shooting photos, to hopefully give you some inspiration. I know how fun it is to see other’s ideas, so feel free to send me your own inspirations! There’s countless options and ideas one could use for a nod to the season. With Easter coming up this weekend, why not celebrate with a beautiful bouquet for your table? Here are a few ideas:
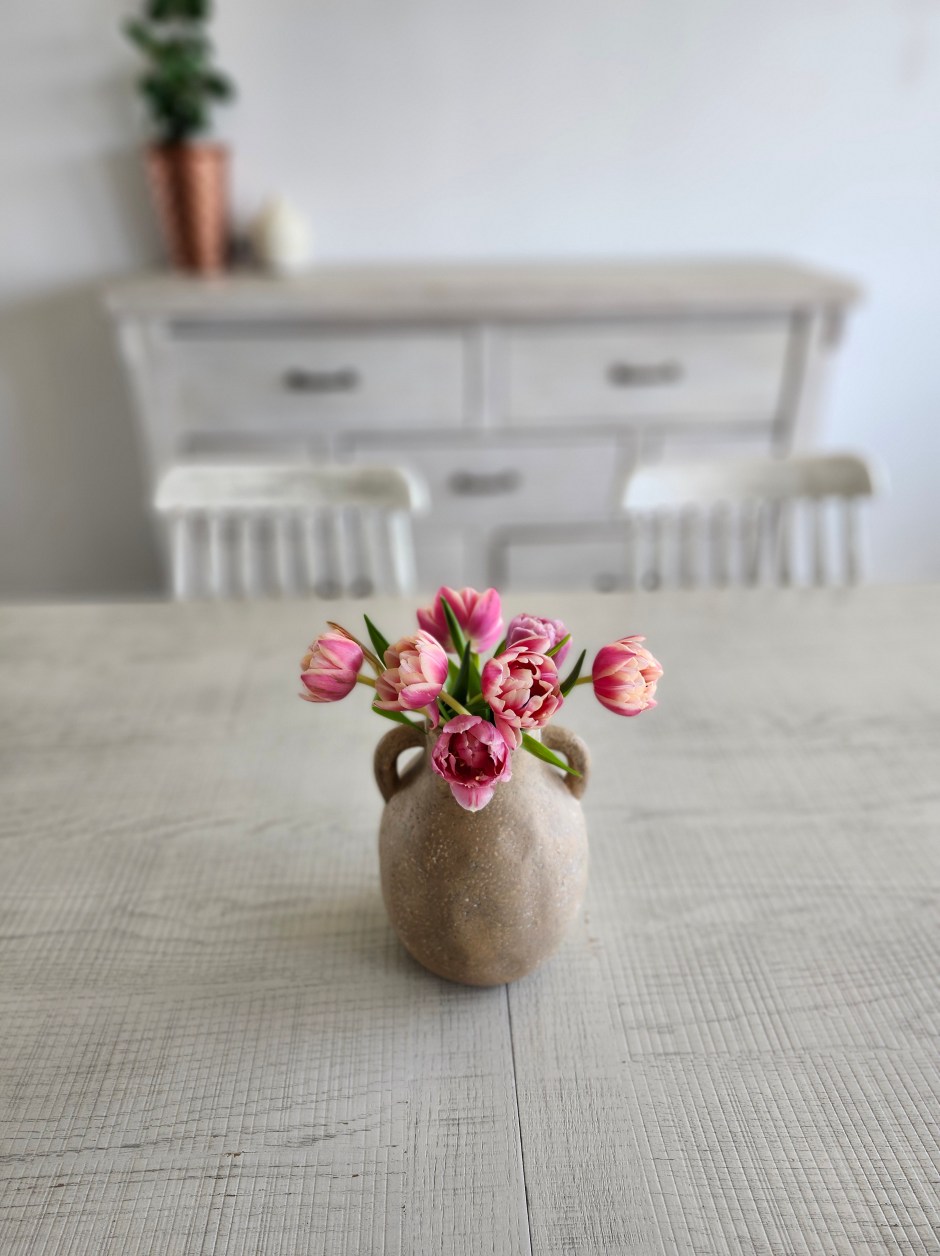
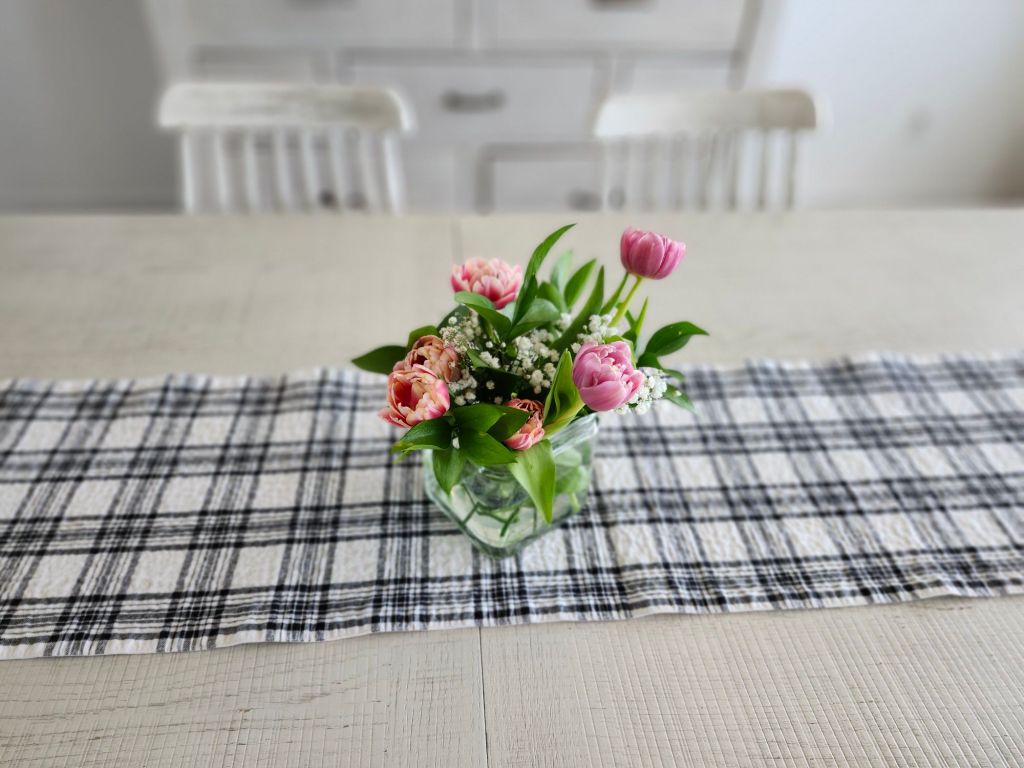
Obviously any spring blooms are a win! Daffodils, tulips or lilies all speak Spring/ Easter. But the arrangement of colors and type of vase or vessel you put them in can make a huge difference in the appearance. Take a look at these centerpieces.
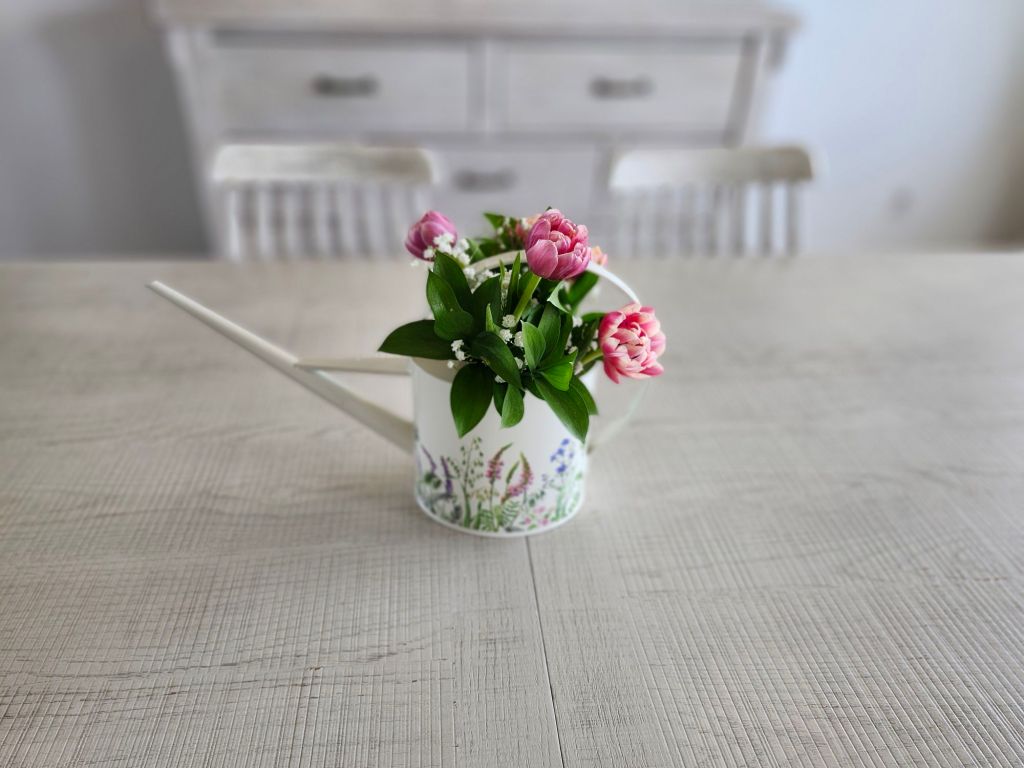
A glass vase or jar is classic, but I’ve learned, if you avoid clear ones, you won’t see the yucky looking water that happens after a couple days. Using a watering can as a vase lends to spring, though I will say it wasn’t exactly my style. I think a cuter watering can would make a difference, but this is what I use for watering my houseplants. If vintage tea cups are your style, that would make a cute vase as well, paired with a small stack of old books. Adding candles always adds coziness, but I don’t use them as much in spring or summer.
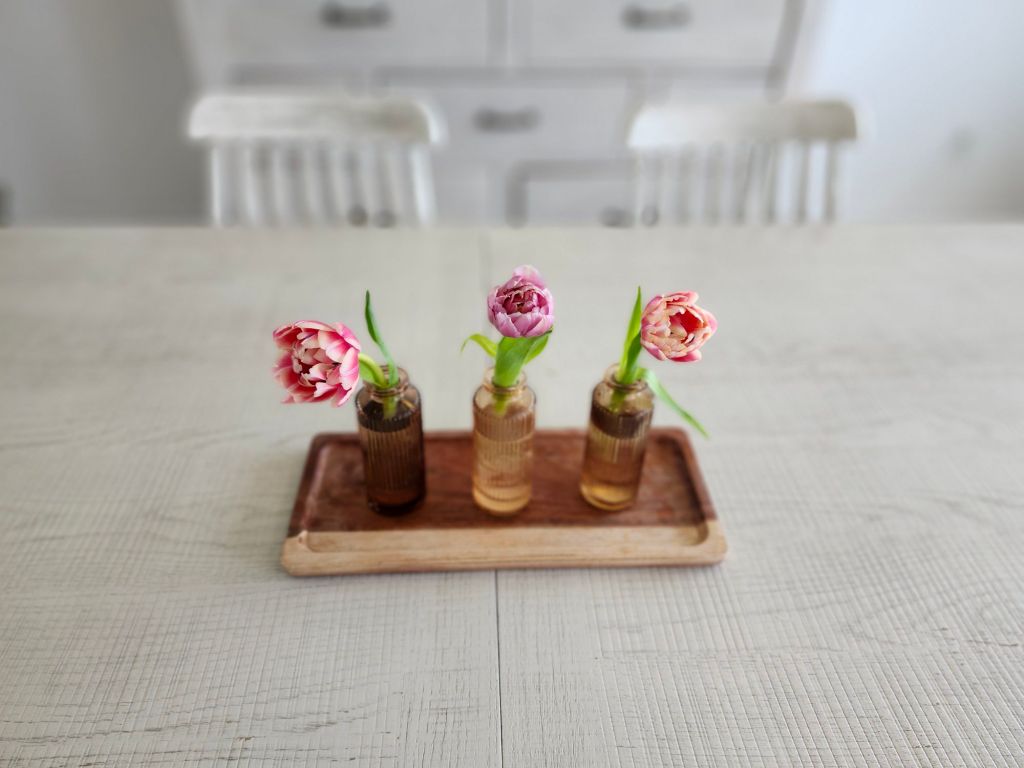
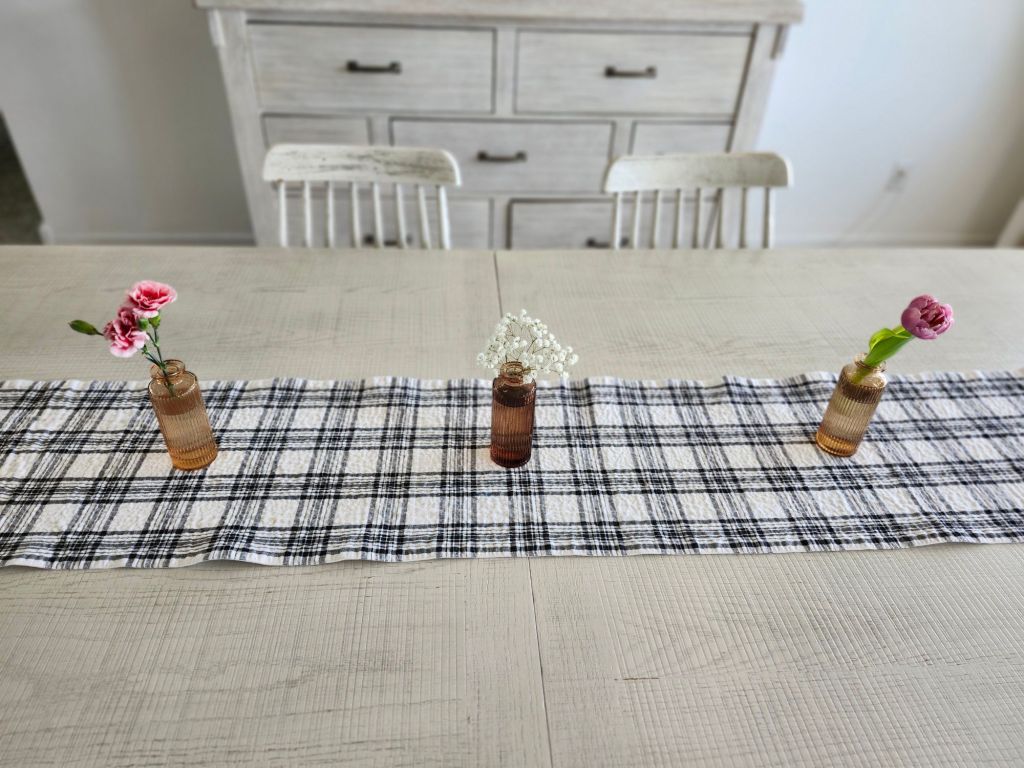
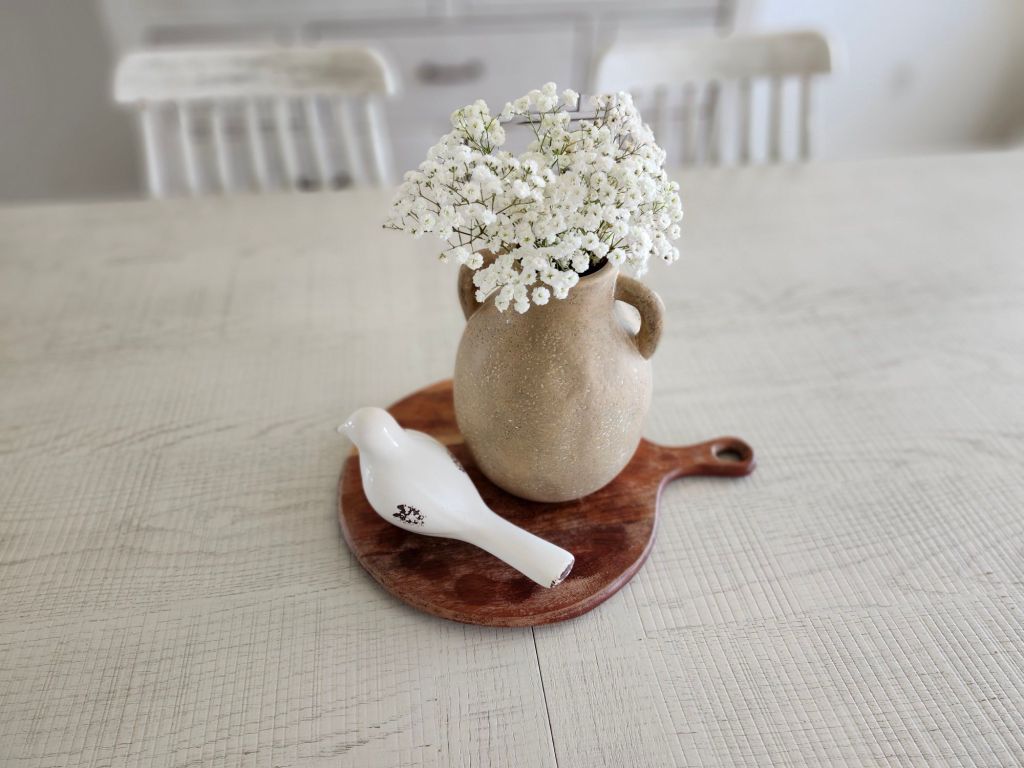
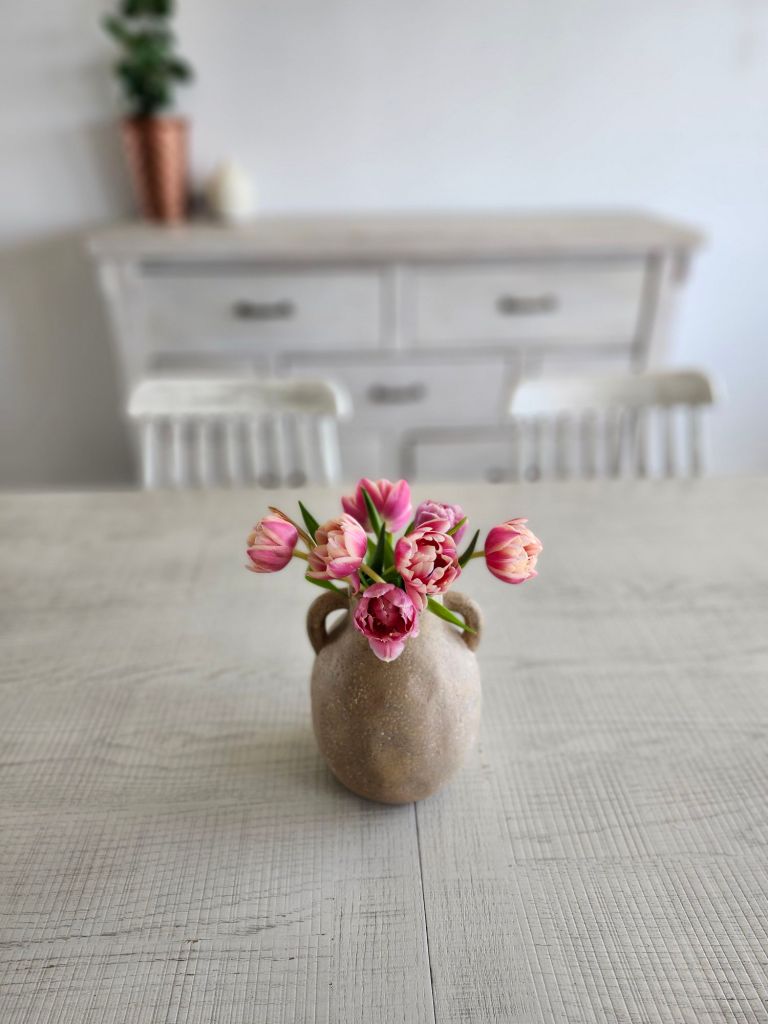
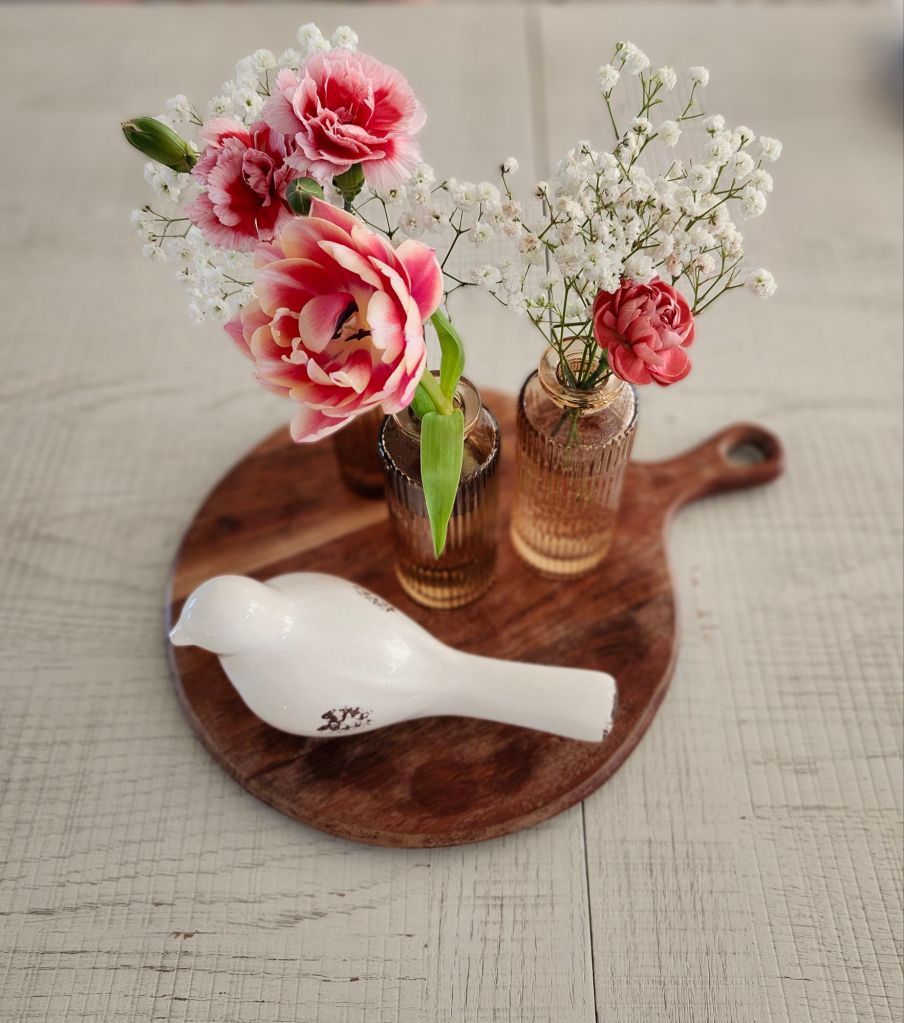
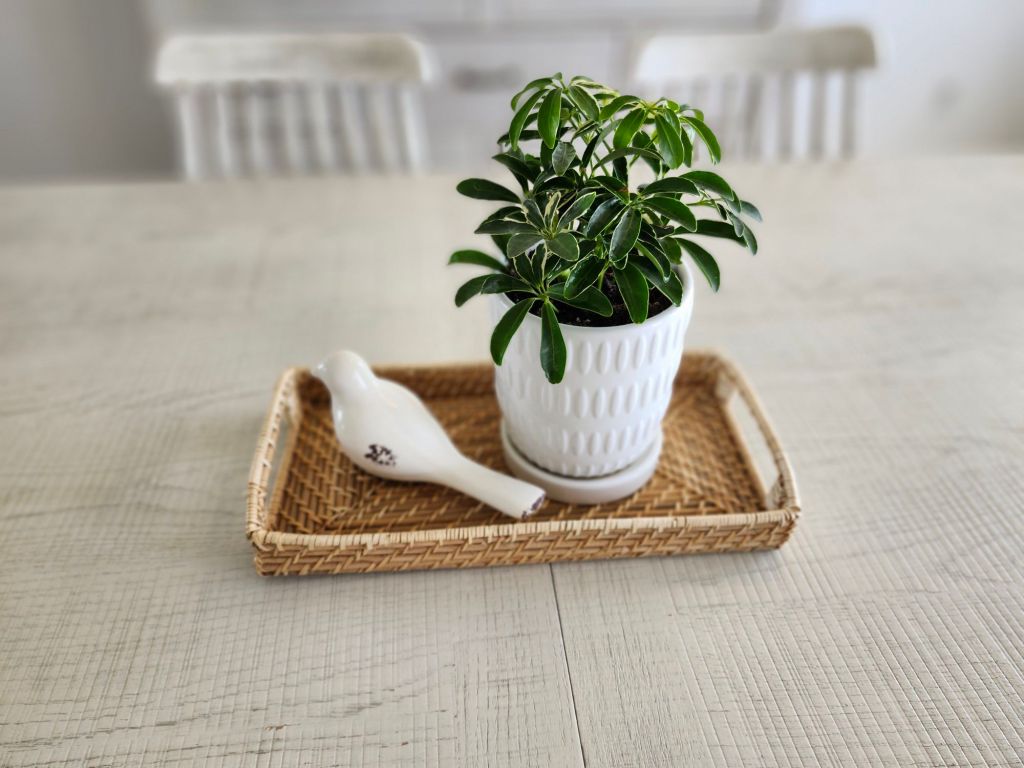
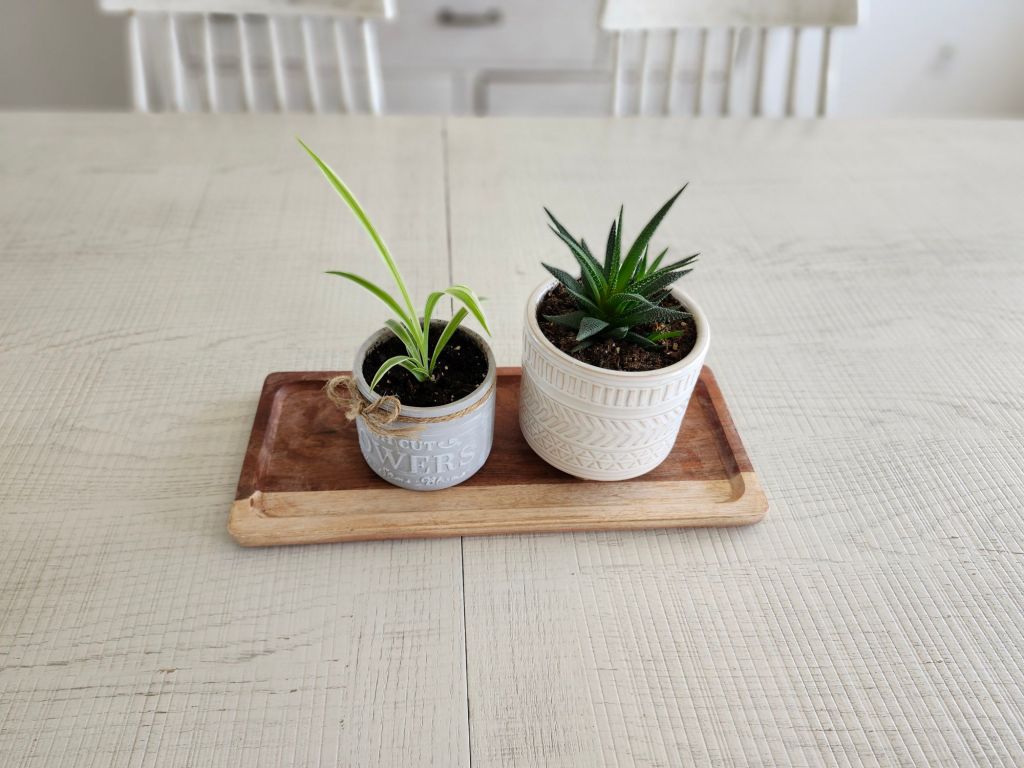
Scattering a variety of mini vases with singular blooms down the center of the table gives a unique twist. I’ll admit, I didn’t like my try at this, but it gives you the idea. I liked the mini vases on the wooden tray better. I loved the pottery with baby’s breath and white bird. It’s neutral, easy on the eyes and gives peaceful vibes. The pottery with tulips also struck me. Mini fresh plants grouped on a wooden cutting board or tray is also pretty, though it nods more to summer, in my opinion. Adding in small birds or real looking bird eggs in a nest is also cute! I stay away from bunnies and colored eggs because it has nothing to do with the true meaning of Easter.
A variety of table cloths or runners totally change things up. I don’t use tablecloths anymore except for company. Its cozy, but it feels a mite stuffy for me.The plaid runner is the only one I have, which I use occasionally. But I think that’s why I didn’t like a couple of the centerpieces because the runner didn’t jibe and looked too busy. An earth toned runner might look better with my brown vases.
This option here was my favorite which I kept on the table.
I had loaned out some vases for an event last week, and my friend graciously said I could keep the flowers that were in them. So that’s what I used in these pictures.
We are probably behind many of you in our growing season and don’t have any blooms yet. We moved from southern Indiana to Nebraska 8 years ago. Every spring I think longingly of the large patch of daffodils we left behind at our place there. They grew along the field, offspring of an old homestead. I could pick to my heart’s content, scattering bouquets through the house. Here’s a picture of Josie and me in that patch.
Shop your house, for trays, baskets, pitchers, pottery, or wooden bowls or cutting boards. (yes your house. You don’t need to go visit the store.) You can create a fresh look by pulling something out that you hadn’t used in a long while. A bowl with fresh lemons or red apples looks cheerful. Greenery and sprigs or apple/cherry blossoms stuck in pottery is lovely! I still remember one spring I was so ‘hungry’ for freshness in my house, I cut a bunch of greening sprigs along the edge of the woods and stuck it in jars, with decorative rocks in the bottom. When my husband came home, he laughed and says ”that’s weeds!” Weeds or not, it was pretty to me!
If you like keeping things like salt and pepper and napkins on the table, consider corralling all those little items in one large tray or basket, along with your pretty centerpiece. It helps tone it down to look like one item instead of 5 little things that tend to clutter.
A resurrection garden would also be a perfect Easter centerpiece. It’s something I’ve wanted to do with my children but have never yet managed it. Every year we make these super simple resurrection rolls which they always love.
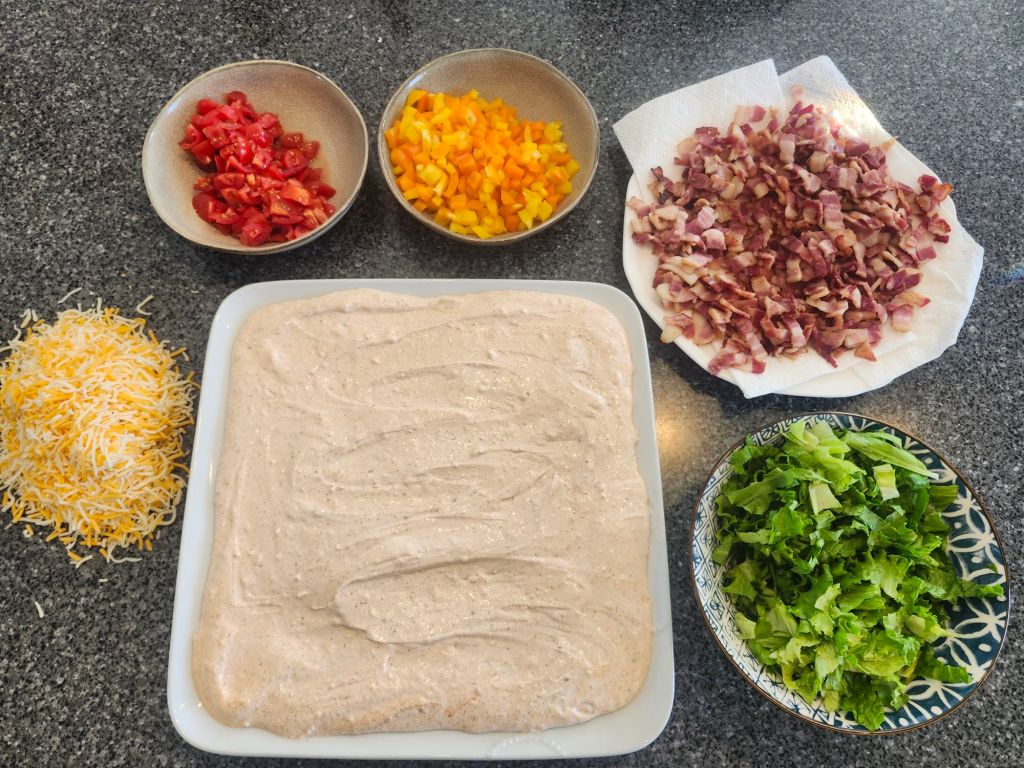
And now for a fun springish kind of recipe! This Taco dip is very light and perfect for a Sunday night supper or maybe an outdoor party. It requires some prepping of ingredients which can be done ahead of time. It doesn’t take long to assemble and can be refrigerated for a couple hours. You can also add a layer of canned beans such as chili, black or pinto, for more protein.
We really like the Better Goods brand of chips, particularly the guacamole flavored ones. They’re lightly fried in avocado oil and have cleaner ingredients. Available at Walmart.
As homemakers, we get the privilege of decorating our homes and creating spaces to our likening. (And if you don’t enjoy home decor, its ok! It doesn’t mean your not a good homemaker. Please don’t think I’m trying to tell you to get your act together and pretty up your house.) Much more important than any decor is the ability we have to set the atmosphere in our homes, for peace or tension. We’ve probably all heard the convicting statement “if Momma ain’t happy ain’t nobody happy!” Some days we can barely keep our own boat afloat. Any flailing of youngsters or husbands in the wrong direction flip us over in turbulent waters of hormones. Often, motherhood doesn’t look like photos in parenting magazines. It’s more like running a marathon, exhausted and wondering how we can keep going one more day. And that’s exactly how God teaches us dependence on Him. We can’t keep going without Him to give us strength for one more step! And how grateful I am for God’s mercy and unending love, that’s not based on our performance level. When our children crunch on our last nerve and we messed up again! We ask forgiveness and trust God for better tomorrows.
Love your family! Create moments to celebrate Easter and new life this season!
This month was one of those when multiple activities and responsibilities involving church and school, happened to land on us. If you’re familiar with the Mennonite culture, we take our turns cleaning the church house, being Sunday lunch host, etc. I was on for cleaning, for school hot lunch and Jerald was on for school devotions. We also visited the classrooms that morning. Then it was our turn to host this past Sunday. There’s a family prepared each Sunday, in case there are visitors who may need a place for lunch.
For school hot lunch there’s always two people helping each other. For something fun, we took Nachos. We spread aluminum foil down the center of the tables, then spread out piles of chips, and in between, taco meat topped with cheese sauce. They fixed their plates with rice, beans, and veggies, but then they could dig in and dip nachos to their hearts’ content! We also served root beer floats and pumpkin muffins.
I’ll include the taco meat recipe I made, although it’s more guesstimates. I had done nachos two years ago for school, so mostly followed what I’d written down for that. I keep a tablet by my cookbooks where I write down my menu and amounts I make for hosting or other events. I love this for later reference! I also write down who we hosted or what the occasion was.
I fried 5 pounds of hamburger and added approximately 3-4 Tablespoons homemade taco seasoning, 2 pints salsa and 4 pints of pinto beans, pureed in the blender. This helps stretch the meat, plus I like the added bulk. And you’d never know there’s beans in it! The salsa adds in peppers and onions. 5 pounds was plenty of meat for our school, but I wanted leftovers for my family later. We served 16 people. It takes quite a bit more meat when you spread it out like this, so keep that in mind if you want to serve this. And here’s a tip- whenever I have large amounts of hamburger to fry, I’ll put it in a big roasting pan, add water and bake at 350 for a couple hours. It’s super simple. None of this standing at my stovetop stirring burger and splattering the top with grease!
When we visited school, I took caramel popcorn for a treat. This recipe uses coconut sugar and zero corn syrup!
Reece’s classJosie’s class
For Sunday lunch hosting, I branched out and served pulled pork stacks, a newish menu for us. I like to think outside the box when I’m cooking for others, if it’s something doable and not overly time consuming. In my current stage, I need no fuss menus! Since we bought the meat from a local food trailer who smokes their pork, it was super duper simple! All I needed to do was heat it.
Pulled pork stacks consist of: pulled pork, barbecue sauce, baked beans, coleslaw, shredded cheese and top with Frito corn chips. It’s scrumptious!! Our guests loved it! This recipe idea comes out of Simple Cooking.
I also bought the baked beans. But I have a tasty recipe to make your own here.
I also served dinner rolls, apple crisp, and ice cream. Much as I love to bake fresh milled breads, my husband gave me orders to buy dinner rolls to save time. And indeed, I was grateful I did. My baby keeps me hopping; it seems I simply forget I don’t have as much time as I used to.
We had plenty of apples on hand that needed used up, so that made an easy choice for dessert. I baked it on Saturday and reheated it Sunday after we got home from church.
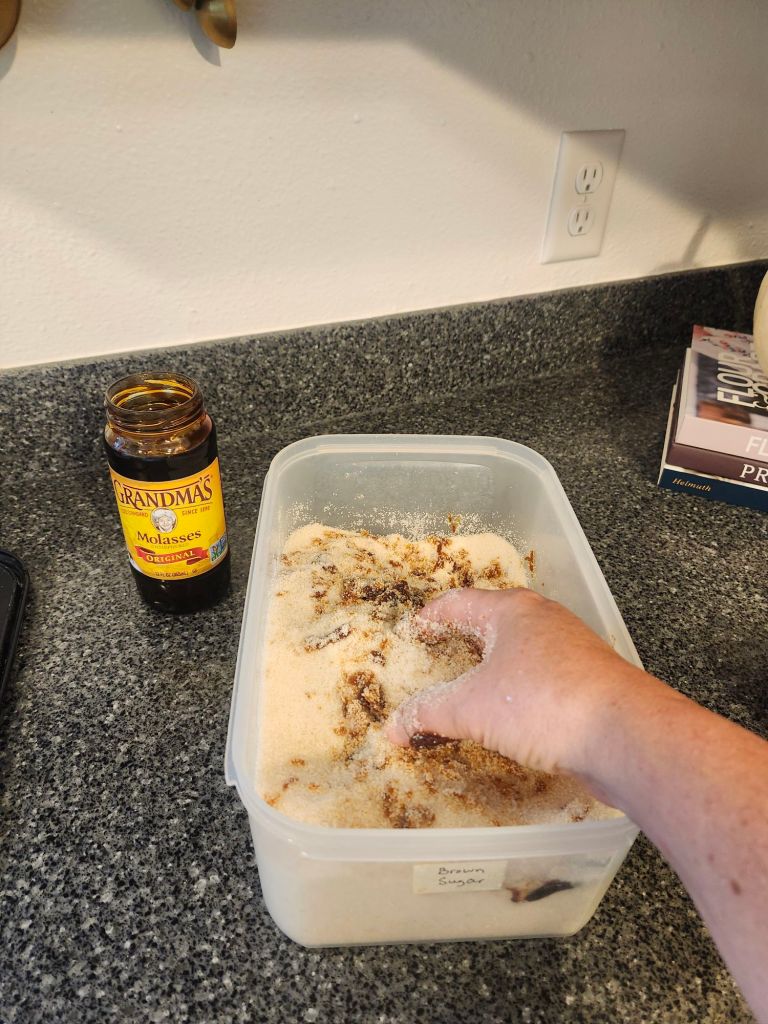
I often use coconut sugar for a brown sugar replacement, but it tends to make the food darker plus has a stronger flavor. Recently, I’ve started making my own brown sugar. I wanted to use that for the apple crisp, since it was for company. I use the Morena (zulka) cane sugar from Walmart and drizzle in molasses according to color. I don’t measure, but probably had around 8 cups sugar and 1/3 cup molasses. Mix thoroughly with your hands to completely combine. Don’t hold me to these amounts but it gives you an idea.
Here you can see the difference side by side.
When you think of fall festivities, you also think of plaids, burnt orange, or mustard colored sweaters, warm hats and cozy boots. Or that’s how my brain does it. But every outing this fall, except one, I was hot. How disappointing!
We’ve had a mild fall with downright hottish weather. I’ve been pining for cooler temperatures, especially since I’ve been on the excessive side of warm-blooded since Macie was born. (Either hormones or the mom flab that likes to hang on- uhhm) I mean, I like sweaters! But its ridiculous to wear them when it increases the heat.
Our church had an outdoor hymn singing one Sunday night hosted by Jonas and Miriam. The weather was almost perfect- just a little too warm in my opinion. There was a hottish sort of breeze, but as the sun set, it died down and became more pleasant. I wore boots and hoped for a sweater, but it was in vain. I was so warm I wanted to pull those boots off! We all brought snacks to nibble on afterwards, alongside a table of hot drinks. Although I, in my overheated state, had not the slightest desire to partake of anything hot.
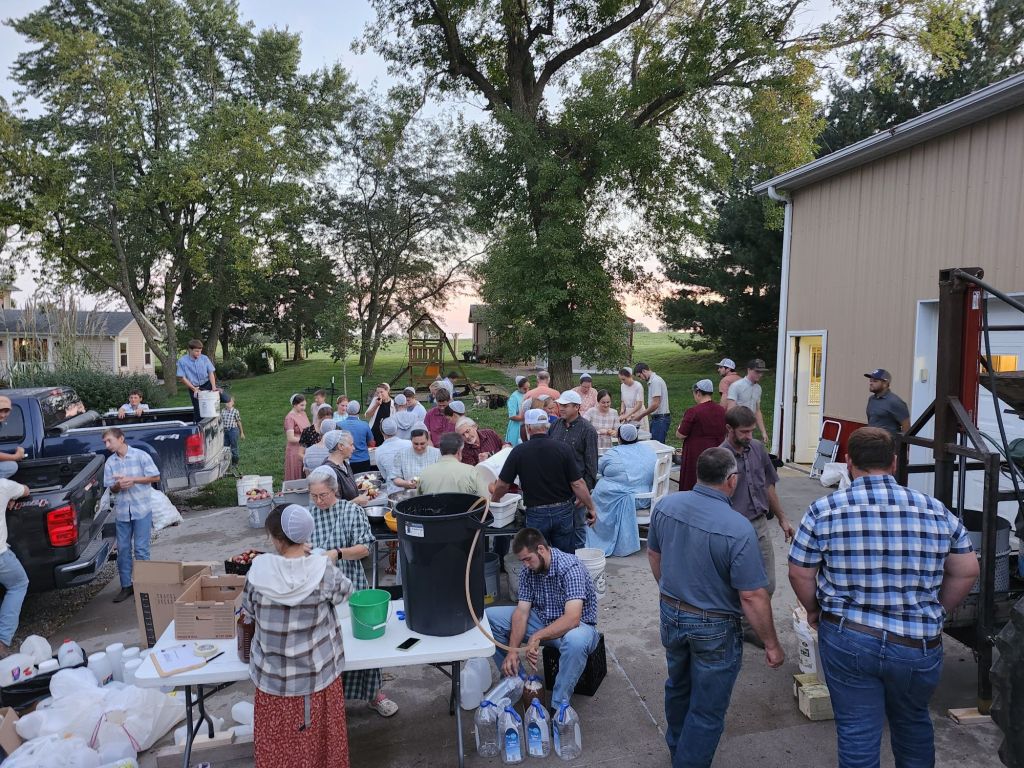
Our church also got together to make apple cider again this fall at Norman and Kathryn’s farm. We ourselves don’t actually drink much cider, but it’s a fun activity to do with friends. It was a perfect evening with pleasant temperatures. Really, it was. I wore flops, no sweater, and was comfortable, if that tells you anything.
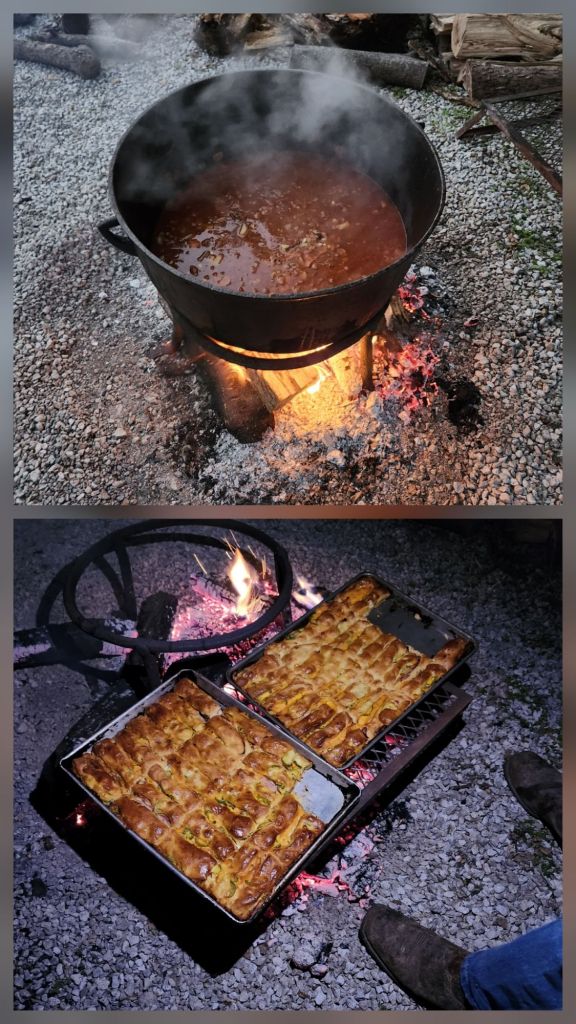
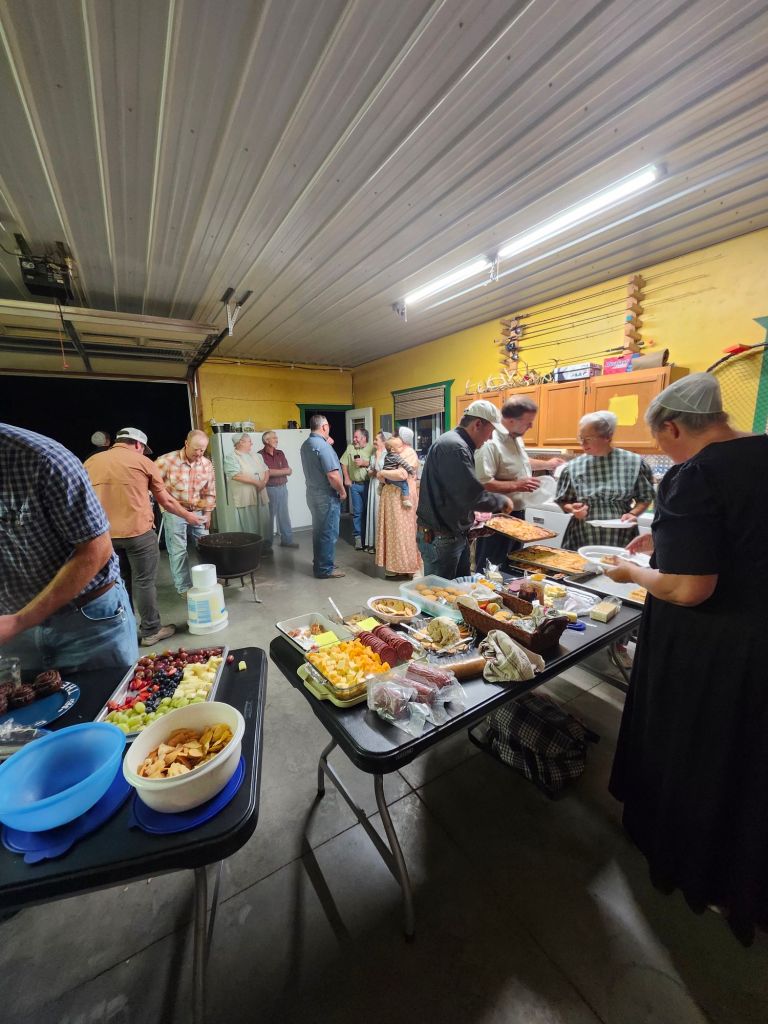
In the past, we would fill jugs with a funnel and measuring pitcher. This year we finally got efficient and filled jugs with a siphon.Jerald enjoys cooking up this stew over the fire for our supper.Another family made these ham and cheese bars.There’s also plenty of yummy finger foods
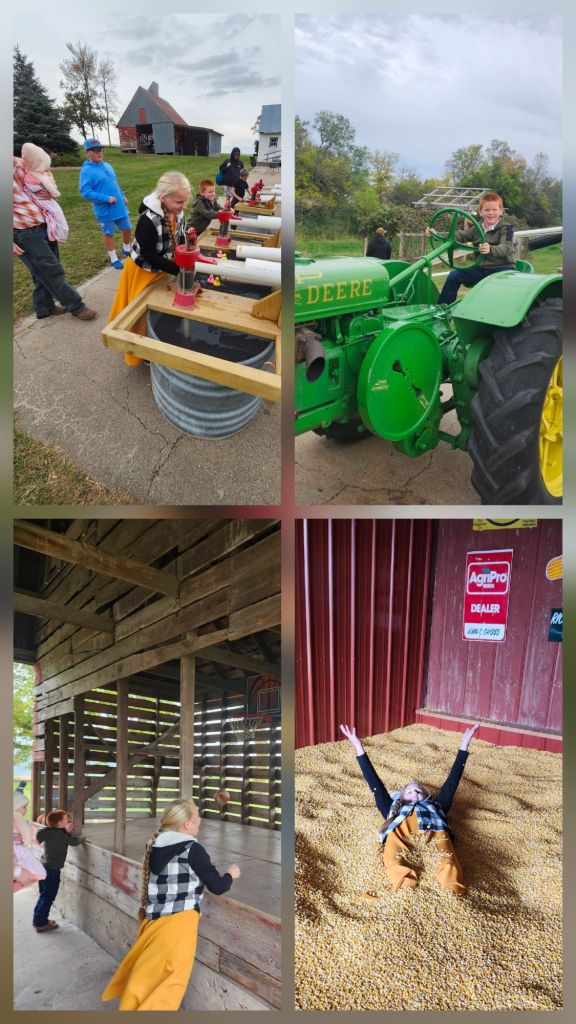
One evening, our family had a fun little outing at a pumpkin farm near Avoca, Nebraska.
This was a smaller farm, but still had a lot of things for the children to enjoy. We were glad there were no Halloween decorations either.
And so it was, on this particular evening we were heading out to Bloom Farms, I was stewing about all the jackets and stuff we were dragging along. Earlier in the day it had been sunny. Backstory- twice, in just a couple weeks, we piled in all the things for outdoor evenings and, as I figured, it was useless. The children even ran barefoot the one night! It makes so much extra unloading when we get home.
So, on this night, I only grabbed a light sweater for me. Wearing flip flops raced through my mind as I sailed out the door, but it seemed a little off for a fall outing, so I slipped in shoes. And what a shame it was- I could’ve put my new boots to use! Late afternoon it clouded over and the north wind blew strong! It was COLD! For the first time in probably months, I was actually chilled. I was grateful the children had jackets and the thick blanket we had for Macie. Whenever I shivered or mentioned the cold wind, Jerald kept ribbing me that it was exactly what I wished for! He thought it was a good joke on me. I kept fearing for Macie in that cold wind. Lest you fear my mothering skills, I promise I had her bundled up. In typical dad fashion, Jerald kept saying, “she’s fine- the fresh air is good for her.” And so she was. She has not been sick yet, for which I am grateful!
All summer long, I kept wanting to post a couple seasonal recipes. But time has seemingly picked up a rapid pace. Is it because I have a baby this summer? Or is it because I turned 40 in July, and now I’m picking up speed going downhill? Whatever it is, I find it hard to keep up with the hampster wheel speed that it feels like. It seems I spin circles just getting the basics done.
But I also enjoy a few hobbies like sewing or blogging. It feels rewarding to occasionally accomplish things of that nature, even in this busy stage.
So real quick here, before summer ambles off and completely forsakes us, I’ve got 3 recipes you need to try.
The lemon blueberry muffins and pesto definitely have got summer vibes! And I’ve been frequently making the chia seed pudding this summer and wanted to share that too. But on second thought, grapes are more of a fall thing. Well, in that case, at least I’m ahead of the game. Now you have it for September!
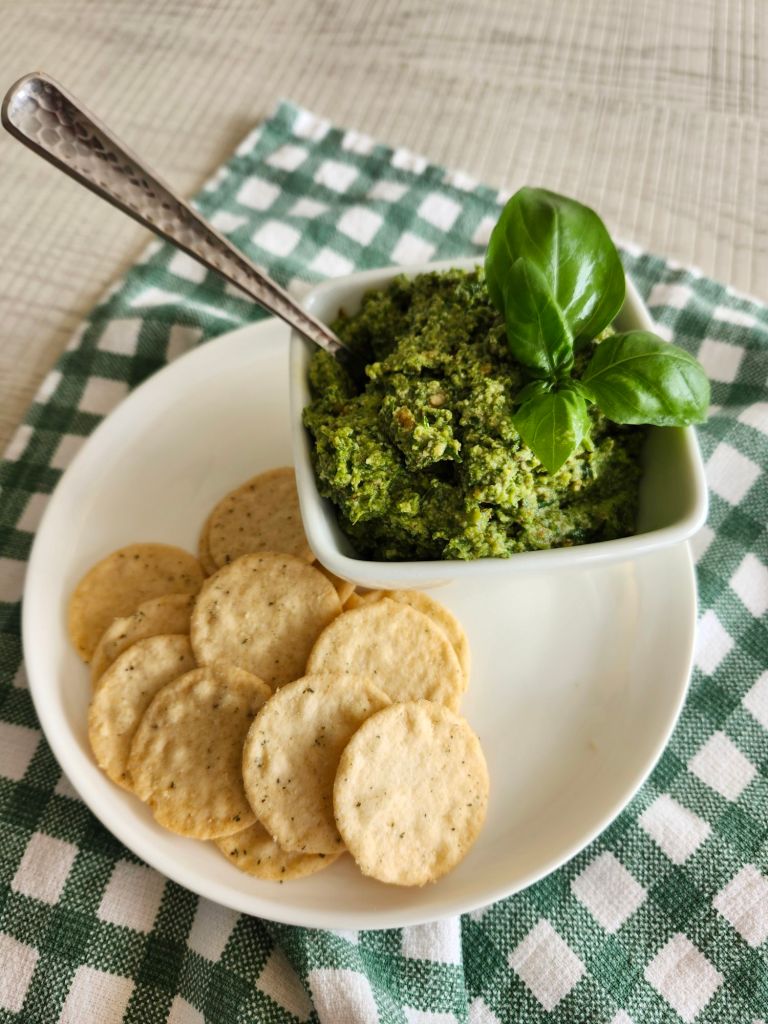
The basil pesto can be easily tweaked to your preference. Most recipes call for pine nuts which I never have. I substituted pecans and I’m sure walnuts could be used as well. Here you go.
2 cups fresh basil leaves, scant 1/2 cup olive oil, 1/2 cup pecans, 1/4 cup parmesan cheese (the shaker kind) 1/4 teaspoon salt or to taste, 1-2 teaspoons garlic, (I use minced canned garlic. Why waste time pressing garlic when I can buy it ready to throw into recipes?!)
If you put the nuts in first, and than the leaves, it blends better. As you can see I didn’t follow my instructions here, but I learned that the next time I made it! Drizzle in the olive oil as you pulse the blender. Blend until smooth.
This is delicious eaten with crackers or spread on a sandwich or on pizza instead of sauce. Add toppings such as fresh tomato and olives. Obviously, it has a distinctive basil flavor, which tastes so fresh!
I’m sorry if you don’t like lemons. Just because lemons are sour doesn’t mean it will make you sour by eating them. Lemons are always fresh looking, smelling and tasting- who can beat that?! Especially in something like cake or muffins. I revised this recipe using fresh ground flour, less sugar, more lemon juice and also added lemon essential oil for that extra punch of lemon. I used fresh squeezed juice, but I’m sure the bottled kind would work too. They were mouth-watering!
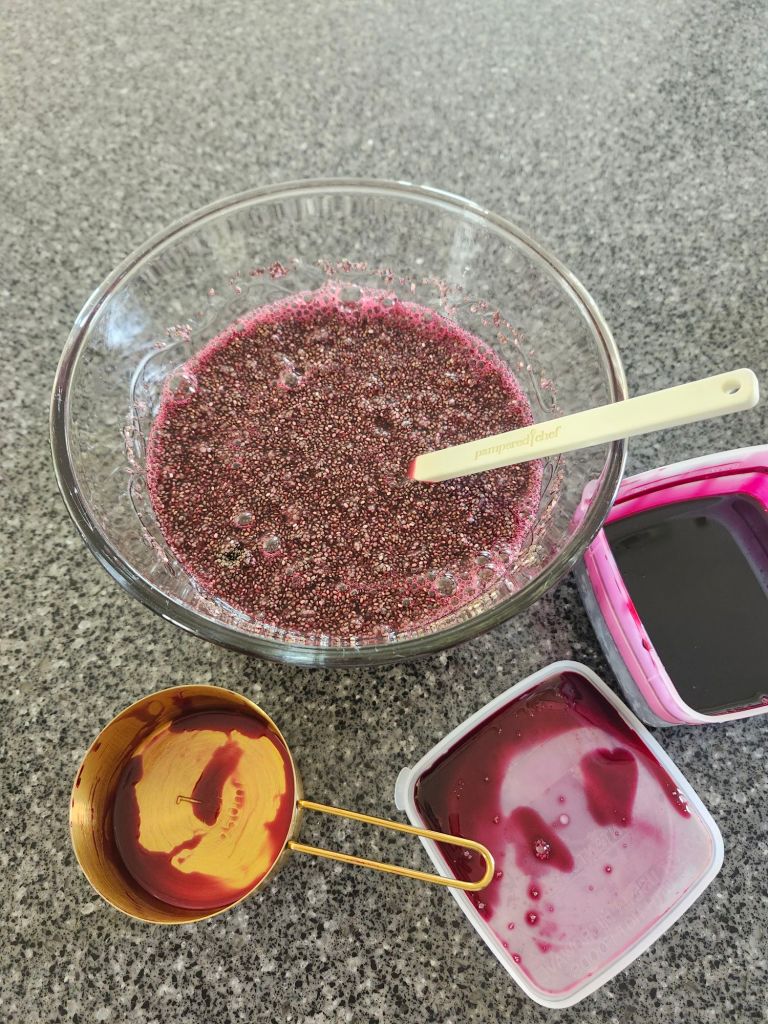
I revised this chia seed pudding to use grape juice concentrate instead of strawberries, like the original recipe called for.
Chia seeds have protein, fiber and Omega 3s. They’re best absorbed by soaking before eating or then grinding first. If you eat them whole in foods, good chance they’ll go right through you without any benefits.
We get our grape juice concentrate through our local bulk food store. It’s ordered in bulk from New York. It is a thick, rich, concentrate. If grapes had feelings, it would put canned grape juice to shame. You can totally use your own canned juice to make this or store bought concentrate. It just won’t be as rich, but I’m sure it will still be tasty. Thinking of school starting up, this makes a great lunch box food. A healthy alternative to sugary tapioca pudding!
Soaking the seeds
Thanks to my sister in law Becky, for sharing the strawberry chia seed pudding with me years ago. That is delicious as well! Eliminate the water and soak 1 cup chia seeds with 1 quart crushed strawberries. Everything else is the same.
Over the winter, when I wasn’t feeling well, our church family blessed us with lots of yummy food. Not just suppers but also breakfast items, which were super helpful. Especially since Jerald would be up with the children, helping them with breakfast, so I could get extra sleep.
I have found how lovely it feels to simply pull out breakfast items from the freezer for less stressed mornings! And I’m going to share ideas and some recipes with you.
I’m sure breakfast looks different with large families or depending what stage of life you’re in. But for us moms with young families, keeping your freezer filled with ready made (homemade) foods is extremely helpful and freeing. You feel prepared instead of scared!
When my Mom and sister Geneva were here after Macie was born, I had them stock the freezer with food and one of those was sausage gravy and biscuits. They filled pint size freezer boxes and bagged up 4 biscuits per package. Now I simply pull out a pint of gravy and bag of biscuits the evening before. It’s ready to reheat in the morning for a nourishing breakfast my children delight in.
Biscuits and gravy in my fridge freezer. The other container has fried bacon.
Sausage Gravy
1 pound ground sausage, 3/4 cup flour, 1 ¹/² teaspoons salt, 1/4 teaspoon pepper, 4 ¹/² cup milk.
Fry sausage, add flour and seasonings. Stir in milk and cook until thickened.
Used with permission from Stutzmans Culinary Secrets
This is a very delicious and super easy gravy recipe!
The biscuits are the buttermilk biscuits out of Prairie Flour cookbook, which I don’t have permission to share. But I’m guessing many of you have your favorite recipes anyway.
This cookbook is filled with recipes using fresh milled wheat flour, besides much information on a variety of grains, using sourdough and such like. A very worthwhile investment! You can find it online at Amazon or some book stores. You can also purchase it directly from the authors by emailing them at prairieflourcookbook@gmail.com
Another helpful tip is to keep fried and crumbled bacon and sausage in the freezer. Geneva filled a container of each when she was here. It’s perfect for pulling out a handful and adding in with eggs. Scrambled or soft. Make a few pieces whole wheat toast for a no fuss healthy breakfast. Josie is good at making this simple breakfast.
Avocado on toast is another delightful breakfast in case you didn’t know! I have a whole post dedicated to that. Avocodos are still dear to my heart. But I don’t eat them on toast anymore, since I’m breastfeeding, and am currently trying to avoid wheat for my baby’s sake. (tummy ache) Although I’ll still eat plain avocodos sprinkled with salt and nutritional yeast. A squeeze of lemon juice over it is tasty as well.
Another easy breakfast is Dutch Babies, although these take about 25 minutes to bake. I have another post dedicated to these as well! Anymore, Josie is often the one to make it for a weekend breakfast.
One of the church ladies gave us these breakfast bites the children loved. They’re very simple and I’ve made a batch myself to have on hand for easy breakfasts. These freeze well!
You can use 2 tubes biscuits or crescent rolls. For the biscuits, you press into greased muffin tin, then fill with the following mixture, and bake at 375 for 13-17 minutes
For crescent rolls, roll out in rectangular shape and spread with filling. Slice like a cinnamon roll and bake.
Filling mixture:
1 pound fried sausage, 1 8 oz soft cream cheese, 6 eggs scrambled, 2 cup shredded cheese. Stir together.
I don’t endorse using processed dough like this, but I’ve had to simplify and hope we don’t die in the process. Nonetheless, my goal is to make them again, but using my own homemade crescent roll dough using freshly milled wheat flour.
Another one of my church ladies gave us quiche. It’s something I rarely make, but hers was delicious! Since then, I made the same quiche but used fresh milled flour in the crust. Not only is it tasty, it’s also chuck full of protein with sausage, eggs, milk and cheese.
The recipe I used is out of Flour & Grace cookbook, so unfortunately I can’t share it here. But I’m sure you can find good recipes elsewhere too.
After baking the quiche, let it cool completely, then cut into pieces and freeze. Pull out a piece the evening before and set in the fridge. It’ll be ready to reheat and eat! (I say piece, because I ate it more than my children. The spinach scared them away, unfortunately!)
Now for a breakfast I’ve been eating lately. Eggs and oats both bother my baby, so I need to avoid those, which is hard when it comes to breakfast time! But a good replacement is quinoa.
Quinoa is a complete protein and is rich in fiber. It’s also low on the glycemic index, which means it doesn’t spike your blood sugar levels. If you want a savory dish of quinoa to replace rice, I suggest cooking it with broth. Not only does it taste better, it’s even more nutritious with the broth! After it’s cooled, quinoa is also a great addition to or a base for salads.
But for breakfast, I cook a big batch using water, and then keep it in the fridge and reheat a bowl as I need it. It’s delicious sweetened with stevia and a drizzle of maple syrup. Then I add fruit, pecans or almonds, and a splash of milk. Sometimes I’ll sprinkle on ‘no sugar added’ chocolate chips yet too. A hearty filling breakfast!
And just a side note. It’s been a number of years since I’d written about the Bolivia stevia. I’ve heard concerning things about that, so have discontinued using it for a few years now. I’ve experimented with different brands. The one I’m currently using is this microingredients brand organic stevia. It sweetens nicely with very little bad after taste. I hardly think of the taste, but I better not say there’s no after taste because some might pick up on it. But it does seem to be a reputable brand and I’m pleased with it. I’ve ordered it off Amazon.
For drinks, I still like the liquid stevia glycerite shown below. Also available on Amazon or health food stores.
I hope I’ve inspired you with ideas you can make to feel prepared for those busy school mornings! There are still days my children eat cereal or granola, but I prefer to have them filled with more nutrition and protein than that. So much of healthy eating takes intentional planning and preparing!
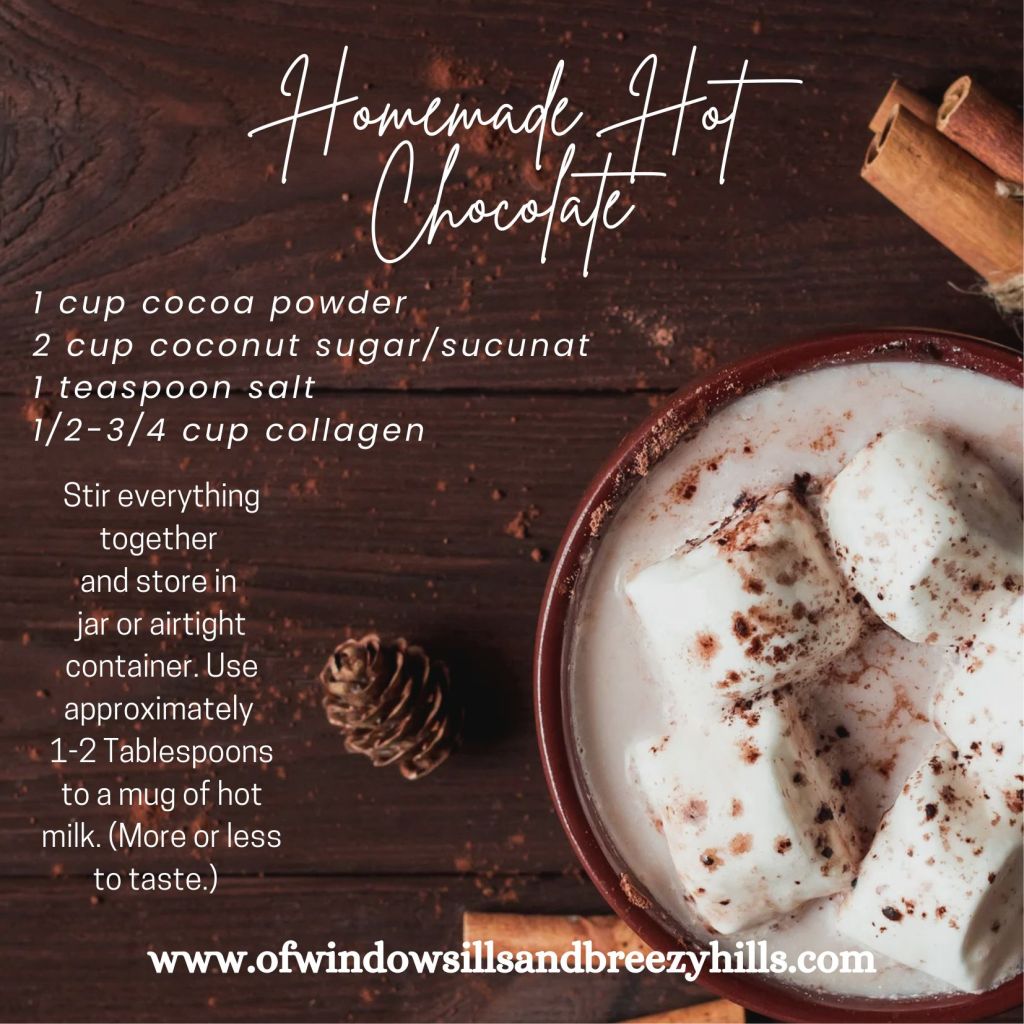
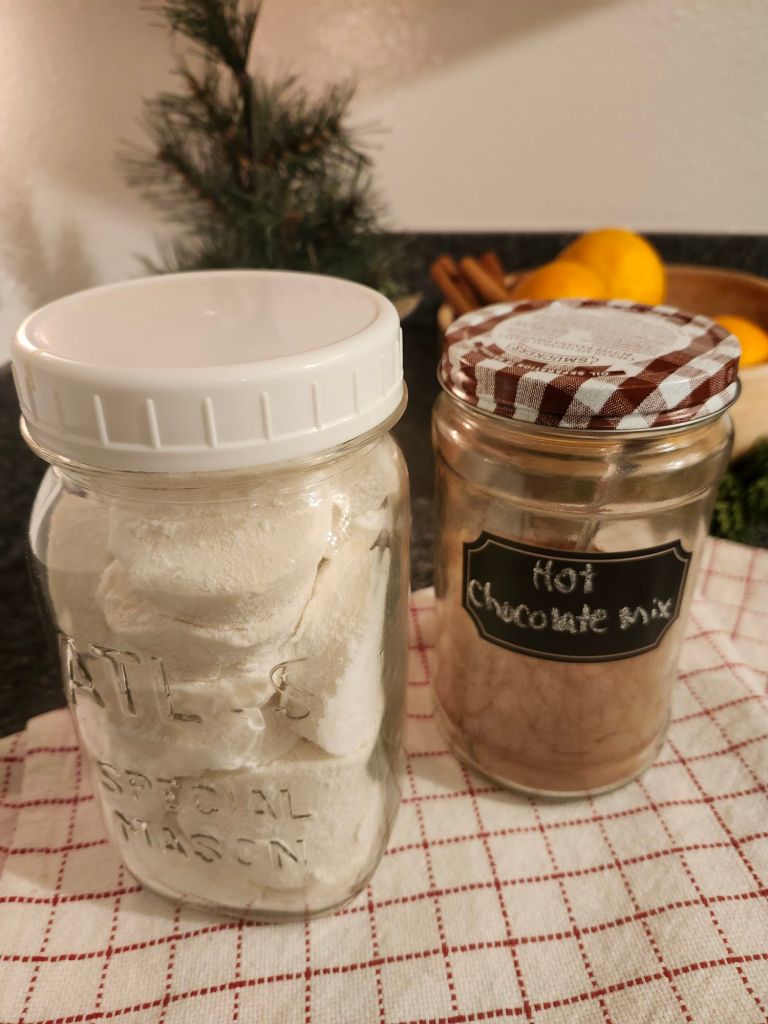
On a shivery sort of day, my children love hot chocolate. When I was growing up, we made our own mix each fall. Many winter mornings we enjoyed a hot cup of chocolate. And often for an after-school snack too. Mom and Dad put restrictions on how many cups we could have in a day. As for mini marshmallows, those were restricted as well. If I recall correctly, 7 was the alloted number allowed per cup.
I still have that recipe for hot chocolate mix in my kitchen, but I just can’t bring myself to make it! It’s full of things like Nesquick, powdered sugar, and powdered milk. Eww… I’ve learned a few things since those days.
But neither does this mother approve of Swiss Miss packets. Occasionally Josie reminds me she had hot chocolate at school that day. And I cringe to think of all the sugar, (28 grams to be exact. Yes, I checked. This was off the milk chocolate packets ingredient list) corn syrup and other non-pronouncable ingredients that entered her body. She quickly assures me she only uses half a pack. “But then I eat the rest,“ she said. Oh shivers!😫 What can I do?! It’s a real world out there.
This is what I can do. I can make my own hot chocolate mix and marshmallows at home!! Then, when they want a hot cup of chocolate, I can rest assured I did my best in creating a much healthier alternative.
Yes, this still has sugar but a kind of sugar that’s much easier for our body to process. If you use coconut sugar like I did, it is even lower on the glycemic index than sucunat. Plus, the mix has an added benefit of collagen, which is great for a little extra protein! I used Great Lakes collagen which is a clean brand. Some will have sneaky additives or MSG in them, so be careful what kind you buy.
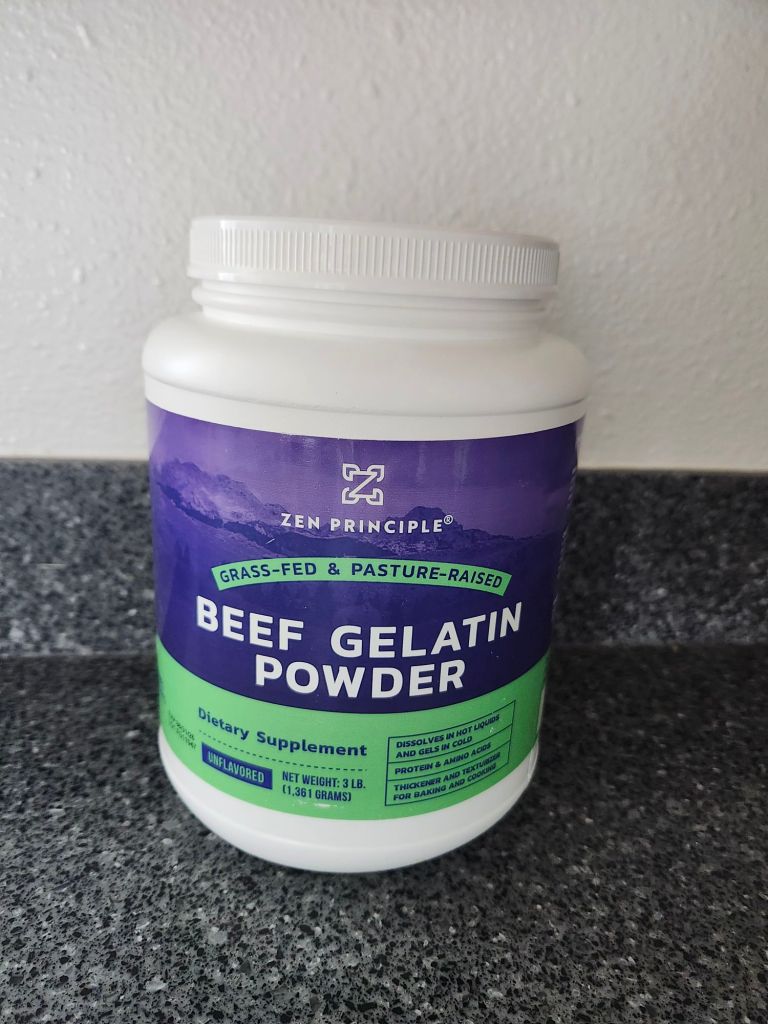
As for the marshmallows, they too have protein in the form of gelatin! Although let me hasten to inform you to make sure you use a good grass-fed beef gelatin. This has wonderful gut healing properties. I use this same gelatin to make a protein packed jello. You can find the recipe in this post.
This is the kind I use. I ordered it off Amazon. Most health food stores will carry a healthier form of gelatin.
You can try cutting back on the sugar or even using Simple Sweet. I tried using less sugar but didn’t think it was sweet enough.
This hot chocolate recipe is one I found out of Keeper’s At Home magazine Fall 2024. Although the lady that shared it said she liked adding water and vanilla yet and cooking it into a syrup. I prefer the dry mix, so that’s how I chose to make it.
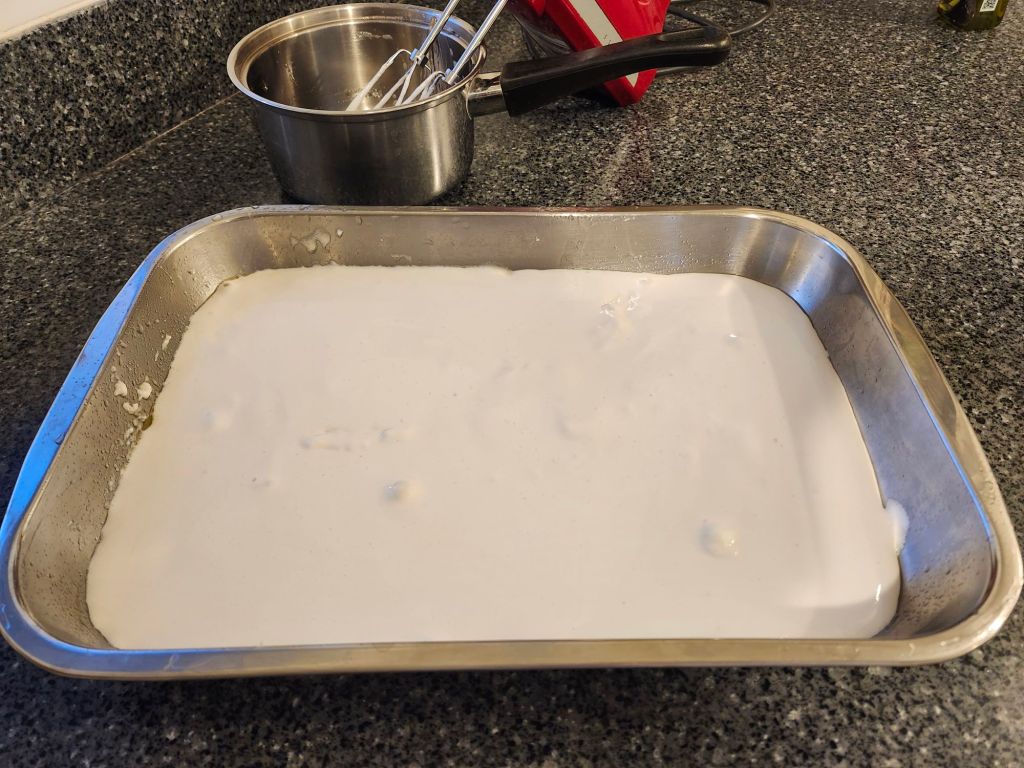
This marshmallow recipe is also not original with me, but I changed it up a bit as to how I make it. And honestly, I was out of vanilla so mine didn’t even get that. I’m sure it’s a good addition though. I used a 9×13 pan but it made thinner marshmallows. So I’d recommend a smaller pan if you want a thick version.
I have tried these using 1/2 cup honey and 1/3 cup xylitol. But there was not enough bulk, and didn’t whip up to a large amount like the full cup of honey does.
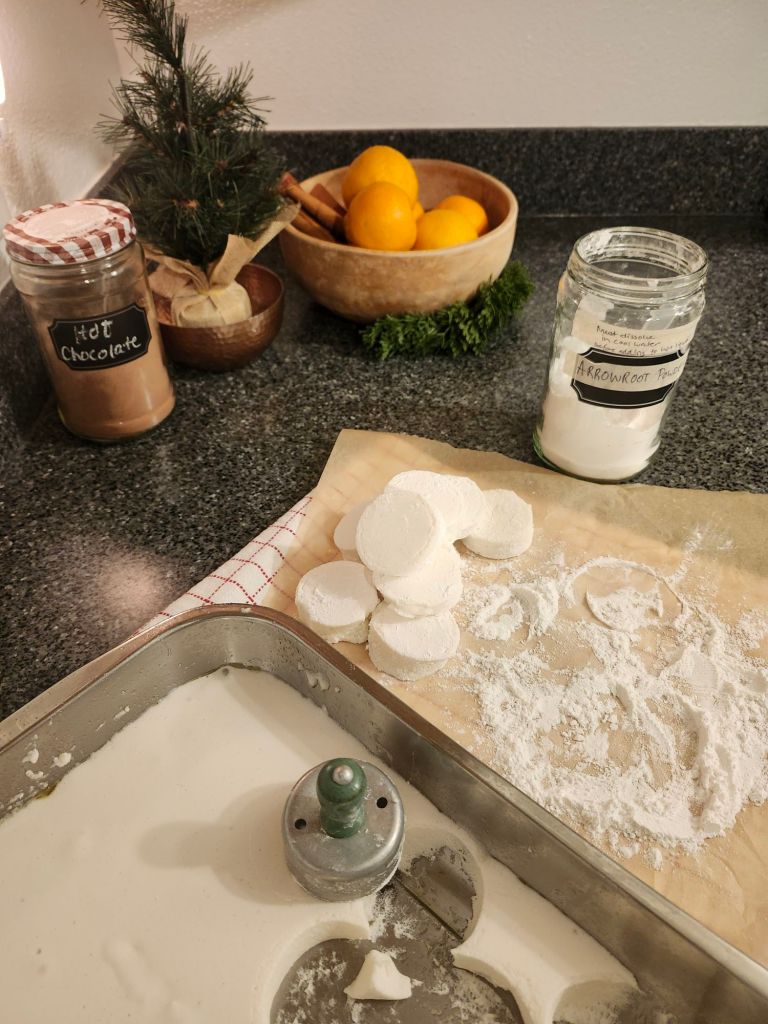
Arrowroot powder comes from the arrowroot plant’s tuber. It’s a gluten free white substance that is used as a thickner for an alternative to cornstarch or flour. To use it as thickner, be sure to dissolve it in cool water first before adding to hot mixtures. It’s also often used in gluten free baking mixes. It’s tasteless, so it works perfectly for dusting these marshmallows without adding extra sugar! You can find it online or health food stores.
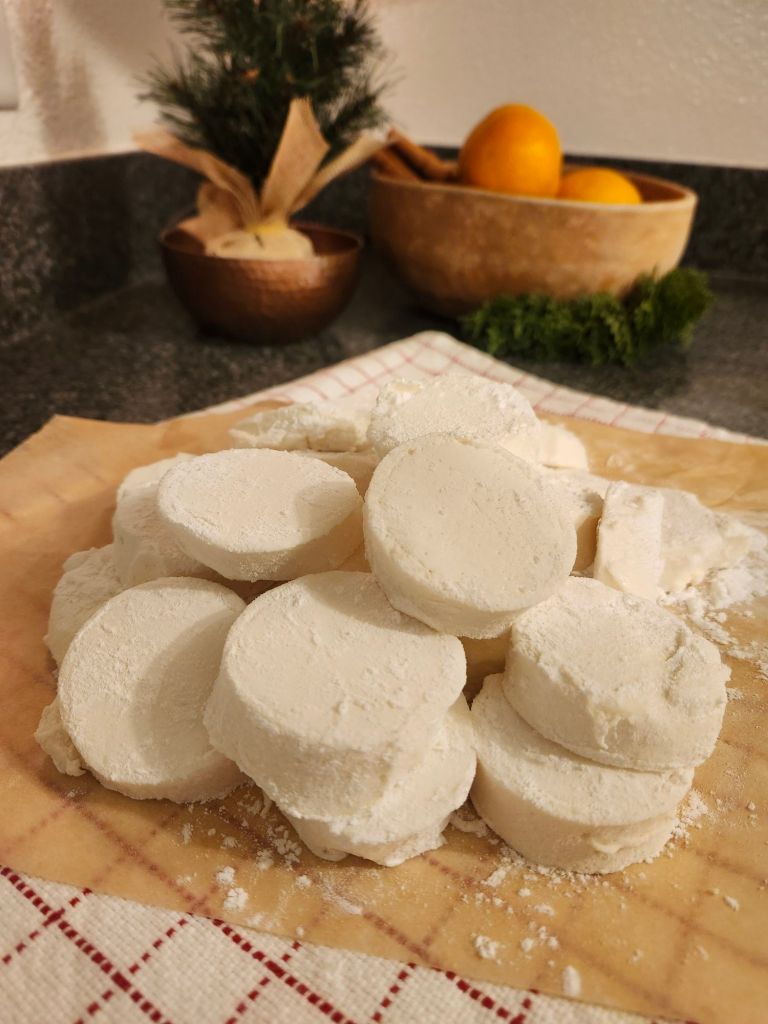
Please believe me when I tell you these marshmallows are waayyy more creamy than their inferior boughten version! Delicious too. I love that I can throw 1 or 2 marshmallows into my cup and it dissolves into a luscious creamy goodness- without that guilty feeling!
I have not tried roasting these, although I don’t know why they wouldn’t work for that.
All set for a cup above the average processed, sugar laden, food coloring smitten packaged mixes. Did you know marshmallows have food coloring in them? Food coloring to make them look sparkly white! 😢 Oh, and have we mentioned corn syrup?!
I thought my marshmallows might not be very white due to the honey, but they really do have a nice white color without fake coloring involved!!
An update on myself since my last post. I’m still dealing with lightheadedness, but am much better than the first 2 weeks, for which I’m grateful! I’m up more than I was, but still not back to my normal duties.
I’ve been getting massages and trying things to help open my eustachian tubes. I’m chomping gum. I hate gum! And sucking Sour Patch Kids. Both make salivary glands run, which can help open the tubes. Imagine me and hideous food coloring, sugar covered candy!! I stand at the bathroom sink and spit out the saliva it produces, then thoroughly rinse my mouth. I would hate to ingest the amount of candy I go through some days!
Most people could take an allergy med or something like Mucinex to help dry up the remaining fluid in the ear, but it’s not safe with pregnancy, because it could affect the amniotic fluid. Today I went for an IV infusion for an added boost to my overall health. I hope it will especially help with the heart palpitations.
Church ladies have been so graciously bringing us meals!! Some have given breakfast foods, which have been such a help for those hurried school mornings! Flowers, cards and messages remind me I’m being prayed and cared for…. I feel so blessed! ♥️ For truly, many people in today’s isolated world do not have this privilege.
It’s been over a month since I last wrote. I have no deadline to meet as to when I write, which is lovely. But it bugs me when I want to write and I lack inspiration. (Writing when you have no inspiration is like yacking when you have nothing to say) And some people certainly yack without saying much, and others don’t talk much but say a lot when they do.
I don’t know what all is going to come out in this post, so beware. Don’t tell me I have nothing to write about because I am, after all, writing about my lack of inspiration.
I couldn’t tell you how many times in the last weeks it weighed on my mind to post another blog, but what?! Oh sure, I have ideas, but my ideas tend to be loftier than the realities. Some of my ideas take research, which equals time and my time kinda spins out on me with trying to keep myself, baby and family alive and nurtured. And there’s always the fun things like organizing spaces or rearranging furniture and such things I’m fond of. Of which we did both this last week. (I said ‘we’ because hubby helped with the furniture.) But I did the pantry myself, of course. I had to show him though, because he would hardly notice. And because it means so much to me to have a good-looking space again!
Back to the stalled inspiration. I wish I could inform you all on deep health subjects that sent everyone on massive clean-out-the-toxins sort of syndrome. You would throw out all the processed foods in your pantries. You would ditch all the plastics, polyesters and synthetic fragrances in your home. By the way, I’m trying to do this as much as I can, or that is reasonable. For example. I’m switching to more glass jars for food storage. (Honestly, I’ve got way too many modular mates in my cabinets than I care to admit and I don’t forsee me excommunicating those anytime soon, sad to say.) But I also have a growing collection of jars hosting dry items in my pantry, so it’s not like I’m not trying!
I am also getting rid of those plush, fuzzy wuzzy throws everyone loves. I’m replacing them with 100% cotton throws. Because there’s plastic in those things! Ya’ll! Plastic is an endocrine disruptor! Don’t sleep with plastic, you could suffocate! Possibly even die.
Instead of eating Hamburger helper and instant pudding, you would cook red beets and eat homemade saurkraut. You would burn beeswax candles and sew all your clothes out of hand spun wool or linen. There would be no plastic wrap or baggies in your kitchen drawers. Only cloth coverings or beeswax wraps. You would wake early, while it is yet dark, (Proverbs 31) and milk the cow, churn the butter and butcher a chicken for the day’s guests. You would fry up liver and onions on a regular basis for a nourishing meal. Or, you would swallow beef liver capsules in abundance. (which I do, and I’m sure some of you do too- hurray for a strand of homesteadyness in us!)
There’s moments we may dream of the slow paced days of yore. Where the homesteading Mama is doing all those virtuous chores plus more. She even made her own lye soap to scrub her family’s clothes. The wooden bowls and cutting boards were necessities, not aesthetics from the department store. But really. Would we want to trot to the outhouse 3 times in the dead of night? I bet the panthers and coyotes were real fears. What about taking only one bath a week? And draw our own water besides? Or how bout sharing the bath water?!
These sort of thoughts whip me right back into the 21st century with a high dose of contentment. I’d take the less toxic life, for sure, but some things I’ll pass, thank you.
To tell the truth, I have plans to write a long post or two on a subject of health that typically affects everyone with a beating heart. Actually, it affects the dead too. I mean, you could die from it and even dead people are afflicted with this malady. It sounds kinda deep, right? Maybe I’ll hit the clean-out-the-toxin syndrome next round?!
I’ve got accountability now, and perhaps that will inspire me to gird up my loins and write about this deep and gory topic I have long avoided!
P.s I think this Mama had too much caffeine today by the looks of this post. Starbucks is rare for me, but today hubby said ”treat yourself,” and I sure did. I ordered a grande, then couldn’t even finish it.
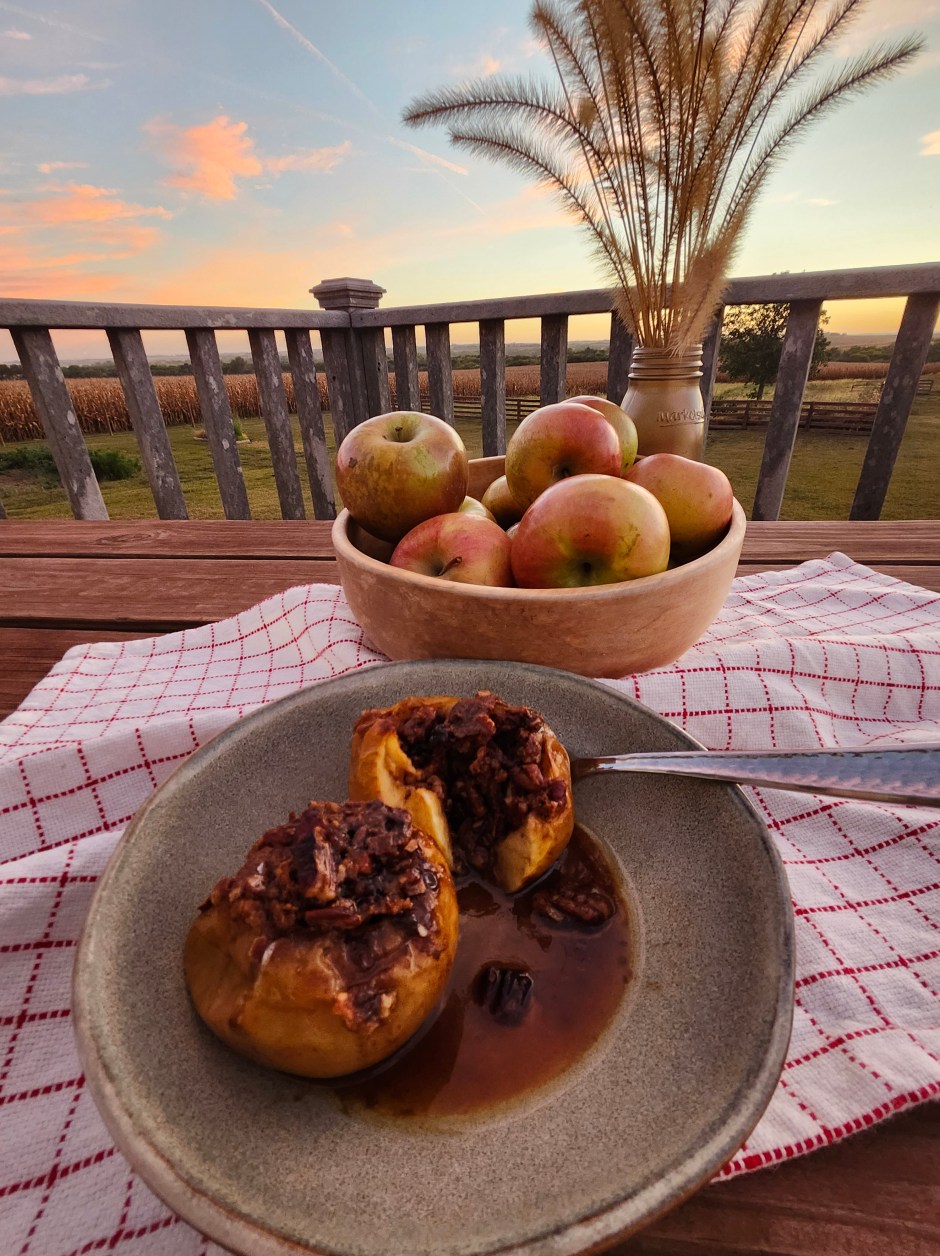
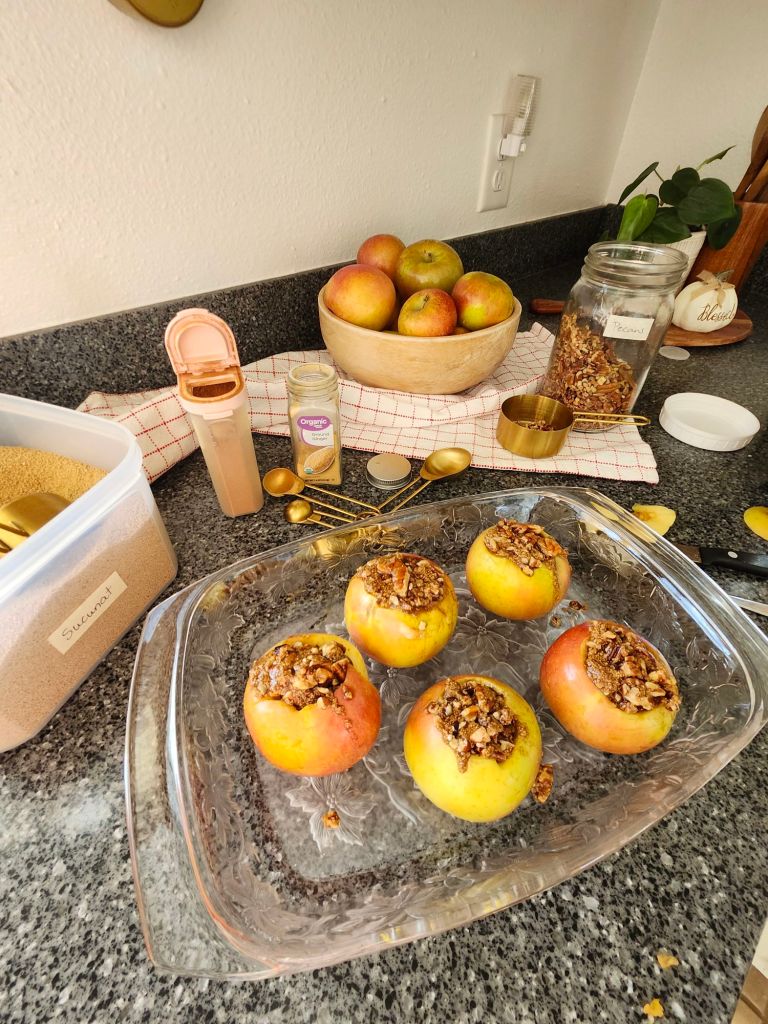
Oh actually, I was going to let you in on a sweet, crispy, healthy dessert for the season! I resurrected this recipe just yesterday or the day before, so I better type while the urge hits or I might lose it again.
Baked Apples
Take 4-6 apples and carve out the insides as much as you can without hitting bottom or ruining too much good flesh. I used a knife and grapefruit spoon. Then fill the cavity with this mixture:
1/2 cup walnuts or pecans, 1/3 cup sucunat or coconut sugar, 1/4 cup melted butter, 1 teaspoon cinnamon, 1/2 teaspoon ginger
Bake at 375* for 35- 40 minutes. They will be piping hot so proceed with caution!
These are the filled apples before baking. They won’t look as pretty afterwards. They turn dark and the juice will cook out into the pan but they certainly are scrumptious!
We are pleased to announce we have recently launched a website for our tahor soap business! http://www.tahor.shop
With the rate summer is speeding by, I better get these recipes published before I miss the season entirely! They’ve been on the radar for some time now, but getting them ready and into a post, is taking me longer than intended. Oh well, I can always say, “it’s summertime, I’ve just been so busy!” That’s the usual thing to say these days, right? Ever hear anyone say, “I’ve beensobored this summer?!” Me neither. Excuses aside, let’s get on with the post. Come along for some of our summer favorites!
This coleslaw recipe is a fantastic way to spice up an outdoor picnic. It’s not your typical coleslaw and we love the diversion of the usual. I prefer not adding the tomatoes.
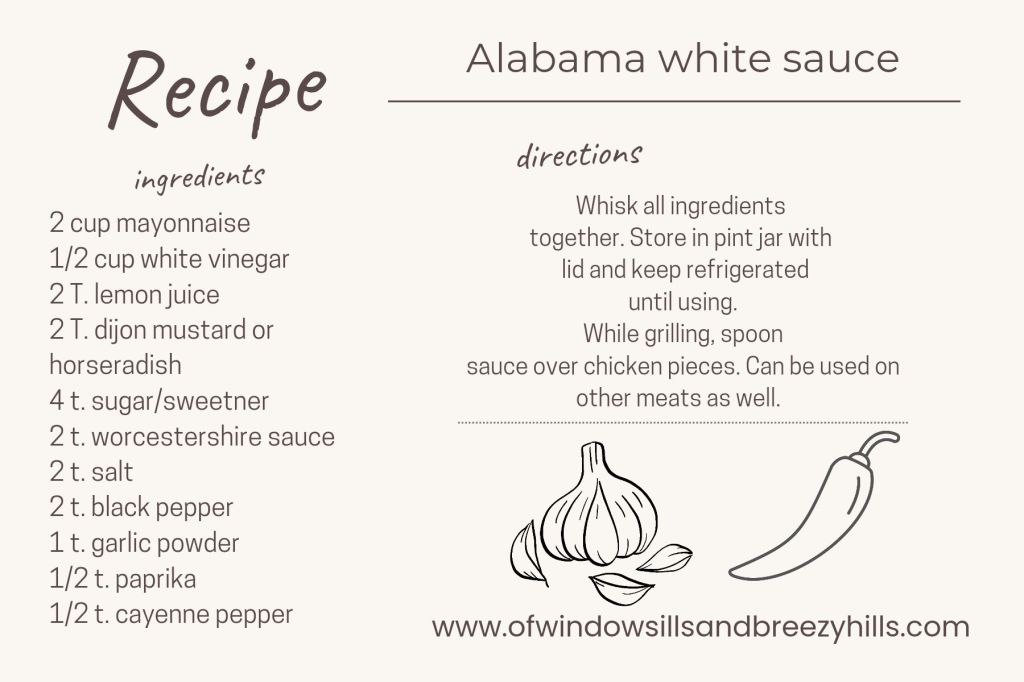
This next recipe we only started using recently. It is super delicious on grilled chicken, but can be used on other grilled meats as well. It’s also great to add on extra sauce when you’re serving the meat. I would highly recommend making your own mayonnaise to avoid consumption of those corrupt seed oils. You can find the recipe I use in this post.
I feel a teeny bit partial to this sauce simply because of it’s name. It reminds me of those good old days that were, when I used to live in Sweet Home Alabama. Some things I don’t miss though, are the chiggers and the 7 month stifling humidity.
Regrettfully, I don’t have a good picture of this sauce.
My family loves baked beans, but I decided with my own stock of home canned beans, there’s no reason I can’t make my own. No carmel color, preservatives or atrocious amounts sugar in these either! You can definitely tweak this recipe to your liking. Swap out the black beans for navy if you prefer, as well as seasonings/onions. I’m a little hit & miss in the seasonings and sauce/ketchup. I often just guess and dump. Most times my Guesser turns out to be pretty accurate!
I devised this recipe many years ago, then revised it this summer. You might freak out at the idea of adding in bacon grease along with the bacon. But we’re blessed to raise our own organic hogs. Because of that, I don’t mind adding in the fat. We love bacon! Typically when I fry bacon, I pour the fat into a glass jar I keep in my fridge for this purpose. Frying green beans? Use some of this fat instead of another oil. Popping popcorn? Bacon grease adds a delicious flavor and we much prefer that over any other oils.
This hummus is an excellent way to sneak in protein for healthy snacking! My family backslides into wanting chips to eat it with instead of veggies. But when I prep it bright and colorful like this, they’re not as apt to ask for chips. Another way to do it is to make sure there’s no chips on hand in the pantry, and then you can honestly say, “we are out of chips. This time we’re eating veggies with hummus.”
Fresh strawberries are a rare fruit this part of Nebraska. Sure, we can find them in the grocery stores, but I mean sun ripened, fresh picked, juicy berries.
When I was growing up, it was a common thing to visit a local strawberry patch open for picking. And oh, I miss that! There’s just no strawberry farms locally. The few that are within an hour or two away have prices that scare me away.
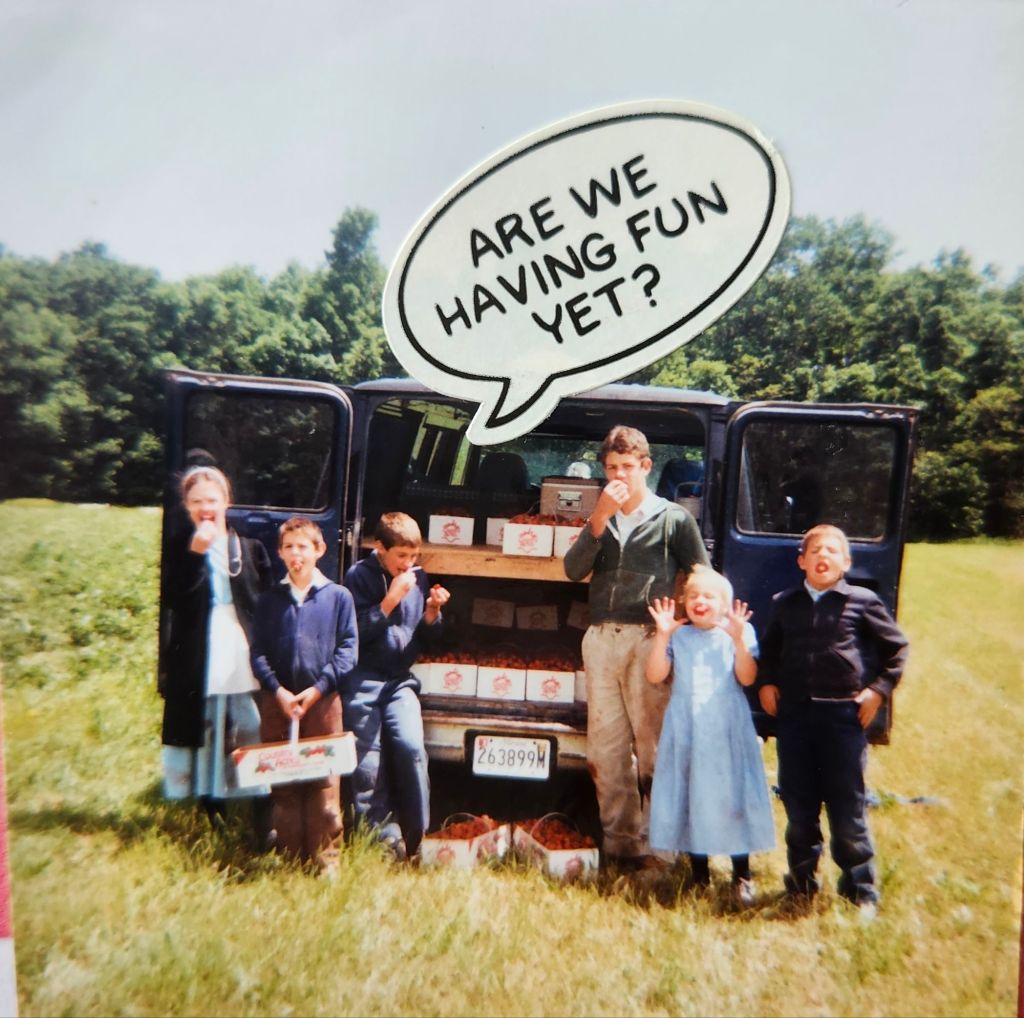
Many years ago, our family picked strawberries to fill orders for Mausts Strawberry Farm in Accident, Maryland. We’d leave early and pick before it got too hot. Mom would pack cereal boxes and milk in a cooler. Breakfast was completed with a side of fresh berries. I’m the little girl in blue and suspicious I wasn’t much help🤭 This is a picture of an old scrapbooked photo, hence the caption.
L-R Faith, Jonathan, Emanuel, Nathan, Me, Millard
The first few years we lived in Nebraska, I’d get a stock pile of strawberries from Aldi, when the price dropped as low as 99 cents a box. Yet it still repulsed me to put store bought berries in my freezer! The past couple years now, they’ve never dropped that low (thanks inflation) so I’ve not put any strawberries in the freezer.
Some weeks ago I began dreaming and praying about fresh strawberries. Fresh strawberry desserts and strawberry jam…. my mouth nearly watered with anticipation! I knew of a farm many hours away that sold them for $2. a pound. My dreams were just that. Dreams. All my lofty plans to travel and see relatives while in the process of acquiring red berries, crashed down (as feared) when my logical hubby started figuring travel expenses combined with the cost of berries. He checked into other farms within a few hours drive, but like I mentioned, the price was enough to drive any budget conscious person away!
But God still answered my prayer! I was able to aquire 14 quarts of fresh strawberries without traveling anywhere! Last week, my in laws, Luke and Arlene Rhodes came out to attend the local funeral of Glenn Bender. No, it wasn’t the kind of circumstances you would ask for, but since it’s strawberry season in southern Indiana, I asked her if she could bring me some. I didn’t even have to pay for postage! Although the berries weren’t cheap at all, and were actually over ripe and on the small side, they were wonderful for strawberry shortcake, delight and jam making!
Now next week, my Mom (from KY) is coming to visit us. Due to my Dad’s unstable health the past years, she hasn’t been able to leave him. But he’s been in good professional care for quite some time now, which makes it possible for her to leave a couple days. It’s been almost 5 years since she was last here. We are quite pleased she has a ride out here, and can you guess?! She plans to (hopefully!) be bringing me 2 or 3 gallons of fresh strawberries!!
And to be on the safe side for berries next Summer? My ever ingenious gardener of a husband went and ordered 50 strawberry plants!! And no, this is not for a ”you pick” patch. It’s for Rhodes family picking! I presented him my fears of weeds and all the work it takes to keep them alive. He calmly assures me, he’ll see after them. Check back with me next year and see if I’ve had my fill of strawberries or strawberry plants!
Here’s a few snapshots of our delightful strawberry desserts we’ve enjoyed the last couple days. They can’t be eaten in silence. There’s always some noisy groans of “mmmmmms” erupting somewhere!
This strawberry shortcake was out of Hope’s Table but substituted with gluten-free flour mix.Strawberry delight. Everyone already has a recipe right? I kinda thought so, so I won’t bother sharing this one.
Strawberry Lemonade
Doesn’t the very name suggest a sort of summertime tea party kissed with dappling sunshine? An old quilt thrown on lush grass beneath the stately maple. Little girls in pig tails scamper outside clutching plastic cups and the bag of pretzels Mama gave them to enjoy. Inside, the remains of the lemonade making are still strewn on the counter. Their patient mother kindly ignores it and wipes up the sticky spills. Now, if she can have ten minutes of silence and an iced coffee to collect herself, she will be most grateful! Doesn’t that sound refreshing?!
I don’t really have a cut and dried recipe. (How would it be possible to have a cut and dried recipe for liquids anyway?!) Don’t ask me!
Basically, make a gallon of Country Time Lemonade mix according to directions on canister, but go scant on the water.
Thaw frozen strawberries (or use fresh) and blend until a nice puree texture. Add 1 to 2 cups puree per gallon of lemonade. Recently, when I made it for a bridal shower, I did 2 cups puree. It was really good but was more red than pink in color. Using less puree allows the yellow of the lemonade to shine through better.
Unless your strawberries already have sugar, then I suggest adding in a bit more to the lemonade to help combat the sourness of the berries. I don’t know how much I added…. maybe 3/4 cup? Or you can totally use stevia to round out the sweetness.
This lemonade is delicious and so fun and easy to dress up!
When I made this for the bridal shower, I threw in whole, frozen strawberries to help keep it chilled. And you gotta add in a couple lemon slices!
For a healthier version of this, make your usual fresh lemonade with juiced lemons, then stir in the pureed strawberries. I’ve made it both ways.
Strawberry Jam
This is another one of those nostalgic recipes. I mean, if you grew up Mennonite, did you even eat bread without homemade strawberry jam?! What’s better than a piece of toast from homemade bread, slathered in butter and a well rounded spoonful of Mom’s strawberry jam?
Because Jerald and I don’t handle gluten, we haven’t been eating bread for years (to speak of- here and there a bite or two). Thus, we also eat very little jam. I do make sourdough bread for the children. But very recently I began dabbling with organic, fresh milled wheat for bread making. The flour being fresh milled is key to the vast expanse of vital nutrients found in it. Flours on the shelf are bleached and stripped of nutrients, then synthetic vitamins added back in. A far cry from any health benefits.
All this to say, I’m holding my breath to see if we can handle this kind of bread! And if we can, bring on the strawberry jam!
There’s massive amounts of ‘gluten intolerance’ around these days. I don’t say that lightly because I know for a fact how it affects me if I eat regular flour. But stay with me here- I’ve heard it explained that there are other things in store bought flours that can irritate the gut more than the actual gluten content. So, for many people, organic, fresh milled flour may just be tolerated by them! 🤞
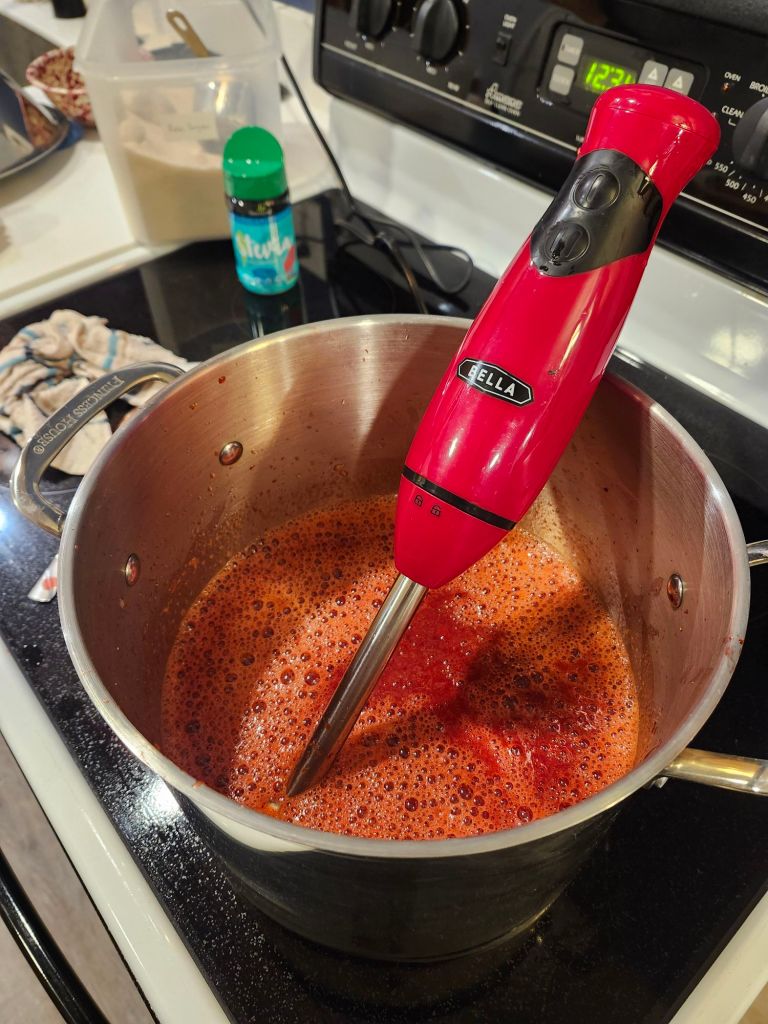
What a long bunny trail to go down to get to the strawberry jam! Today’s jam recipe is quite healthy compared to the normal versions. I just couldn’t stand to make jam for my family using atrocious amounts of sugar, or the boxed Surejell or Certo. Some years ago I saw a recipe using Granny Smith apples for pectin, but since I never made jam anymore, I finally deleted the email. That’s all it took to need it. Gratefully, Gina Martin sent me the recipe link when I asked her for it. Here it is.
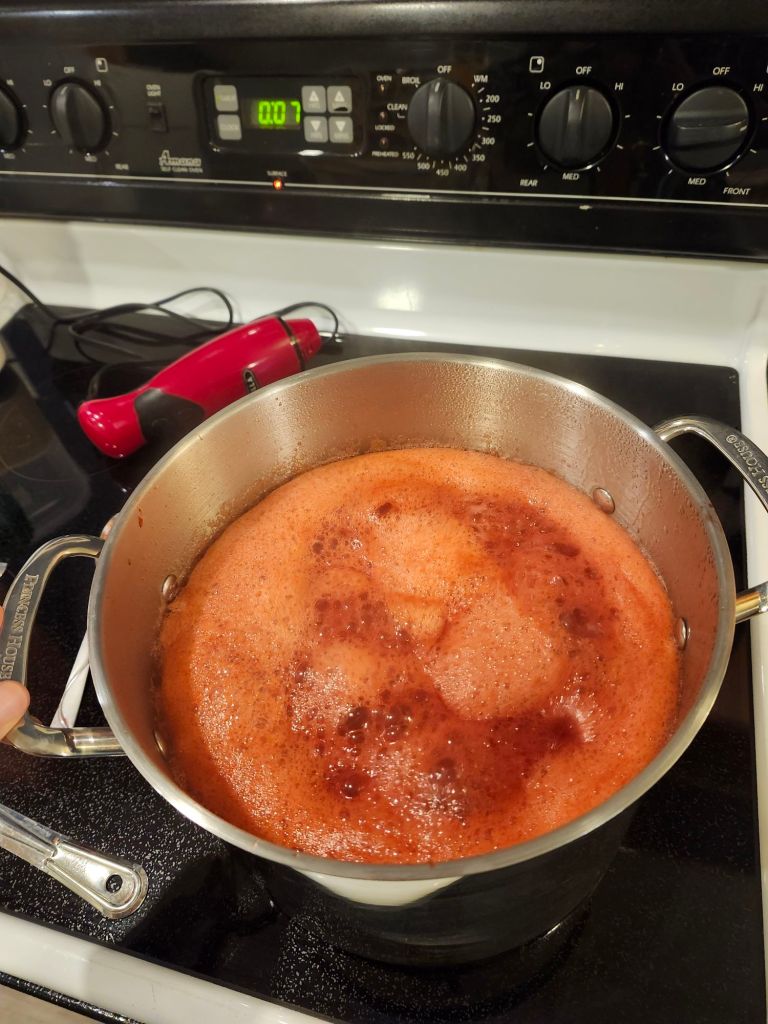
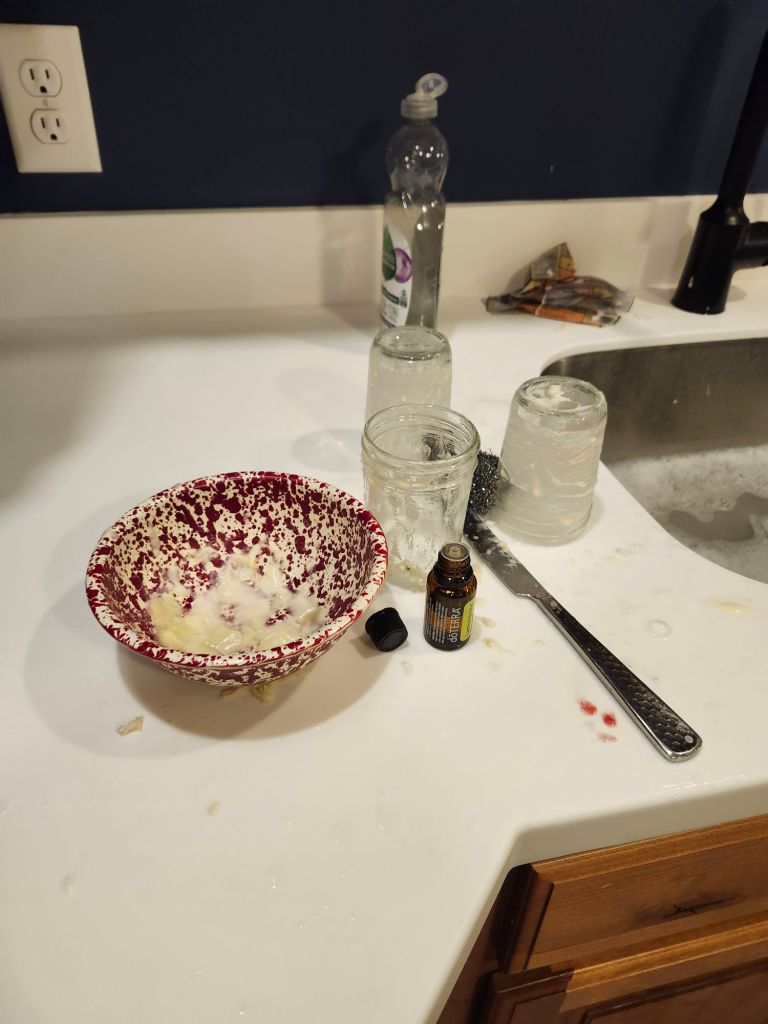
To 3 lbs strawberries, I used 1 ¹/² cup raw sugar and 3 teaspoons Sweet leaf stevia. I wanted it to be sweet enough that you don’t think of it being a healthier version. Plus, I think Sweet leaf brand stevia isn’t super sweet, so it took extra. Pardon the lighting in these pictures. I made the jam in my basement kitchen which is significantly darker. Use an extra large kettle to cook the jam because it bubbles up a lot. Here you can see how far it’s come up. I scrubbed labels off these old jam jars because it was more thrilling to fill clean looking jars. Make a paste of baking soda and oil, rub over sticky labels, let set a few minutes, then scrub off. I also used essential oil and a scrubby. It was hard work, but it made my brain a lot happier. Clean jars of healthy strawberry jam bring so much satisfaction. Try it!
And to clarify, since the jam is in jars, this is still freezer jam, not canned. I happen to have an affinity with glass for most food related storage.