
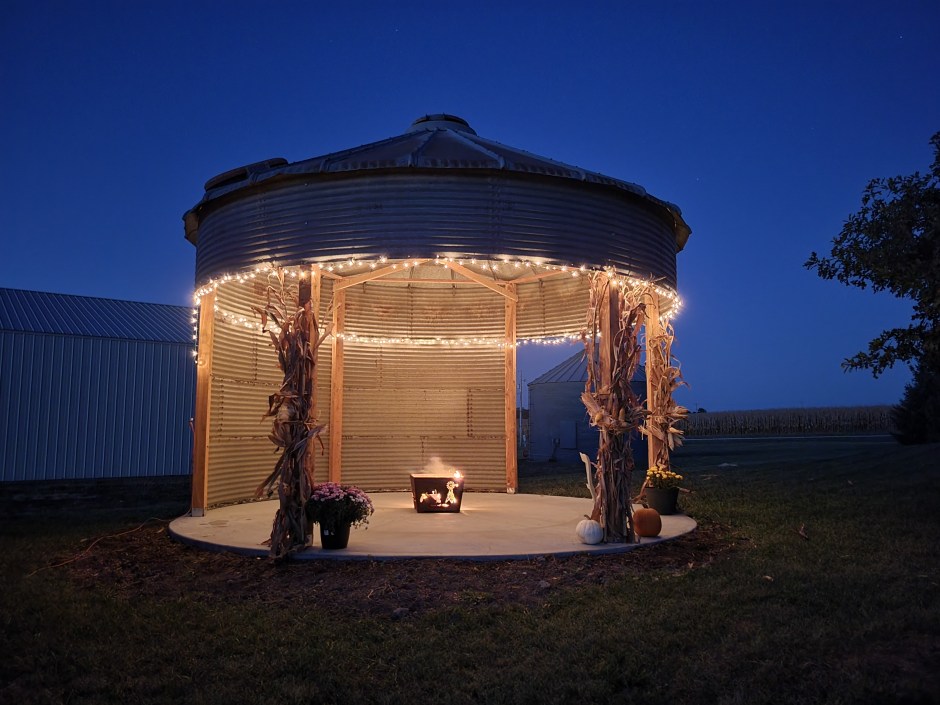
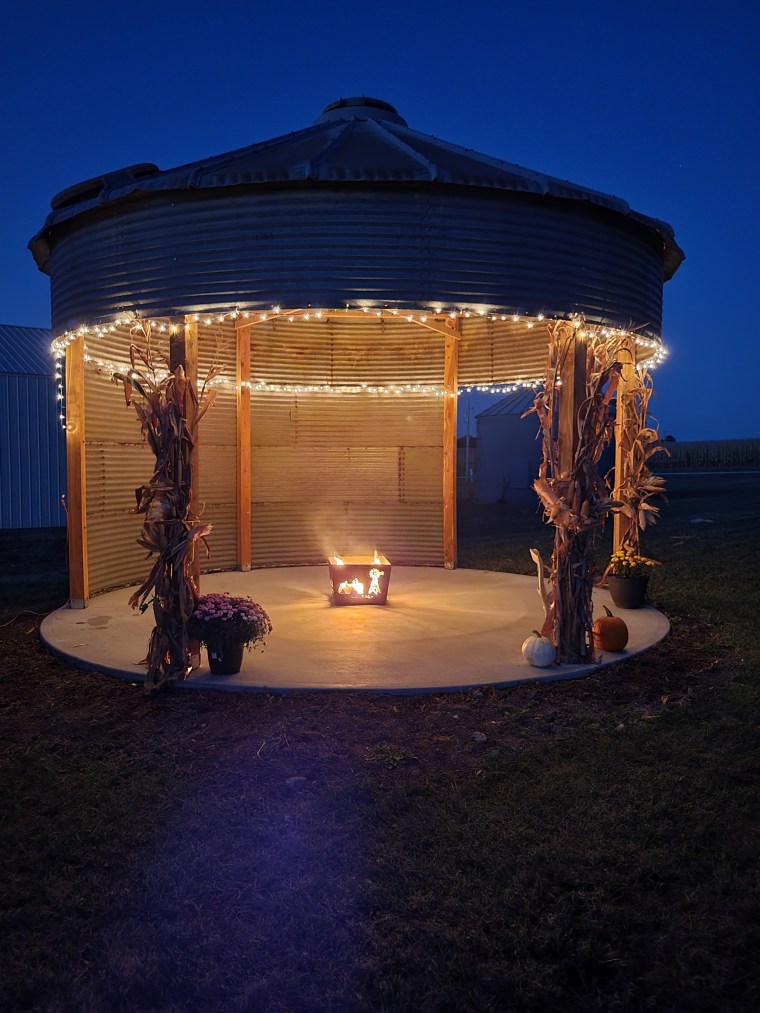
We have a new addition in our backyard- a grain bin gazebo! Some years ago when my husband suggested it, I was skeptical. I thought we had plenty in our backyard already without placing yet another object back there! But this has turned out really pretty and we are looking forward to using it for many parties to come! In this post Jerald details the construction of this, so if you’re interested in erecting one, read on! If you would like to purchase a new grain bin gazebo kit you can do so through our business Creative Backyards.
They’re everywhere. Grain bins that is. At least here in Nebraska. You’re bound to see one on every farmstead. They’re part of the landscape. An integral part of agriculture. And over the decades there they have stood on the Great Plains marking each homestead. They each have a story to tell. Of the bountiful years with their timely rains causing the farmer to work late at night in the light of the Harvest Moon to bring in the copious amounts of grain before the first skiffs of snow feather the landscape. And of the paltry years where the corn was flattened by derechos and the beans were consumed by the locusts for a mid-day snack and the sorghum was stripped by the hail in a mere 60 seconds. There they’ve stood braving the strong thunderstorms and the occasional tornado, providing a safe haven for the trillions of harvested kernels. But alas with time they become weathered and worn and by and by they are replaced with a new shiny bin that is larger to accommodate the growing farmstead. Left alone in the corner of the farm yard they become mere icons of the days gone by and eventually are surrounded with trees or find a new home in the local scrap yard. Except for the few who are fortunate enough to be repurposed!
I’ve dreamed of having a grain bin gazebo for a long time. This fall it finally became a reality! So I decided to document the process and hopefully inspire someone else to save a relic from the past.
The first step of course would be to locate a bin. While there are scores of them around I had some criteria to meet. Most older bins are repainted with an aluminum looking paint. While this extends the life of the bin it causes it to lose it’s original look. I wanted a bin that was original and so that knocked out a lot bins. However when you do find an original bin they can often be totally rusted out. So that narrows the list even more. And then you have to find someone who is willing to part with theirs. Often if they are in good shape they are still in use but with the size of the average farm increasing the smaller bins will be easier to acquire as they become inconvenient to use. Bins come in a variety of sizes and the diameters are generally in increments of 3′. The smallest bins are 12′ and go up in size from there- 15′, 18′, 21′, 24′ and so on. The size of bin you need will vary based on the available space in your yard and the size of crowd you want to accommodate. I had decided to go with an 18′ and this has proved to be a good choice for us. An 18′ bin has a circumference of 56′. We have discovered this will comfortably seat around 15 people around the perimeter of the bin. A 15′ bin will have a circumference of 47′ and a 21′ bin will have a circumference of 66′. Suit yourself.
So after looking for several years for the perfect bin I was able to locate one that met all my criteria and was about 35 miles from us. The best part of it was that it was free! You can expect to pay anywhere from $500-$1,000 for a bin so I was thrilled to be able to get this one at no cost. I noticed the bin earlier this summer on one of my clients farms. After inquiring he told me it was coming down this fall and that if I would agree to have it completely removed by this winter I could have it for the taking!

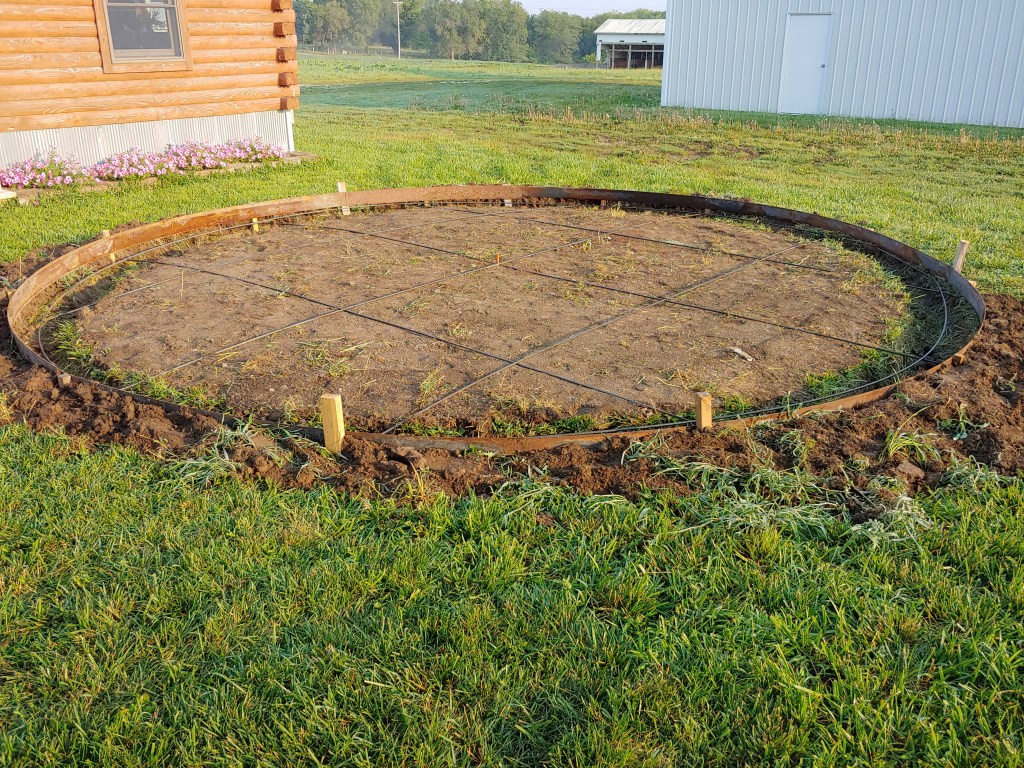
Now that I knew I could get a bin I started prepping for it in our backyard. We already have one nice structure back there, Violet’s Cabin, and we decided to erect it right beside the cabin. You will need to decide what type of base/floor you will want for you gazebo. Some options are sod, gravel, concrete, or pavers. I went with the concrete option as I wanted a nice level place that would be easy to keep clean. Pavers would have worked too but would’ve been more time consuming and would’ve cost more. So after figuring out the location I drove a stake in the center and then pulled from there in all directions to create a nice circle. I put a stake about every 3-4′ around the perimeter and then used 4″ steel forms to create a nice circle. I made the pad a 19′ circle which gives 6″ extra all the way around. If I would do it over I would make it a tad bigger as the way it’s setting right now the roof drip hits just outside the pad. And of course this could vary with the bin you get depending on how much overhang the roof has. We put a light broom finish on the concrete. Other options would be to use colored concrete and stamp it but this will increase the cost of project.

After pouring the concrete I then mounted my posts. I chose 5X5 (true 5X5) Eastern Red Cedar as my posts and was able to source them from native trees here in Nebraska. I have seen some designs that use 6X6 posts and that gives a nice look as well however that comes with an increased cost. I do not recommend going with anything smaller than 5X5. A smaller post is probably fine structurally as a bin is not that heavy but it doesn’t provide the aesthetics that a 5X5 or 6X6 would give. Another option would be to use steel posts but I think the cedar gives a nice accent.
Next you will want to determine how many posts you would like to have. As I already mentioned a bin is not that heavy however they are a bit flimsy so you don’t want to have to big of a span between your posts. I decided on 6 posts which gives a span of just over 9′ between each post (on an 18′ bin). This worked but if I would do it over I would probably go with 7 posts which would give a span of 8′. One thing I did that makes placement of the posts easier was to cut the concrete according to the number of posts I was going to use. So since I was going with 6 posts we wanted to have 6 cuts from the center to the perimeter. After the pad was poured we pulled a tape around the perimeter and divided the measurement by six and marked each of the six points. With six points around a circle every third one will match with the point on the opposite side. We then chalked 3 lines across the pad which resulted in all three lines crossing exactly in the center providing a center point. This will work with an even number of posts but if you go with an odd number of posts you will first have to find the center and then chalk lines from there out to the perimeter.

I purchased the cedar posts from Sunshine Cedar Co., a family owned business located here in Nebraska. I wanted to have one ring around the gazebo with about 90″ of headroom under that. Each ring will measure about 34″ so this required 10′ posts. The post were rough cut so after getting them home I sanded them with 60 grit sandpaper. This did a nice job of removing the roughness and splinters but still gave somewhat of an authentic look. I then gave them 2 coats of Cabot Clear Exterior Weather Protector. I was hoping this would retain some of the pink/purple strands in the wood but they did fade after several days of sunlight. However this did give it just a bit of sheen. And of course with cedar you could always leave it alone as it is naturally resistant to rot.
There are several ways to fasten your posts down. If you go with a gravel pad or with pavers you could just get longer posts and put them in the ground. And you could also do this with a concrete pad but then you would have to pour around the posts creating a little more work when finishing the concrete. I chose to go with mounting brackets on top of the pad. I wanted a nice clean look so I went with brackets that use a hidden fastener system. One thing I discovered after having my posts ordered was that it’s hard to locate a bracket that’s designed for true 5X5’s. I finally sourced some from Menards but they had to be special ordered and they didn’t have any photo’s of them so I took a shot in the dark and ordered them. They turned out to be a bit flimsier than I anticipated which resulted in some movement within the bracket. Going with an exposed fastener bracket with the feet out on all sides of the posts would’ve provided a stronger mount but then you have to contend with bolt heads sticking up that someone might trip over. That being said I would probably consider this type of bracket if I were to do it again as I feel it would give a stronger mounting point.

Determining where to mount the posts was very easy. Enter the cut concrete. I put a pin in the center of the pad where the cuts crossed and then pulled from there on each cut. You will need to measure the interior of your bin to determine where to mount the posts. The bin I was getting was exactly 18′ on the interior. I wanted to make sure it would slide easily down over the post so I positioned my posts a 1/2″ under. This proved to be a perfect match for the bin.
Fastening the posts fully to the brackets allowed them to stand on their own but I wanted to tie them all together. So I put a center mark on the inside of each post down at the floor. I then measured from center to center between each posts and cut a 2X4 that length to mount on the top of the post. The 2X4’s needed to be cut on an angle. To determine the angle I simply divided the circle (360 degrees) by six which results in 60 degrees. Subtract that from 90 degrees and you come up with 30 degrees which is what I cut on the 2X4’s. (The measurement at the bottom inside of the posts that you use will be the short of the 30 degree angle that you put on each end of the 2X4.) I also put a 2X4 across the pad at the top tying each post together that sit opposite of each other. I cut these a 1/2″ under 18′ to match the bottom. I had put all the perimeter 2X4’s up first and then the cross pieces. Since the post were rough cut they weren’t all exactly 5X5 so a few of the angle cuts had to be revisited and shortened. Next time I would probably put up the 3 cross pieces since they are what determine the circumference of your bin and then put in the perimeter 2X4’s. After I had all the posts tied together I leveled the entire structure and put in some braces to hold it in place until the bin was mounted.

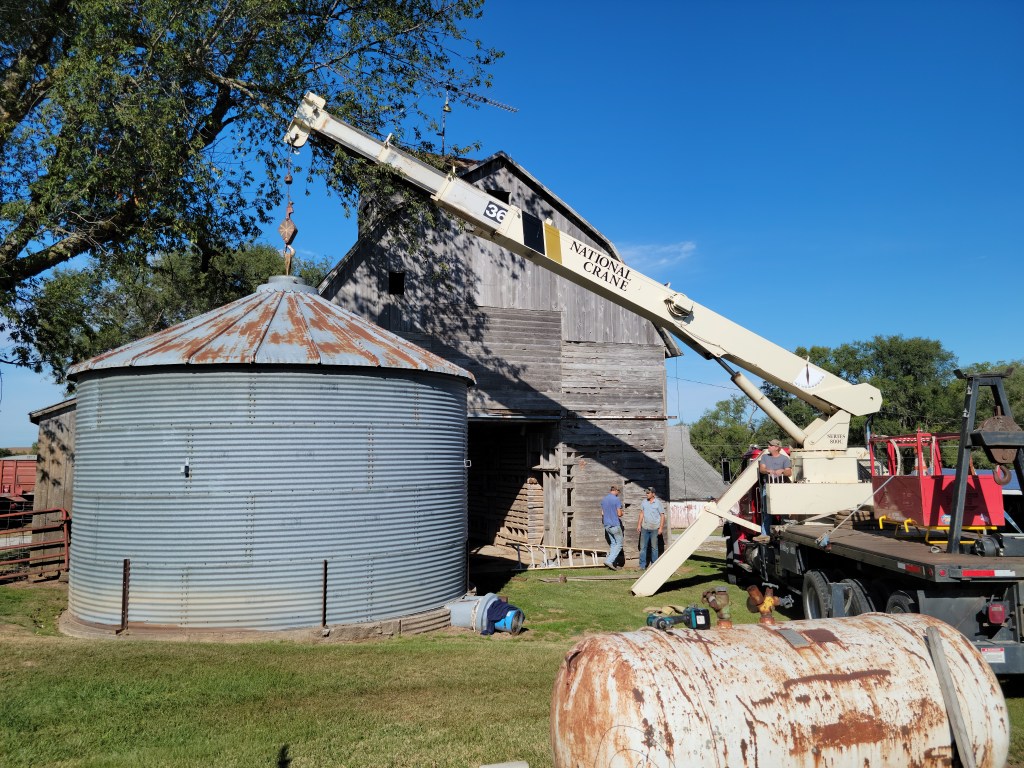
The next step was to formulate a removal plan for the bin. There are 2 ways to move a bin. You can completely disassemble it which requires a set of bin jacks. The bin jacks allow you to lift up the entire bin and to remove each panel starting from the bottom and working your way up to the roof. The entire bin can be lowered after each round is removed so you’ll always be working down on the ground. Another method is to use a crane or telehandler and lift up the bin and move it in one piece. This is the method I chose to use. Depending where you live an 18′ bin may not be feasible to move down the road. Around here the roads are fairly wide and traffic is minimal. The bin was located 35 miles from our place and we were able to travel all back roads except for about 2 miles where we had to use the highway. I think we met a total of 3 vehicles in the 35 miles so it was a pretty low stress move.
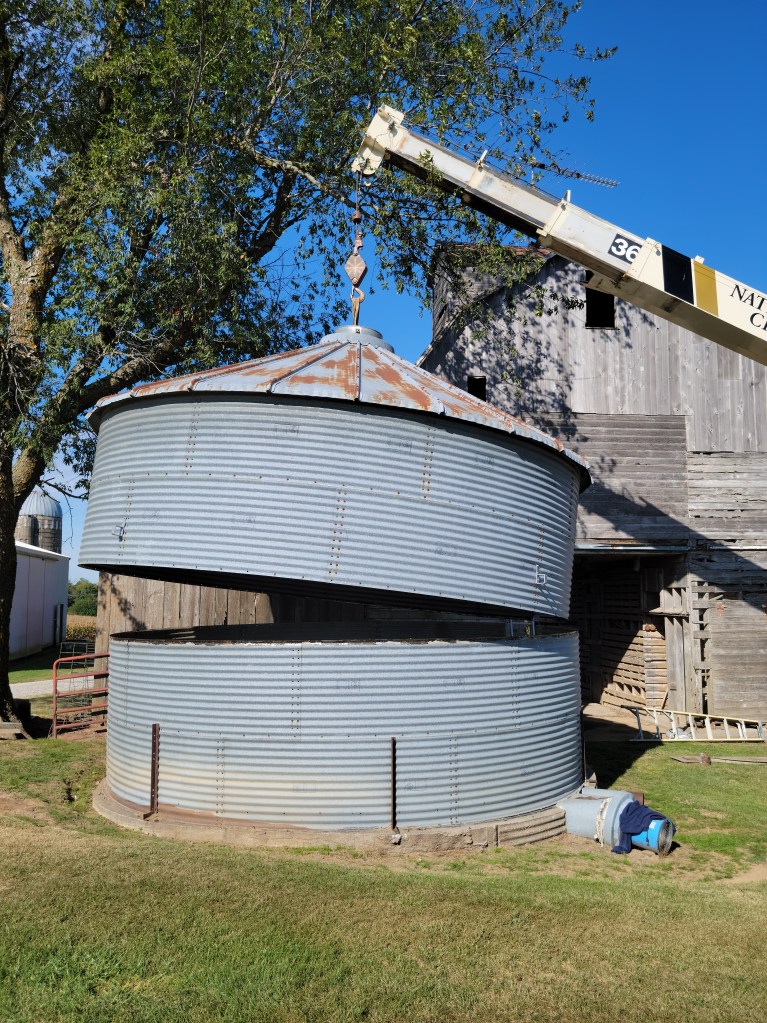
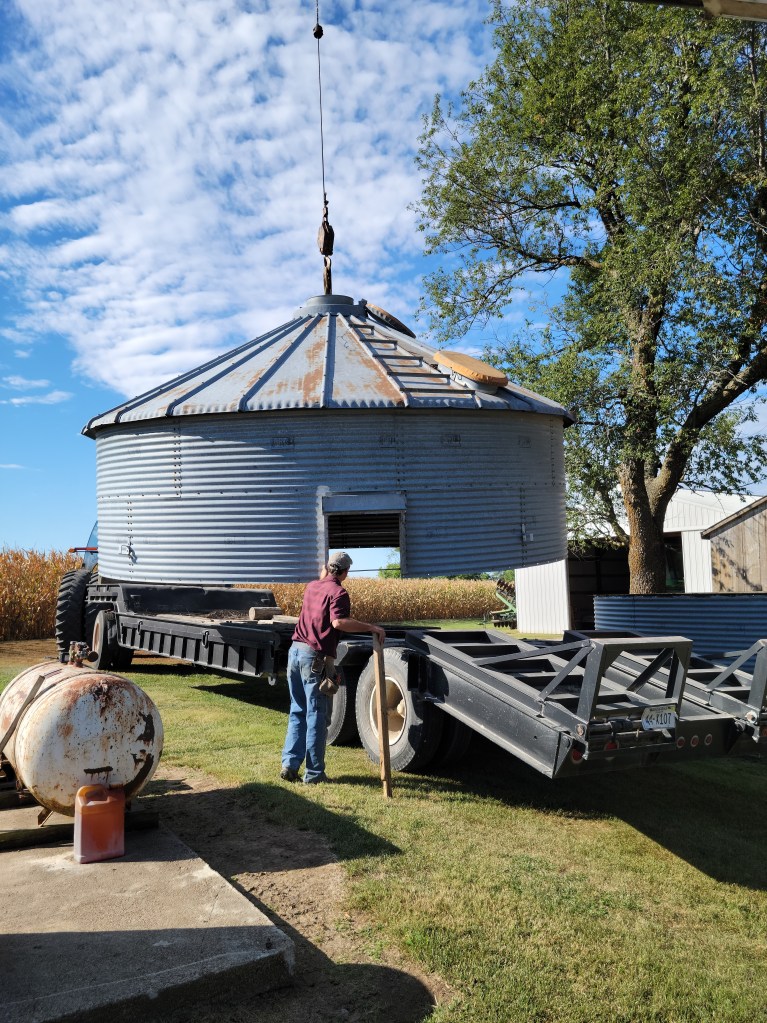
I was able to solicit some help from Bender Farms (Merlyn and Tyler) who are church friends to help with moving the bin. They had moved various bins in the past so their help was invaluable. They had a lowboy trailer that was 9′ wide that we decided to use to haul the bin. While I only wanted one ring on the bin for the finished product we decided to retain 2 rings on the bin for moving to help keep it more stable. I was able to locate a crane service that was based 5 miles from the bin site to lift the bin and set it on the trailer. To prepare for the lift we had to remove the door of the bin and then removed a majority of the bolts between the 2nd and 3rd ring. We then took a tire mounted on a rim that was similar in size to the roof hole at the top. We put a strap through the center of the rim and wrapped it around a 2″ pipe that ran parallel with the tire. The crane lowered his cable through the roof hole and we attached it to the strap going through the tire. He then lifted the tire up to the hole and put just a bit of pressure on it and held it there. We quickly removed the remaining bolts between the 2nd and 3rd rings. The upper section of the bin that we wanted was now loose and was swung over onto the trailer. We then chained the bin at the 4 points where the perimeter of the bin met the edge of the trailer and we were ready to roll! As was required in the deal we had to dismantle the remaining 2 rings and the drying floor before leaving. With 4 fellows the entire tear down and removal took a little over 2 hours. The remaining rings and drying floor I loaded up later and hauled home, using more of the rings for the finished product and selling the drying floor on BigIron. The remaining miscellaneous pieces will be hauled off for scrap.
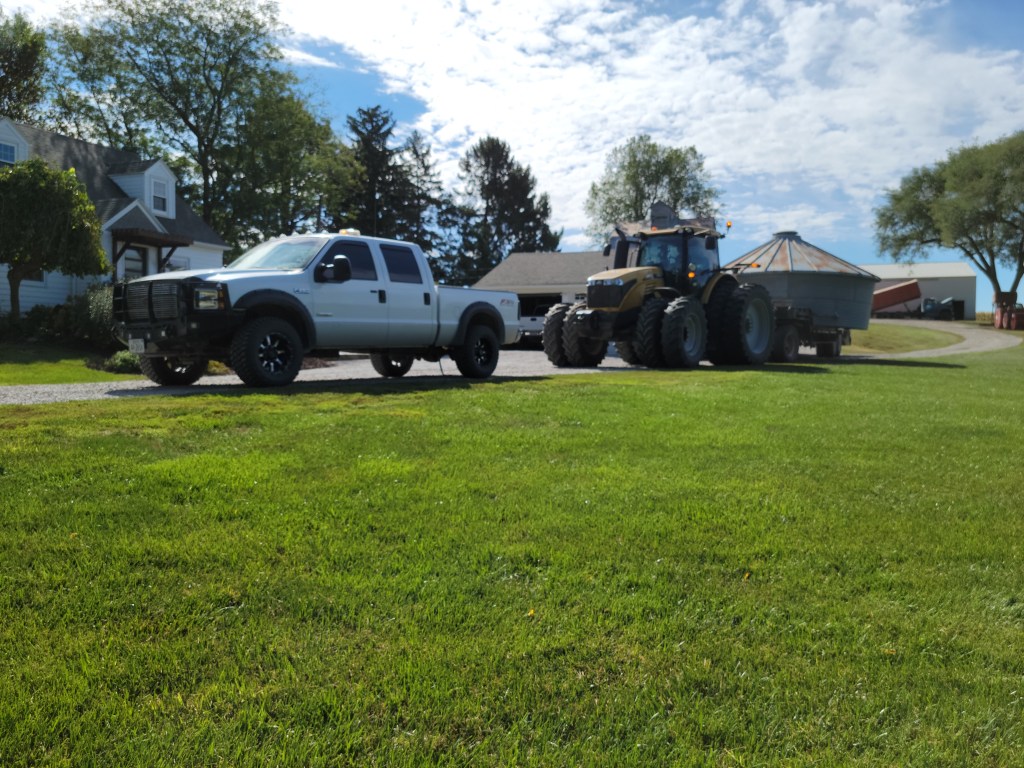
Moving the bin home 35 miles was pretty much uneventful. The trailer was pulled by Bender’s Challenger tractor that could do 33 MPH and we ran an escort in front (escort was provided by a Bender Farms employee, Seth Steria.) The trip home took a little over an hour.

Upon arriving here at home I had a telehandler onsite to lift off the bin. For this phase of the project I had the help again of Fred Halteman and his employee Chris Charlton. We used the same tire/rim setup to help lift off the bin. We then removed the 2nd ring and set it up on the posts. The bin slid fairly easily over the posts. We then got it leveled and used three 1/2″ bolts spaced symmetrically on each post.
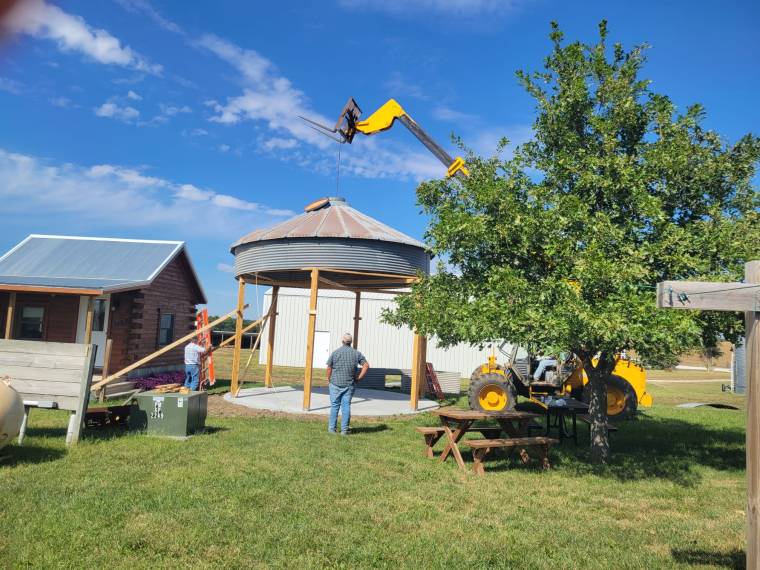
My original plan was to only use the top ring and leave the bottom entirely open. However after removing the external bracing the structure was a bit shaky. I decided then to run panels down to the ground on 2 sections of posts (around 18′). This firmed things up quite a bit however on the opposite side it is still a bit shaky so I may put in some more permanent bracing. I think if I would have used a stronger post bracket would’ve helped this problem.
While the gazebo turned out a bit differently than planned (somewhat closed in instead of entirely open) I actually like the finished product better than my original plan. So, scout out your neighborhood, find a grain bin, and erect it in your back yard!

Need a grain bin gazebo in your backyard? Contact our company Creative Backyards and let us design one for your backyard space!
This blog post was written by my husband Jerald. He can be reached directly at acountrycouple@gmail.com.

Whoa, what an awesome-looking gazebo indeed. The nighttime pic really did it justice. Amazing progress pics too. I really enjoyed this, and here’s to you enjoying your gazebo!
LikeLike
Thank you! We sure do enjoy using it!
LikeLike